Setting up Using the Setup Guide
0UUY-003 0UW1-003 0X7F-003 0X7H-003 0X6E-003 0X6W-003 0X7C-003 0X7A-003 0WXY-003 0X7E-003 0WR6-003 0WR7-003 0WR5-003 0WR8-003 0YWJ-003 0YWH-003 0YWR-003 0YWK-003 0YWE-003 0YWF-003 140K-003
When the machine is turned ON for the first time (Turning ON the Machine), the initial setup of the machine begins automatically. You can adjust the basic setup necessary to use the machine. Configure the basic setup in accordance with each screen, or click a link to display the corresponding page and see details.
Step 1 | Specify the language and keyboard layout. |
Select the language to be displayed on the screens. Depending on the language, you can change the layout of the keyboard that is displayed to enter characters.   Select the language, and press <OK>. To change the keyboard layout, press <Set>, select the keyboard layout, and press <OK>. Displaying the button for switching languages will be convenient for frequent language switching. Switching the Displayed Language | |
Step 2 | Check the paper settings. |
Check that the paper loaded in the drawers is correctly specified.   If the paper sizes are correct, press <OK>. For information on the screen and the instructions on how to change the settings, see Specifying Paper Size and Type in the Paper Drawer. | |
Step 3 | Log in as the administrator. |
Make an authenticated login to configure the settings that require administrator privileges.   Press <Log In>, and enter the user name and password. The default user name for the administrator is "Administrator" and the default password is "7654321". Press <Log In> again, and press <OK>. If you enter the factory default password, the screen prompting you to change the password is displayed. You can also change the password later. Logging in as an Administrator You can skip the settings that require administrator privileges and proceed to the next step by pressing <Skip>. In this case, proceed to Step 10. | |
Step 4 | Specify the user authentication settings. |
To enhance the security of the machine, use the machine under a system that uses user authentication.  This machine is set to use the user authentication as the login service. For more information, see Configuring the Personal Authentication Management Settings.  Press <On> for <Use User Authentication>, press <On> for the login method to use, and press <Next>. If you do not use user authentication, press <Off> for <Use User Authentication>, press <OK>, and proceed to Step 5.  Specify the following settings if there are no administrators besides the "Administrator" user registered in the machine.  To enhance the security of the machine by disabling the "Administrator" user and registering a new administrator, press <Yes>. In <Register Administrator>, enter <User Name> and <Password>, and press <OK>. Specify <E-Mail Address>, <Department ID>, and <Display Name> as necessary. For more information, see Registering User Information in the Local Device. The "Administrator" user will be disabled the next time you log in. To operate as "Administrator," press <No>.  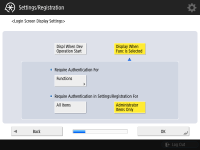 Select the timing for displaying the login screen. If you select <Display When Func Is Selected>, press <Functions>, select the function to display the login screen for, and press <OK>. Also, select the setting items on the <Settings/Registration> screen to display the login screen for. If you select <Off> for <Keyboard Authentication>, press <OK>. Proceed to step 5. If you select <On> for <Keyboard Authentication>, press <Next>.  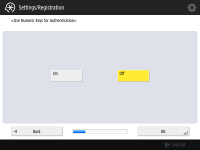 To use authentication via numeric key entry only on the login screen, press <On>, and press <OK>. | |
Step 5 | Set the date and time. |
Set the machine's date/time.   Enter the date and time, and press <OK>. Set <Time Zone> and <Daylight Saving Time> as necessary. For more information, see Setting the Date/Time. | |
Step 6 | Set the IP address. |
Specify the settings for network connection.  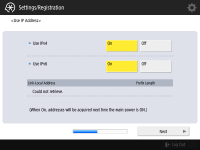 Press <On> for <Use IPv4> or <Use IPv6>, and press <Next>. You can also use both IPv4 and IPv6. If you press <Off> for <Use IPv4> and <Use IPv6>, and press <OK>, skip the network settings and proceed to Step 9. If you press <On> for <Use IPv4>, specify the following settings.  To obtain the IP address automatically, press <DHCP> or <Auto IP>, and press <Next> or <OK>. To set the IP address manually, clear the selection for <DHCP> or <Auto IP>, press <IP Address>, <Subnet Mask>, and <Gateway Address> to enter each value, and press <Next> or <OK>. For information on the IPV4 address settings, see Setting an IPv4 Address.  If you press <On> for <Use IPv6>, specify the following settings.  Press <On> to use the stateless address or <Off> to not use the stateless address, and press <Next>. For information on the IPv6 address, see Setting an IPv6 Address.  After specifying the stateless address, specify the following settings.  Press <On> to use the manual address or <Off> no not use the manual address, and press <Next>. To use the manual address, press <Manual Address>, <Prefix Length>, and <Default Router Address> to enter each value.  After specifying the manual address, specify the following settings.  Press <On> to use DHCPv6 or <Off> to not use DHCPv6, and press <OK>. | |
Step 7 | Specify the DNS settings. |
Specify the DNS server address, DNS host name, and DNS domain name.  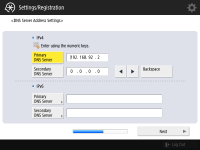 Press <Primary DNS Server> and <Secondary DNS Server>, enter IPV4/IPv6 address for the DNS server, and press <Next>. For information on the settings of the DNS server address, see Making DNS Settings.   Press <Host Name> to enter the name of the machine (host name). Press <Domain Name> to enter the domain name that the machine belongs to, and press <Next>. If the settings of IPv4 and IPv6 are the same, press <On> for <Use Same Host Name/Domain Name as IPv4>.  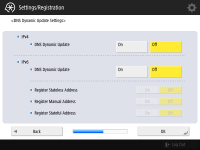 To update automatically using the DNS Dynamic Update Settings, press <On> for <DNS Dynamic Update>, and press <OK>. If you set <DNS Dynamic Update> for <IPv6> to <On>, select <On> for the items to register automatically. | |
Step 8 | Specify the Proxy settings. |
Specify the necessary settings to use the Proxy.   To use the Proxy, press <On>, press <Server Address> and <Port Number> to enter each value, and press <OK>. If you set <Use Proxy within Same Domain> to <On>, press <Set Authentication> to specify the Proxy authentication settings. For information on the Proxy settings, see Setting a Proxy. | |
Step 9 | Specify the fax settings. |
Specify the necessary settings to use the fax function.  Select the country/region if the selection screen appears, and press <Next>.   Enter the fax number, and press <Next>. For information on the fax settings, see Fax Line Settings.   Press <Set>, enter the user name, and press <Next>.  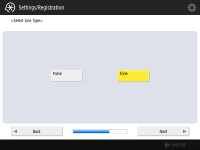 Select the line type, and press <OK>. | |
Step 10 | Perform the automatic gradation adjustment. |
Adjust the gradation to print clearly. Depending on the machine, the procedure differs. For information on the automatic gradation adjustment, see Adjusting Gradation. | |
Step 11 | Print a report. |
You can print the network user list, fax user data list, and adjusted value list.   Press <Start Printing> for the report you want to print. When printing is complete, or if you do not print a list, press <OK>. | |
Step 12 | Complete the Setup Guide. |
When finishing the Setup Guide, restart the machine to apply the specified settings.   Press <OK> to restart the machine. |
 |
If you do not use the Setup Guide, press <End Setup Guide> in Step 1. You can press  (Settings/Registration) to individually specify settings configured during the Setup Guide at a later time. (Settings/Registration) to individually specify settings configured during the Setup Guide at a later time. |
Starting the Setup Guide later
 |
The Setup Guide cannot be started in the following cases.If the user authentication or department ID authentication is set. If the DepartmentID Authentication is set. If the authentication with a card is performed. |
 (Settings/Registration)
  <Management Settings>
  <License/Other>
  <Start Setup Guide>
  <Start>
 |
If you start the Setup Guide later and log in as an administrator, Step 3 will not be displayed. Proceed to Step 4. |