Inserting Sheets
This mode enables you to automatically add blank sheets, chapter pages, or tab paper to prints. You can use a different type of paper from that used for the main document. In addition, you can set whether to print on the sheet insertions and tab paper. Chapter pages are always printed on.
This is useful when you want to use a blank sheet to sort prints.
Sheet Insertion/Chapter Page
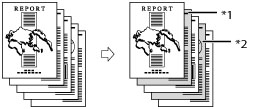
*1 Printed Chapter Page
*2 Printed Sheet Insertion
Tab Paper
This is convenient when sorting the body of documents etc.
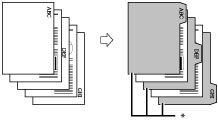
* Printed Tab Paper
To print on the tab paper, set the shift width of the image to be printed on the tabs.
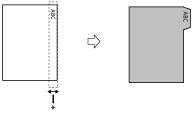
* Area Shifted Out
IMPORTANT |
This mode can be used only for printing a file stored in a mail box. Make sure to set the paper type correctly, especially when using heavy paper or other special types of paper. If the type of paper is not set correctly, it may adversely affect image quality. Moreover, the fixing unit may become dirty, or the paper could jam, and a service repair may be needed. |
1.
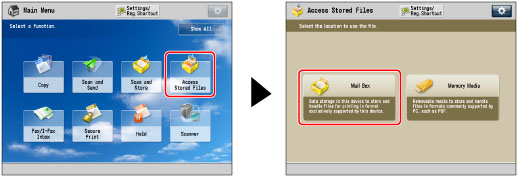
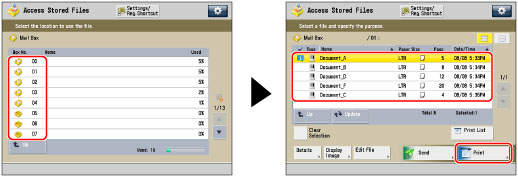
Press  (Main Menu) → [Access Stored Files] → [Mail Box].
 (Main Menu) → [Access Stored Files] → [Mail Box].
2.
Select the desired Mail Box → select the desired file → press [Print].
3.
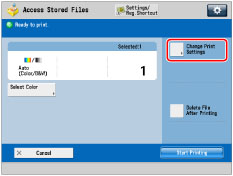
Press [Change Print Settings].
4.
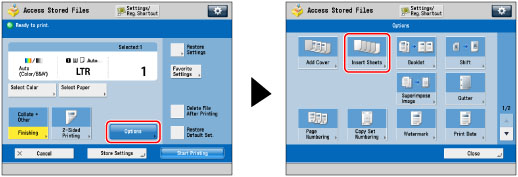
Press [Options] → [Insert Sheets].
5.
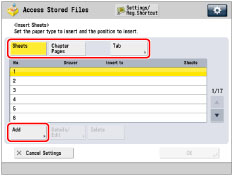
Select the type of sheet insertions → press [Add].
NOTE |
You cannot select [Sheets] and [Chapter Pages] at the same time. |
6.
Specify the detailed settings for the sheet insertions → press [OK].
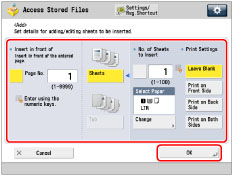
Set the pages to insert the sheets using  -
-  (numeric keys).
 -
-  (numeric keys).
If you select [Sheets], set the number of sheets to insert and side(s) to be printed on.
If you selected [Tab], set the print shift width (0" to 1" (0 mm to 25 mm)) using [-] or [+] → press [OK].
To select the paper for the sheet insertions, press [Change] for <Select Paper> → select the paper source → press [OK]. If you selected [Change MP Tray Paper], select the paper size and type.
Repeat step 6 to specify the features as necessary.
IMPORTANT |
If you set a different paper size for the front cover, back cover, or sheet insertions, the paper sizes for the other features are automatically changed to the new paper size. However, changing the paper source for a feature to a source with the same paper size does not change the settings for the other features. If you select [Tab], only LTR paper can be used. You can insert sheets and chapter pages starting from page 2. Before feeding paper from the Document Insertion Unit-N, load paper into the Document Insertion Unit-N and specify the paper size. To feed paper from the Document Insertion Unit-N, select [Sheet Inserter 1] or [Sheet Inserter 2]. If paper is being fed from the Document Insertion Unit-N for the current job, press [Change Insert. 1 Ppr.] or [Change Insert. 2 Ppr.] to select paper for sheet insertions. You can specify multiple paper source per job when feeding tab papers. To specify the number of tabs, load tab paper into the Document Insertion Unit-N and select [Tab], and then press [No. of Tabs]. If [Print on Both Sides] is selected for the front cover in [Add Cover] and tab paper is set to insert in front of the first page, the front cover is output first, and then the tab paper is output. The front cover outputs as a blank paper and prints are made starting from the tab paper. If you select [Leave Blank] for the sheet insertion, you can set the same page for tab paper. In this case, the paper for the sheet insertion is output first, and then the tab paper is output. |
NOTE |
You can insert a total of up to 100 sheet insertions or chapter pages. If you are using paper that already has printing on it (e.g., company logo) as your sheet insertion, then you must select [Leave Blank]. Otherwise, the machine will print on the preprinted paper. The paper drawer which is already specified as the paper source cannot be selected in the Automatic Paper Selection mode. |
7.
Press [OK] → [Close].
NOTE |
You can confirm/change the settings for sheet insertions, chapter pages, tab paper by pressing [Details/Edit] after selecting the settings. To delete a sheet insertion, select the setting to delete → press [Delete]. Make sure that the Number of Tabs shown on the touch panel display is the same as the number of tabs on the tab paper loaded in the paper source. |
IMPORTANT |
If [Staple] is selected, for the total number of sheets that can be stapled, including sheet insertions and chapter pages, see "Maximum number of sheets you can staple." |
NOTE |
You cannot select multiple files and specify sheet insertion settings for the files at the same time. In this case, set the Job Separator mode. (See "Job Separator.") If you are printing on the sheet insertions, these sheets are included in the count of the total number of prints made. However, if these sheets are left blank, the machine's counter does not count them as prints. If you add chapter pages, these sheets are included in the count of the total number of prints made. If you want to set both [Insert Sheets] and [Add Cover], select the same paper size. Tab paper is always printed on. If you do not want to print on the tab paper, insert blank sheets of paper in each place where you want the tab paper to go. When printing on tab paper, check that the position of the tabs is correct. If you are feeding tab paper from a paper drawer, the POD Deck Lite-C, or the Multi-drawer Paper Deck-C, you must register the paper type in the paper source as tab paper beforehand. (See "Registering the Paper Size and Type for a Paper Source.") For instructions on loading tab paper into the drawer, the POD Deck Lite-C, the Multi-drawer Paper Deck-C, or the Document Insertion Unit-N, see "Maintenance." If [Unprocessed Tab Paper Forced Output] in [Function Settings] (Settings/Registration) is set to 'On', the extra amount of tab paper sheets that were not required for the job are forced out of the machine. Example: If the number of tabs is set to 5 and the machine estimates that seven sheets of tab paper are needed for the print job, you must prepare two sets of tab paper each containing five tabs (10 total). Therefore, if the machine only uses seven tab paper sheets, three tab paper sheets will remain. Areas of images shifted outside the tab paper cannot be printed on the paper, and may cause the following prints to have black streaks or appear dirty. 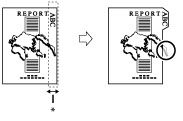 * Area Shifted Out |