Memory Media
The flow of basic operations for using files stored in memory media is shown below.

Memory Media Selection Screen
On the Memory Media Selection screen, available memory media appears.
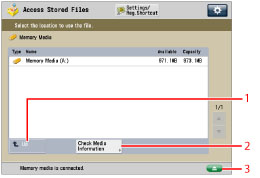
1 | [Up] Press to return to the upper level. |
2 | [Check Media Information] Press to check the details of memory media. |
3 |  Press to remove the memory media. |
File Selection Screen
A list of folders and files in the selected memory media appears.
An icon indicating the file format of each file when it was scanned and stored appears.

1 |  You can specify the following settings: Register to Quick Menu (See "Quick Menu.") |
2 | [Name] Press to sort the files by name, in ascending or descending order. [Date/Time] Press to sort the files by date/time, in ascending or descending order. |
3 | [Folder Operations] Press to display the menu for editing the folders in the memory media. |
4 | [Display Image] Press to view the contents of the selected file. |
5 | [Edit File] Press to add a file, delete the selected file, or change a file name. |
6 | [Print] Press to print the document. |
7 | [Details] Press to check the details of the selected file. |
8 | [Clear Selection] Press to cancel the selection of a file. |
9 | [Up] Press to return to the upper level. |
10 | [Update] Press to update the contents of the memory media. |
Edit File Screen
Use this screen to edit a file in the memory media.

1 | [Delete] Press to delete files stored in the memory media. You can select and delete up to 32 files at a time. |
2 | [Change File Name] Press to change a file name. |
3 | [Add Files (Scan and Store)] Press to scan and add a file. |
Scan Screen
Display this screen when you want to scan an original and store it as a file in the selected memory media.

1 | You can specify the following settings: Register/Edit Favorite Settings Register to Quick Menu (See "Quick Menu.") Changing the Default Settings |
2 | [Direct] Press to scan your document in the same size as your original. |
3 | [Copy Ratio] Press to reduce or enlarge the scanning size of the original. |
4 | [Scan Size] Press to set the size of the original that you are going to scan. |
5 | [File Format] Press to select the file format for the files to store. |
6 | [Favorite Settings] Press to recall scan settings or register frequently used settings in the Favorite Settings. |
7 | [Restore Default Set.] Press to cancel all settings. (The machine restores the default settings for Scan and Store.) |
8 | [Options] Press to specify useful scan settings, such as scanning different size originals together or dividing originals into multiple batches. |
9 | [File Name] Press to assign the file a name. |
10 | [Density] Press to adjust the density for scanning. |
11 | [Original Type] Press to select the type of original (text only, photo only, or both text and photo) you are going to scan. |
12 | [2-Sided Original] Press if you are scanning a two-sided original. |
13 | [Select Color] Press to select the color for scanning. |
14 | [Resolution] Press to select the resolution for scanning. |
Print Settings Screen
Display this screen when you want to print files that are stored in memory media.
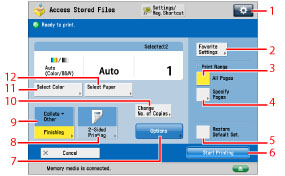
1 | You can specify the following settings: Register/Edit Favorite Settings Changing the Default Settings |
2 | [Favorite Settings] Press to recall scan settings or register frequently used settings in the Favorite Settings. |
3 | [All Pages] Press to select all the pages for printing. |
4 | [Specify Pages] Press to specify pages for printing. |
5 | [Restore Default Set.] Press to cancel all settings. (The machine restores the default settings for Access Stored Files.) |
6 | [Start Printing] Press to start printing. |
7 | [Options] Press to specify useful print settings, such as selecting the halftone mode to use for printing, and enlarging the printable area to the edges of the page. |
8 | [2-Sided Printing] Press to make two-sided prints. |
9 | [Finishing] Press to select the Collate, Group, or Staple mode. |
10 | [Change No. of Copies] Press to set the number of prints when multiple files are selected. This key is displayed only when multiple files are selected. |
11 | [Select Color] Press to select color mode for printing. |
12 | [Select Paper] Press to select the paper size/type and the paper source. |
IMPORTANT |
You cannot store documents in the memory media if there is no free space available. |
NOTE |
For information on the types of icons displayed for memory media, see "Types of Memory Media Icons." For the procedure regarding [Add Files (Scan and Store)] and instructions on operating the Scan screen, see "Adding a File (Scan and Store)" and "Flow of Scan and Store Operations." |