Overview of This Function
There are two types of Fax/I-Fax Inbox: the Memory RX Inbox and Confidential Fax Inbox. You can use both inboxes to store files received by Fax and I-Fax. The Memory RX Inbox also contains the Divided Data RX Inbox.
Optional products are required to use the Fax function. For information on the optional products required to use this function, see "Optional Products Required for Each Function."
The explanations of procedures in this category assume that the Duplex Color Image Reader Unit-M is attached.
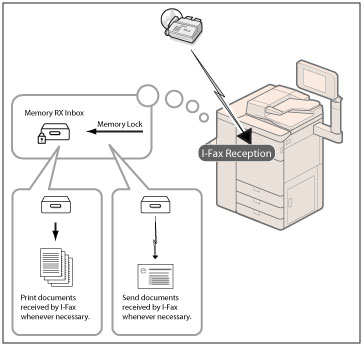
Memory RX Inbox
The Memory RX Inbox is an inbox for storing files received by I-Fax. Files received by I-Fax are stored in the Memory RX Inbox without being printed. You can print or send the stored files whenever necessary.
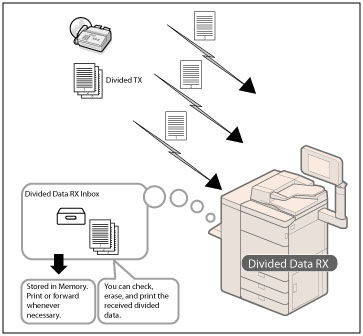
Divided Data RX Inbox
I-fax files received as divided data are saved in the Divided Data RX Inbox, and combined together as one file.
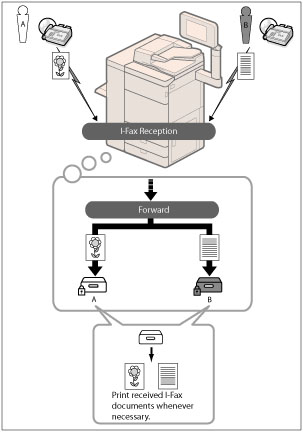
Confidential Fax Inboxes
If a file received through I-Fax matches the specified forwarding conditions, it is stored in the Confidential Fax Inbox. You can print the stored file whenever necessary using the desired settings.
The basic flow of operations for sending and receiving files using the Memory RX Inbox or Confidential Fax Inbox is as follows:
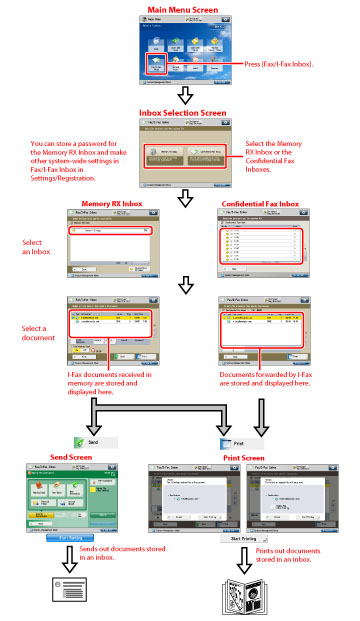
Memory RX Inbox Screen
You can select either the Memory RX Inbox or Divided Data RX Inbox from the Memory RX Inbox screen.
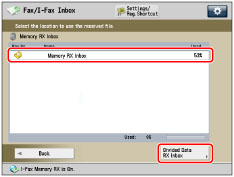
<Memory RX Inbox Screen>
Displays a list of the I-fax files received in the Memory RX Inbox.
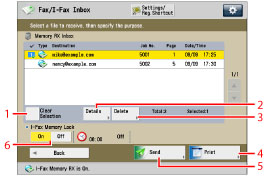
1 | Select All (Max 32 Files)/Clear Selection Press to select all of the files in the inbox. If you select a file, this key changes to [Clear Selection]. |
2 | [Details] Press to check the detailed information for the file. |
3 | [Delete] Press to delete the file. |
4 | [Print] Press to print the file. |
5 | [Send] Press to send the file. |
6 | <I-Fax Memory Lock> Press to turn the I-Fax Memory Lock mode 'On' or 'Off' for the Memory RX Inbox. |
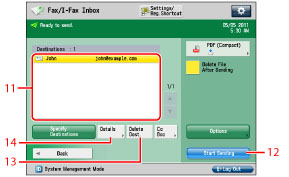
<Send Screen>
Display this screen when you want to send a file stored in the Memory RX Inbox. You can specify a destination, and set other useful send features.
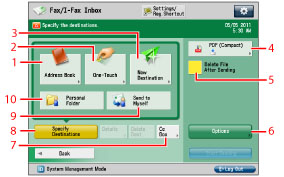
1 | [Address Book] Selects a destination from the Address Book. |
2 | [One-Touch] Displays the screen for registering/specifying one-touch buttons. Press [To Remote Add. Book] to specify destinations registered in the one-touch buttons of a server machine by accessing from a client machine on the network. For more information, see "Specifying Destinations from the One-Touch Buttons of a Server Machine." |
3 | [New Destination] Press to specify a destination is not stored in an Address Book. |
4 | File Format Press to select the file format. |
5 | [Delete File After Sending] Press to automatically delete the file after sending is complete. |
6 | [Options] Press to set useful send functions, such as sending different sized originals together, or sending two-sided originals. |
7 | [Cc Bcc] Press to specify Cc or Bcc addresses. |
8 | [Specify Destinations] Press to display the methods for specifying destinations or the destination list. |
9 | [Send to Myself] Press to specify your own e-mail address as the destination. The administrator can restrict general users to send e-mail only to their addresses. (See "Setting Limited Destination for Sending E-Mail.") |
10 | [Personal Folder] Press to specify your personal folder as the destination. For more information on specifying personal folders, see "Specifying Personal Folders." The administrator can restrict destination for file transmission to the operator's personal folder. (See "Restricting Destination for File Transmission.") |
11 | Destination List Press to display a list of destinations. |
12 | [Start Sending] Press to start sending. |
13 | [Delete Dest.] Press to delete a destination displayed in the destination list. |
14 | [Details] Press to check or change the destination information selected from the destination list. |
<Divided Data RX Inbox Screen>
You can check the divided data being received by the machine.
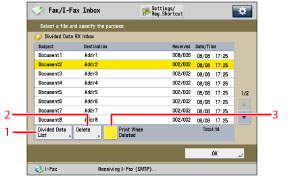
1 | [Divided Data List] Press to check the status of divided data, and the remaining capacity of the Divided Data RX Inbox. |
2 | [Delete] Press to delete the file. |
3 | [Print When Deleted] Press to automatically print the divided data when it is deleted. |
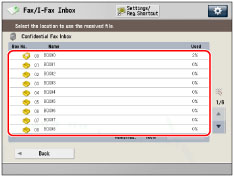
Confidential Fax Inbox Screen
Displays a list of the Confidential Fax Inboxes.
A list of the received files in the selected Confidential Fax Inbox appears.
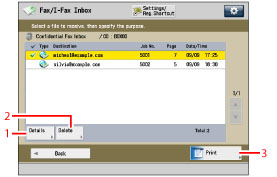
1 | [Details] Press to check the detailed information for the file. |
2 | [Delete] Press to delete the file. |
3 | [Print] Press to print the file. |
IMPORTANT |
You cannot store any more files in the Fax/I-Fax Inbox in the cases described below. These numbers may vary depending on the remaining capacity of the hard disk. When a total of 1,500 files or images are stored in the Mail Box and Fax/I-Fax Inbox When a total of 6,000 pages of files or images are stored in the Mail Box and Fax/I-Fax Inbox When there is insufficient memory available |
NOTE |
If image files attached to received I-fax documents are not compatible with this machine, the machine does not process (print, forward, or store) these files. The files are deleted instead. In this case, the names of the deleted files and the message <No programs can process the file attachment.> are printed with the text of the received I-fax. We recommend you delete unwanted files and image data from your Fax/I-Fax Inbox to make space for storing new files. [Send to Myself] appears only if you register a user's e-mail address when you are using authentication by SSO-H. [Personal Folder] appears only if you set authentication by login service such as SSO-H. |