Scan Features of the WSD Scan
This section describes how to use the scan features of the WSD Scan.
IMPORTANT | ||||||||
You can use the Network Scan function only in the following conditions:
|
1.
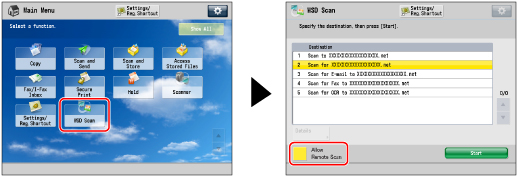
Press  (Main Menu) → [WSD Scan] → [Allow Remote Scan].
(Main Menu) → [WSD Scan] → [Allow Remote Scan].Set the scan function of the machine to online.
NOTE |
If [WSD Scan] is not displayed on the Main Menu screen, press [Show All]. After pressing [Allow Remote Scan], if the operation conflicts with other operations from scan driver, the earlier operation will be received. |
2.
Place your originals.
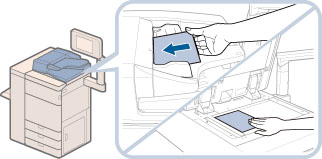
IMPORTANT |
You cannot scan 2-sided originals even if you are using a feeder. Place 1-sided originals. The available scanning size is up to LTR. For example, if you set 11" x 17" originals, only LTR size is scanned. |
NOTE |
For instructions on placing originals, see "Placing Originals." |
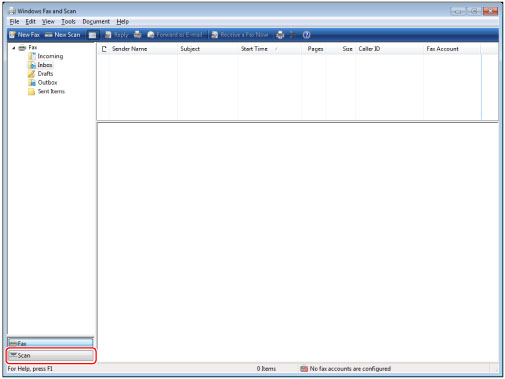
3.
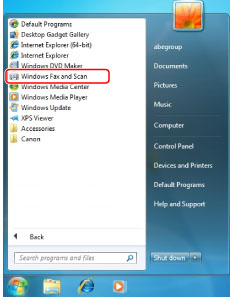
For Windows 7, click  (Start) on a computer → [All Programs] → [Windows Fax and Scan].
For Windows 8.1, click or tap [ ] on the bottom left on the [Start] screen, and click or tap the [Windows Fax and Scan] tile on the [Apps] screen.
For Windows 10, select start menu → [All apps] → [Windows Accessories] → [Windows Fax and Scan].
(Start) on a computer → [All Programs] → [Windows Fax and Scan].For Windows 8.1, click or tap [
] on the bottom left on the [Start] screen, and click or tap the [Windows Fax and Scan] tile on the [Apps] screen.For Windows 10, select start menu → [All apps] → [Windows Accessories] → [Windows Fax and Scan].
NOTE | ||||||||
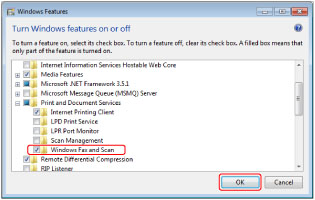
If [Windows Fax and Scan] is not displayed in Windows 7, follow the procedures below.
For information on functions of the Windows operating system, see the manual provided with the operating system, or contact Microsoft. |
4.
Click [Scan].
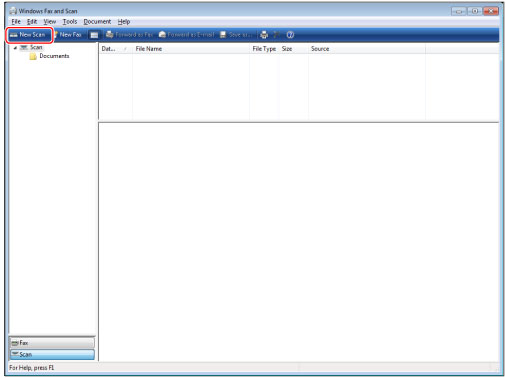
5.
Click [New Scan].
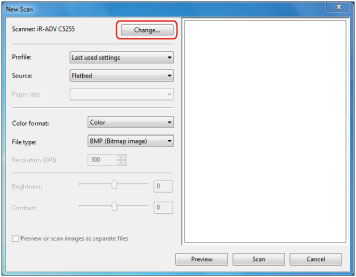
6.
Click [Change] → select this machine as a scanner → click [OK].
7.
Specify each setting.
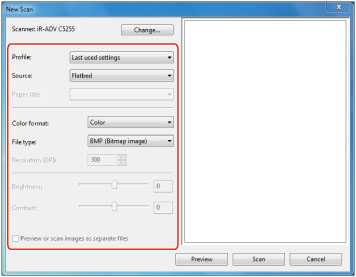
[Profile]: | If you scan text originals, select [Document], or select [Photo] for scanning photos. |
[Source]: | If you are using a feeder, select [Feeder (Scan one side)], or select [Flatbed] if you are using the platen glass. |
[Paper size]: | Select LTR. |
[Color format]: | [Color] is set. |
[File type]: | Select from BMP, JPEG, PNG, and TIFF. |
[Resolution]: | "300" is set. |
8.
Click [Scan].
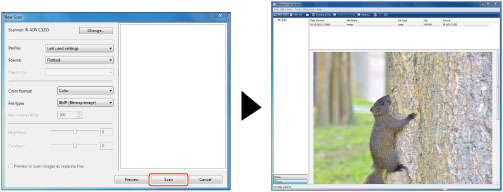
Scanned originals are displayed on the list.
NOTE |
Scanned files are stored in [Scanned Documents] folder in [Documents]. If you click [Preview], the scanned file is displayed, but it is not stored in a computer. |