Default Screen after Startup/Restoration
You can set the default screen displayed at startup.
1.
Press  (Settings/Registration).
(Settings/Registration). 2.
Press [Preferences] → [Display Settings] → [Default Screen after Startup/Restoration].
3.
Specify the settings → press [OK].
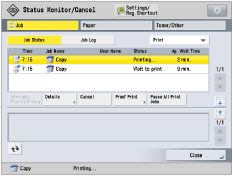
If you set [Open Status Monitor/Cancel] to ‘On’:
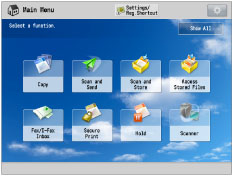
If you set the Main Menu as the Default Screen after Startup/Restoration:
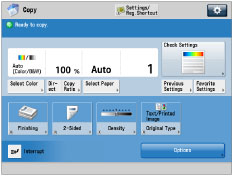
If you set [Copy] as the Default Screen after Startup/Restoration:
IMPORTANT |
If [Department ID Management] or [Limit Functions] for [Department ID Management] is set to 'On', the startup screen may differ from the screen set to be displayed as default at startup. If [Department ID Management] is set to 'On', and if a function restricted by Limit Functions is set for the default screen, the Main Menu screen appears at startup. (If [Department ID Management] is set to 'On', [Copy] is restricted by Limit Functions.) To display the function you set for the default startup screen, select the function on the Main Menu screen → enter the Department ID/PIN on the Log In screen. If all functions in [Limit Functions] for [Department ID Management] are set to 'On', even if you set [Open Status Monitor/Cancel] to 'On', the Log In screen appears at startup. If you press  (Status Monitor/Cancel), the Status Monitor/Cancel screen is displayed. (If you want to display the Status Monitor/Cancel screen, no Department ID/PIN is necessary.) (Status Monitor/Cancel), the Status Monitor/Cancel screen is displayed. (If you want to display the Status Monitor/Cancel screen, no Department ID/PIN is necessary.)For more information on Department ID Management, see "Specifying Department ID Management." If you are using SSO-H (Single Sign-On H), regardless of the [Default Screen after Startup/Restoration] settings, the Log In screen appears at startup. If you press (Status Monitor/Cancel), the Status Monitor/Cancel screen is displayed. (If you want to display the Status Monitor/Cancel screen, no user name/password is necessary.) For more information on SSO-H, see "SSO-H (Single Sign-On H)." |