Print on Tab
If you load tab paper in the paper source, the POD Deck Lite-C, or the Multi-drawer Paper Deck-C, you can copy onto the tabs on tab paper by using the Print on Tab mode.
* Tab Paper
You must set how much the image on the originals must be shifted so that the image is copied onto the tabs.
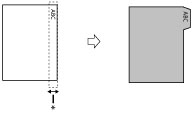
* Area to be Shifted
IMPORTANT |
Only A4 originals can be used with the Print on Tab mode. |
NOTE |
For instructions on loading tab paper into a paper drawer, the POD Deck Lite-C, or the Multi-drawer Paper Deck-C, see "Maintenance." If you feed tab paper from a paper drawer, the POD Deck Lite-C, or the Multi-drawer Paper Deck-C, you must register the paper type in the paper source as tab paper beforehand. (See "Registering the Paper Size and Type for a Paper Source.") If [Unprocessed Tab Paper Forced Output] in [Function Settings] (Settings/Registration) is set to 'On', extra sheets of tab paper are output forcibly after each set is output. Example: If the number of tabs is set to five and seven sheets of tab paper are used for each set, the number of extra sheets of tab paper output is three. (See "Forcing to Output Excess Tab Paper.") Areas of images shifted outside the tab paper cannot be copied on the paper, and may cause the following copies to have black streaks or appear dirty. Example: Areas of images may shift outside the tab paper. 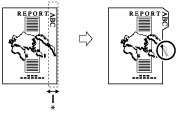 * Area Shifted Out |
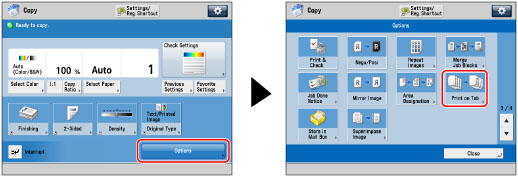
1.
Press  → [Copy].
→ [Copy].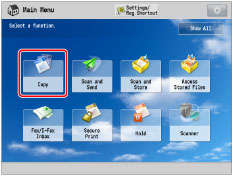
2.
Press [Options] → [Print on Tab].
3.
Press [Change] → select the paper source that contains tab paper.
4.
Set the copy shift width (0 mm to 25 mm) by pressing [-] or [+] → press [OK].
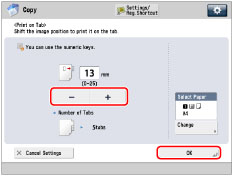
5.
Press [Close].
NOTE |
Check that the number of tabs on the tab paper displayed on the touch panel display is the same as the number of tabs on the tab paper loaded in the paper source. You can change the number of tabs in [Paper Settings]. (See "Registering the Paper Size and Type for a Paper Source.") |