Changing the Tail End White Patch Correction
When paper with curls or paper that tends to curl is used for 2-Sided copying/printing, toner may not be applied on the tail end of the paper and the area where toner is not applied may remain white or the color may be faint. Also, when low density image is used, the color may be faint or dense. In these cases, change the Tail End White Patch Correction of the custom paper type.
IMPORTANT |
This function is displayed only if the settings are made available by your local authorized Canon dealer. Even if this function is displayed, do not allow anyone to change the settings except for the system manager. For more information on changing the settings, contact your local authorized Canon dealer. |
1.
Press  .
.
.2.
Press [Preferences] → [Paper Settings] → [Paper Type Management Settings].
3.
Select the paper type that you want to edit from the list → press [Details/Edit].
4.
Press [Change] for <Corr. Tail End Toner Applic.>.
5.
Press [Front Side] or [Back Side] → [-] or [+] for <Correction Level> or <Correction Amount> to adjust the correction level and correction amount → [OK].
Details of each item are shown below:
[Correction Level]: | Press [+] to adjust the value if low density images on the tail end of the paper are faint or dense. Please note that if you increase the value too much, white patches may appear on high density images on the tail end of the paper. |
[Correction Amount]: | Depending on the paper type and paper curl, the size of the area on the tail end of the paper where white patches appear may differ. You can use this feature to adjust the starting position to correct the area. |
The default position of the Tail End White Patch Correction mode starts at the edge of the paper. You can shift the starting position by pressing [+].
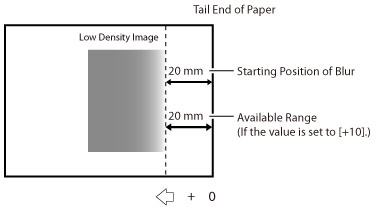
For example, if the image begins to blur at around 20 mm from the edge of the paper, you can improve the condition by expanding the correction area to 20 mm. In this case, enter [+10]. Effective range for correction is increased by 2 mm every time [Correction Amount] is increased by +1. If you set [Correction Amount] to +10, effective range for correction is 20 mm from the tail end of the paper.
6.
Press [OK].
NOTE |
If adjusting the value does not eliminate the white patches, you can try to decrease the Secondary Transfer Voltage. However, note that decreasing the Secondary Transfer Voltage may adversely affect the images. Make sure to check the output result while adjusting the Secondary Transfer Voltage. |