Adjusting the Zoom Ratio of the Image
Depending on the paper type, the heat generated by the fixing unit may cause the paper to expand or shrink slightly. In this case, images may also be enlarged or reduced accordingly. This function enables you to set the zoom ratio of the image for each paper, or enlarge the reduced image to match the zoom ratio of the image on the second side of the paper. You can adjust the zoom ratio of the image either by entering the enlargement/reduction ratio, or by entering the value of the test page you measured manually.
NOTE |
You can also make the adjustment by using the guide sheet. (See "Adjusting the Image Position Using the Guide Sheet.") |
1.
Press  .
.
.2.
Press [Preferences] → [Paper Settings] → [Paper Type Management Settings].
3.
Select the paper type that you want to edit from the list → press [Details/Edit].
4.
Press [Change] for <Adjust Image Position>.
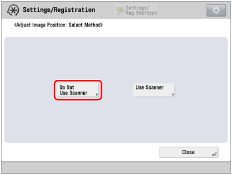
5.
Press [Do Not Use Scanner].
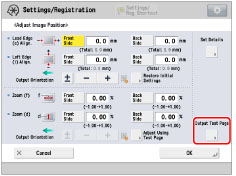
6.
Press [Output Test Page].
NOTE |
To adjust the image position on long sheets, print out a long sheet test page. The adjustment can be made more efficiently than with the test page printed out by [Output Test Page] under <Adjust Image Position>. (The long sheet test page is available from the online manual site.) |
7.
Enter the number of test pages to make → press [Next].
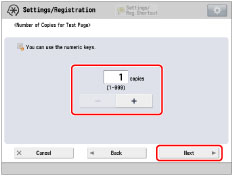
NOTE |
If the image position varies greatly, the accuracy of correction may be improved by printing several test pages and using an average of the measured length. |
8.
Select a paper source that contains a custom paper size → press [Start Printing].
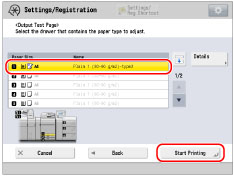
The test page is printed.
9.
Return to the <Adjust Image Position> screen → set the zoom ratio.
If you enter the enlargement/reduction ratio (%):
Set the enlargement/reduction ratio (%) for <Zoom (f)> and <Zoom (d)> on <Adjust Image Position> screen → press [OK].
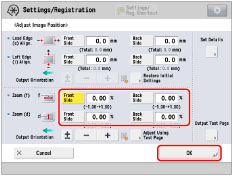
<Zoom (f)>: | Enlarges or reduces the image in the direction that is parallel to the feeding direction according to the inputted ratio. |
<Zoom (d)>: | Enlarges or reduces the image in the direction that is perpendicular to the feeding direction according to the inputted ratio. |
As necessary, try printing the test page again and then check the correction amount.
If you enter the value of the test page you measured manually:
Measure the length of the 'f' and 'd' marks on the test page manually.
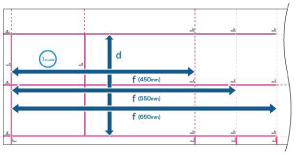
Default value: f = 360.0 mm, d = 250.0 mm (for the long sheet: f = 450.0 mm, 550 mm, 650 mm, d = 250.0 mm)
Standard size | Long sheet |
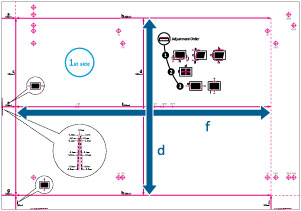 |  |
NOTE |
Standard sizeIf you print the test page using paper smaller than 270 mm x 380 mm, you cannot measure the length of 'f' and 'd' as the entire image will not be printed on the paper. In this case, calculate the expanding/reducing percentage by comparing the measured length of 'f/2' and 'd/2' with the default values (f/2: 180 mm, d/2: 125 mm). By using the calculated percentage, adjust the zoom ratio. Long sheetIf you print the long sheet test page using paper smaller than 270 mm x 762 mm, the entire image will not be printed on the paper. Calculate the expanding/reducing percentage by comparing the measured length of 'd/2' with the default value (d/2: 125 mm). If 'f' is not printed entirely, measure the length of 'f' that is closest to the tail edge of the paper, and calculate the expanding/reducing percentage by comparing the measured length with the default values (f=450 mm, 550 mm, 650 mm). By using the calculated percentage, adjust the zoom ratio. |
Press [Adjust Using Test Page].
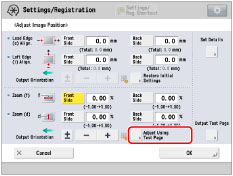
Enter the length of the test page on front and back sides → press [OK].
For example, if the measured length of [f] is 360.4 mm, enter 360.4. The difference in length (0.4 mm in this case), is reduced, so that the image is printed in the correct size.
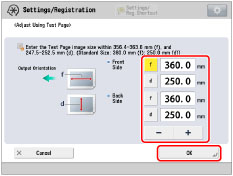
[f]: | Enter the measured length of 'f' mark on the test page. For the long sheet: Enter the input value calculated from the measured length of 'f' mark on the long sheet test page. Input value = ((default ‘f’ value: 360 mm)/measured ‘f’ position: 450, 550, 650 mm)) x measured ‘f’ value |
[d]: | Enter the measured length of 'd' mark on the test page. |
As necessary, try printing the test page again and then check the correction amount.
10.
Press [OK].