Storing Scanned Originals in a Mail Box
NOTE |
If the machine is used as a network printer, you can store data in the machine from a computer via the network printer. |
1.
Place your originals.
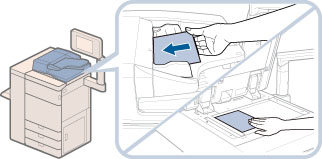
NOTE |
For instructions on placing originals, see "Placing Originals." |
2.
Press  → [Scan and Store] → [Mail Box].
 → [Scan and Store] → [Mail Box].
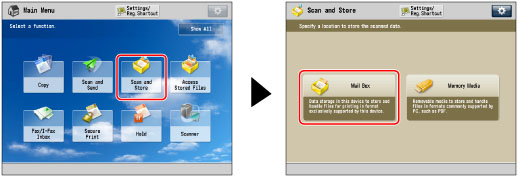
If the desired function is not displayed on the Main Menu screen, press [Show All].
3.
Select the desired mail box.
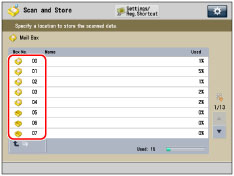
If the desired mail box is not displayed, press  or
or  to scroll to the desired mail box.
 or
or  to scroll to the desired mail box.
If you want to enter the mail box number or the PIN for the mail box, use  -
-  (numeric keys) → press [OK].
 -
-  (numeric keys) → press [OK].
NOTE |
If you make a mistake when entering the mail box number using the numeric keys, press [Cancel] → enter the correct mail box number. |
4.
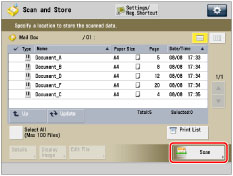
Press [Scan].
5.
Specify the desired scan settings.
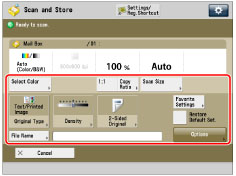
You can press [Options] to select useful scanning modes. You can also use modes in combination.
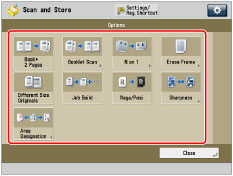
For more information on setting each mode, see the corresponding section.
Follow the procedure below to save the file with a new filename.
Press [File Name].
Enter a name → press [OK].
IMPORTANT |
You cannot use the following characters in a file name: \ / : , * ? " < > | You cannot use a . (period) or space for the first or last character of the file name. The full pathname, including folders and the file name, must not exceed 256 characters in length. |
NOTE |
If you create a file without assigning it a name, the machine automatically assigns the file a name using the year, month, day, and time the file was created. For example, if a file is created at 1:35 PM, 41 seconds, on January 15, 2016, its name will be <20160115133541>. If you enter a file name that already exists, (1) to (9) is added to the file name. Example: a(1).pdf |
6.
Press  .
.
 .
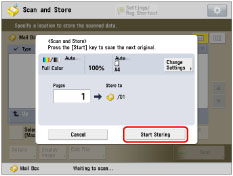
.If the following screen is displayed, after the last batch of originals is scanned, press [Start Storing].
If you place your original on the platen glass, press  to scan each original. Your original is scanned.
 to scan each original. Your original is scanned.
NOTE |
To cancel scanning, press [Cancel] or  . .When multiple sheets are fedScanning is stopped and the message is displayed on the screen. Follow the instructions to clear the jam. When you have cleared the jam, the resume job screen is displayed. If the machine mistakenly detects multiple sheet feeding, press [Do Not Detect Multi. Sheet Feed] to resume scanning. To set the machine in advance to not notify you of multiple sheet feeding, perform one of the following operations. Each time you send, press [Options] on the Fax Basic Features screen → select [Dtct. Feeder Mlti Sheet Fd] to disable the setting. Set [Set Detect. of Feeder Multi. Sheet Fd as Def.] to [Off] (See "Changing the Default Setting of the Multiple Sheet Feed Detection.") |
7.
Remove the original.
NOTE |
You can scan and store up to 999 pages at one time. If two-sided originals are scanned using the feeder, you can store up to 1,000 pages. Once the maximum number of originals you can scan is reached, a message asking whether to store appears. To check whether the file was stored correctly, press  → [Job] → [Job Log] → select [Store] from the drop-down list. If the result is displayed as "NG," press [Details] to check the error code. For more information on the causes and remedies for each error code, see "List of Error Codes without Messages." → [Job] → [Job Log] → select [Store] from the drop-down list. If the result is displayed as "NG," press [Details] to check the error code. For more information on the causes and remedies for each error code, see "List of Error Codes without Messages." |