Overview of This Function
You can use various copy features from the Regular Copy Basic Features screen displayed on the touch panel display.
For information on the optional products required to use this function, see "Optional Products Required for Each Function." The explanations in this category assume that the Duplex Color Image Reader Unit-M is attached.
Switching the Copy Basic Features Screen
After you power on the machine and press  , the Main Menu screen appears on the touch panel display. If you press [Copy] on the touch panel display, the Copy Basic Features screen is displayed.
, the Main Menu screen appears on the touch panel display. If you press [Copy] on the touch panel display, the Copy Basic Features screen is displayed.
Regular Copy Basic Features Screen
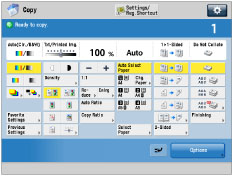
Express Copy Basic Features Screen
The Express Copy Basic Features screen simplifies the copying procedures in comparison to the Regular Copy Basic Features screen.
Regular Copy Basic Features Screen
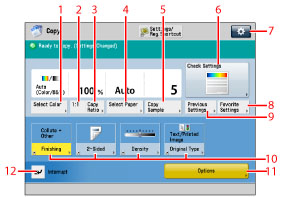
1 | [Select Color] Press to select the color mode for copying. |
2 | [1:1] Press to make copies the same size as your original. |
3 | [Copy Ratio] Press to specify the desired copy ratio. |
4 | [Select Paper] Press to select the paper size/type and the paper source. |
5 | [Copy Sample] This mode enables you to check the copy result before making multiple copies. |
6 | <Check Settings> Press to check, edit, or clear the current copy settings. |
7 |  You can specify the following settings: Register/Edit Favorite Settings Register to Quick Menu (See "Quick Menu.") Changing the Default Settings Register Options Shortcuts |
8 | [Favorite Settings] Press to register frequently used copy settings. You can also recall registered settings. |
9 | [Previous Settings] Press to recall the three most recent copy settings. |
10 | Shortcuts to [Options] Press to select an option mode. [Finishing], [2-Sided], [Density], and [Original Type] are set as default. |
11 | [Options] Press to specify other settings. You can configure a range of copy functions. |
12 | [Interrupt] The interrupt mode enables you to pause a reserved or current job to make higher priority copies. |
Options Screen 1/4
The screen below, which appears on the touch panel display when you press [Options] on the Regular Copy Basic Features screen, is called the Options screen. This screen is divided into four screens. Press  or
or  to display the next or previous screen. All special copy modes appear on these screens.
or to display the next or previous screen. All special copy modes appear on these screens.Press  after selecting a mode to display a Tutorial screen containing guidance information. This is useful when you want to learn more about the selected mode.
after selecting a mode to display a Tutorial screen containing guidance information. This is useful when you want to learn more about the selected mode.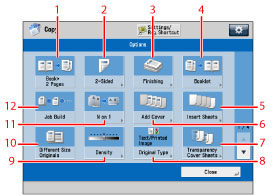
1 | [Book  2 Pages] 2 Pages]Press to select or deselect the Book 2 Pages mode. This mode enables you to copy facing pages of an opened book onto separate copy sheets. |
2 | [2-Sided] Press to specify the 2-Sided Settings. Press to make [1-Sided 2-Sided], [2-Sided2-Sided], [2-Sided1-Sided], or [Book2-Sided] copies. |
3 | [Finishing] Press to select the Collate, Group, or Staple mode. |
4 | [Booklet] Press to make a booklet by copying several originals. |
5 | [Insert Sheets] Press to insert sheet insertions, chapter pages, or tab paper between specified pages. |
6 | [Add Cover] Press to add covers. |
7 | [Transparency Cover Sheets] Press to insert a sheet between each transparency when copying transparencies. You can also copy on the inserted sheets. |
8 | [Original Type] Press to select the type of original (printed image, photo printout, text, map, or color copy) you are going to copy. |
9 | [Density] Press to adjust the copy density. |
10 | [Different Size Originals] Press to make copies of different size originals by placing them as a group in the feeder. |
11 | [N on 1] Press to automatically reduce two, four, or eight page originals to fit onto a one-sided or two-sided copy sheet. |
12 | [Job Build] This mode enables you to scan multiple originals that are too many to be placed at once, by dividing them into multiple batches. |
Options Screen 2/4
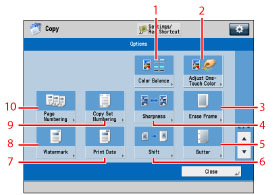
1 | [Color Balance] Press to make color balance adjustments. |
2 | [Adjust One-Touch Color] Press to make fine adjustments to the image quality on copies. |
3 | [Erase Frame] Press to eliminate dark border areas, lines that appear around original images, or shadows from binding holes. |
4 | [Sharpness] Press to sharpen or soften the original image for the copy. |
5 | [Gutter] Press to create gutters along the sides of the copy. |
6 | [Shift] Press to shift the position of the original image for the copy. |
7 | [Print Date] This mode enables you to print the date. |
8 | [Watermark] This mode enables you to print a watermark. |
9 | [Copy Set Numbering] This mode enables you to print copy set numbers. |
10 | [Page Numbering] This mode enables you to print page numbers. |
Options Screen 3/4

1 | [Print & Check] Press to confirm scanned images page by page before copying when you scan originals on the platen glass. |
2 | [Nega/Posi] Press to make copies of the original image by inverting the hues and gradations. |
3 | [Repeat Images] This mode enables you to repeatedly copy the entire original image in either the vertical or horizontal direction. |
4 | [Merge Job Blocks] This mode enables you to scan multiple batches of originals with different copy settings and copy them as one document. |
5 | [Print on Tab] Press to copy onto the tabs on tab paper. |
6 | [Area Designation] Press to make copies of a designated area. |
7 | [Superimpose Image] Press to superimpose an image stored in memory onto the original image for copying. |
8 | [Store in Mail Box] This mode enables you to store originals scanned from the Copy screen as a file in a Mail Box. |
9 | [Mirror Image] Press to copy the original image reversed, as if it were a reflection in a mirror. |
10 | [Job Done Notice] Press to have the machine notify the user through e-mail when the copy job is done. |
Options Screen 4/4
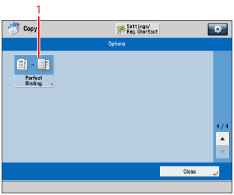
1 | [Perfect Binding] Press to make a glued booklet by copying several originals. |
NOTE |
You can perform the same operations on both the Regular Copy Basic Features screen and the Express Copy Basic Features screen. Set which screen to display from the Settings/Registration screen. (See "Switching the Copy Basic Features Screen.") |