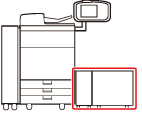
POD Deck Lite-C (Optional)
This section describes how to clear a paper jam which occurs in the POD Deck Lite-C. The location of the POD Deck Lite-C is indicated in the following illustration.
Follow the procedure described below, while referring to the location of the paper jam and the directions that appear on the touch panel display, to remove the jammed paper.
1.
Close any open cover.
 CAUTION CAUTION |
When closing the cover, be careful not to get your fingers caught, as this may result in personal injury. |
2.
Move the POD Deck Lite-C away from the main unit.
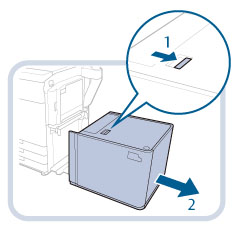
3.
Remove any paper jammed in the side of the POD Deck Lite-C.
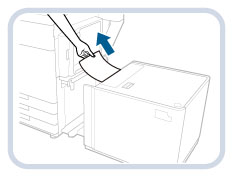
Paper can also be jammed in the feeding slot on the side of the main unit.
Remove any jammed paper from the feeding slot.
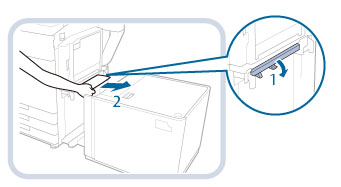
4.
Reconnect the POD Deck Lite-C to the main unit.
If the paper jam message is no longer displayed when you reconnect the POD Deck Lite-C, proceed to step 8.
| CAUTION |
When reconnecting the POD Deck Lite-C to main unit, be careful not to get your fingers caught, as this may result in personal injury. |
IMPORTANT |
When reconnecting the POD Deck Lite-C to the main unit, confirm that the front cover of the main unit is closed properly. |
5.
Open the paper deck.
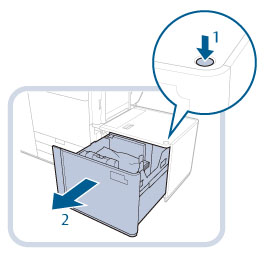 | 1. Press the open button. |
2. Open the paper deck.The inside lifter automatically descends to the paper loading position. |
IMPORTANT |
If the machine is in the Sleep mode (the touch panel is not displayed, and only  is lit), you may be unable to open the paper deck unit. In this case, press to reactivate the machine, and then press the open button on the paper deck unit. is lit), you may be unable to open the paper deck unit. In this case, press to reactivate the machine, and then press the open button on the paper deck unit. |
6.
Remove any jammed paper.
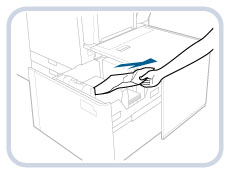
Look carefully, as jammed paper may be difficult to see.
7.
Close the paper deck.
| CAUTION |
When closing the paper deck, be careful not to get your fingers caught, as this may result in personal injury. |
IMPORTANT |
When closing the paper deck, confirm the followings: Paper is loaded properly. The size change plates and rear edge retainer are set in the proper position. |
8.
Follow the instructions on the screen.
NOTE |
The screen indicating the directions on how to clear the paper jam is displayed repeatedly until the paper jam is cleared. |