Changing the Port
This explains the procedure for changing the port used by a device connected to a network.
If you temporarily set a port for the device when installing the driver, change it to the correct port by following this procedure.
Here, the method for creating a Raw or LPR port using a standard TCP/IP port is explained.
Prerequisites
Driver installation
Confirm the name or IP address of the device (if adding a standard TCP/IP port).
To add a standard TCP/IP port, you need to enter the name or IP address of the device. For the name of the device, use the name by which the device is known on the network. If you do not know the device name or IP address, check with your network administrator.
Determining the protocol to use
Raw: A protocol that can be used with Windows. It transmits data at a higher speed than LPR.
LPR: The protocol commonly used by TCP/IP.
When starting the computer, log on as a user with administrator privileges.
Procedures
1.
Display the printer properties screen.
(1) Display [Bluetooth & devices] (or [Devices]) from [ Settings] in the Start menu.
Settings] in the Start menu.(2) In [Printers & scanners], display the management screen for the device to set.
To display the management screen, click the device or click [Manage] for the corresponding device.
(3) Click [Printer properties] for the device to set.
2.
Display the [Ports] sheet → set the port.
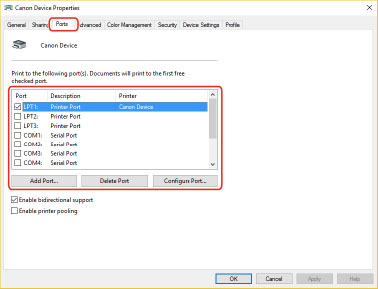
When using an existing port:
Select a port from [Port].
When adding a standard TCP/IP port:
(1) Click [Add Port] → select [Standard TCP/IP Port] from [Available port types] → click [New Port].
(2) Enter the device name or IP address according to the instructions of the wizard.
[Port Name] is automatically entered. Change the port name if required.
If the [Additional port information required] screen is displayed, click the subsequent "Open details" and perform the necessary operations.
Perform one of the following.
Return to the previous screen in the wizard → re-enter the information for [Printer Name or IP Address] → click [Next].
Select [Device Type] > [Standard] > [Canon Network Printing Device with P9100] → click [Next].
Depending on the device you are using, the name you select in [Device Type] > [Standard] may differ from [Canon Network Printing Device with P9100].
(3) Click [Finish] → click [Close] in the [Printer Ports] dialog box.
3.
If you want to configure the standard TCP/IP port, click [Configure Port].
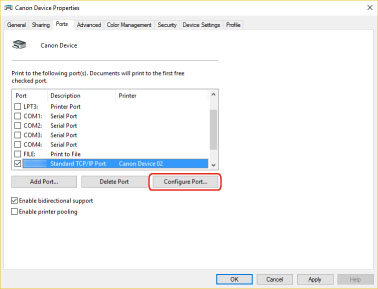
4.
Configure the port.
When using Raw:
Select [Raw] for [Protocol] → click [OK].
When using LPR:
(1) Select [LPR] for [Protocol] → specify one of the following print queues for [LPR Settings] > [Queue Name].
LP: Outputs according to the spool setting of the device. This is the setting that is normally used.
SPOOL: Always outputs after spooling to the hard disk, regardless of the device settings.
DIRECT: Always outputs without spooling to the hard disk, regardless of the device settings.
(2) Click [OK].

5.
Click [Close].