Attaching Numbers and Symbols to Copies
 | You can attach page numbers, management numbers, or dates, etc. when copying. You can also attach stamps which read "Confidential," etc. This allows for easier management in situations such as when you distribute multiple copies of documents. |
1
Place the original. Placing Originals
2
Press <Copy>. <Home> Screen
3
Press <Options> on the Copy Basic Features screen. Copy Basic Features Screen
4
Press <Page Numbering>, <Copy Set Numbering>, <Watermark>, or <Print Date>.
5
Select the printing format.

There are no settings to select if you specified <Copy Set Numbering>, <Watermark>, or <Print Date> in step 4. Proceed to step 6.
6
Select the printing position.

7
Select the orientation of the placed original.

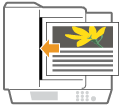
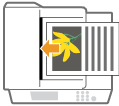
As shown in the illustrations below, if the original is placed in the portrait orientation when facing you, select <Top at Far Edge>, if placed in the landscape orientation, select <Top at Side Edge>.
 |  | ||
<Top at Far Edge> | <Top at Side Edge> |
8
Specify the content to print.

9
Press <OK>  <Close>.
 <Close>.
10
Press  (Start).
 (Start).
Copying starts.
 |
Copy set numbers are printed on all copied pages. Copy set numbers can be printed together with dates or text. <Print Settings>  <Copy Set Numbering Option Settings> <Copy Set Numbering Option Settings>The text for <Page Numbering> and <Watermark> can also be selected from the text which has been registered in <Register Characters for Page Numbering/Watermark>. If you set any two of <Page Numbering>, <Watermark>, <Print Date>, or <Copy Set Numbering> to print in the same position, a message asking whether to print with these settings appears when you press  (Start). (Start).If you set <Copy Set Numbering Option Settings> to <On>, the settings you can specify change as follows. <Copy Set Numbering Option Settings> You can no longer select <Full Surface> and <Numbers in 5 Locations> for print positions in the Copy Set Numbering mode. The number sizes of the Copy Set Numbering mode become <10.5 pt>, <12.0 pt>, and <14.0 pt>. |
<Common>  <Print Settings>
 <Print Settings>