Saving a Copy of a Sent Document
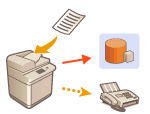 | You can save a copy of a sent fax in a pre-specified destination (e-mail or file server, etc.). Depending on the destination, the saved fax copy is converted into another digital file format such as PDF, thus keeping documents organized and manageable. This method also helps you easily manage logs because a folder categorized by sender name or date is automatically created in the specified destination on the server. |
 |
A copy of a document is saved even if a sending error occurs. Depending on the type of destination, the following restrictions may apply. E-Mail: An e-mail without a message is sent. Fax/I-Fax: The sent fax cannot be saved as an electronic file. |
Registering the Storage Location and File Format
In order to back up fax documents, it is necessary to register settings such as the storage location and file format in advance.
 |
You cannot perform Direct Sending if you set <Settings for Sent Document Backup> to <On>. This setting automatically switches to <Off> in the following cases. Specify the destination again or return the setting to <On> as required. When the backup destination has been deleted from the address book When an address book has been imported from the Remote UI Importing/Exporting the Setting Data When an address book has been received from <Device Information Distribution Settings> Distributing the Device Information to Other Canon Multifunction Printers |
1
Press  (Settings/Registration)
  <Function Settings>
  <Send>
  <Common Settings>
  <Settings for Sent Document Backup>.
 (Settings/Registration)
  <Function Settings>
  <Send>
  <Common Settings>
  <Settings for Sent Document Backup>.
2
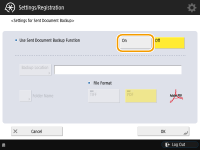
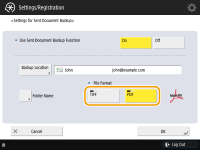
Press <On> for <Use Sent Document Backup Function>.
3
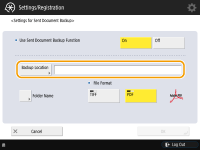
Press <Backup Location>  select the destination
  press <OK>. Registering Destinations in the Address Book
 select the destination
  press <OK>. Registering Destinations in the Address Book
 |
A destination in <Personal Address List> cannot be specified as the destination. |
4
Press <Folder Name>  set how to organize the created folders
  press <OK>.
 set how to organize the created folders
  press <OK>.
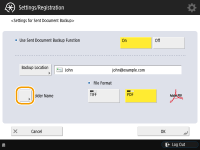
You can select <Sender Information>, <Date>, or <Off> to categorize folder names.
File names are specified by send date and time, job number, sender information, destination information, and result information.
Example: 201603151005_0050_John_1112223333_OK.pdf
 |
Sender information Information regarding the sender is displayed in the following situations. Sender Name: When <Sender Name (TTI)> is set to <W/Settings> User Name: When <Sender Name (TTI)> is set to <No Settings>, and the user is authenticated Line Name: When <Sender Name (TTI)> is set to <No Settings>, the user is not authenticated, and the user name is registered for the line used to send the fax Telephone Number: When <Sender Name (TTI)> is set to <No Settings>, the user is not authenticated, and the user telephone number is registered, but the user name is not registered, for the line used to send the fax ----: When none of the above information is available Destination information Information regarding the destination is displayed in the following situations. Destination Unit Name: When the destination unit name is available Telephone Number: When the destination unit name is not available Destination name of first successful sending: When performing a sequential broadcast transmission |
5
Press <File Format>  select the file format for saving the sent data.
 select the file format for saving the sent data.
6
Press <OK>.
Registration is complete.
 |
Specifying multiple destinations including a fax destination You can save a copy of a sent document by sending to multiple destinations which include a fax destination from the Scan Basic Features screen. To display fax destinations on the Scan Basic Features screen, it is necessary to set <Enable Fax in Scan and Send Function> to <On>. <Display Fax Function> |