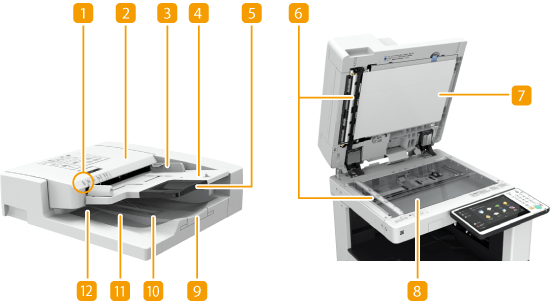
Feeder
This section describes the name and use of each part of the feeder.

 Original set indicator
Lights up when originals are placed in the original supply tray.
 Feeder cover
Open this cover when removing paper jammed in the feeder. Paper Jams in the Feeder
 Slide guides
Adjust these guides according to the width of an original.
 Original supply tray
Originals placed here are automatically fed into the feeder. When two or more sheets are loaded, originals can be scanned continuously. Placing Originals
 Original supply tray extension
Pull out this tray when loading a large-sized original.
 Document feed scanning area
Originals placed in the feeder are scanned in this area.
 Document feed scanning area cover
Open this cover when replacing a stamp cartridge or cleaning the document feed scanning area. Maintenance
 Platen glass
When scanning books, thick originals, thin originals, and other originals that cannot be scanned using the feeder, place them on the platen glass. Placing Originals
 Original output tray extension
Pull out this tray when scanning large-sized originals to prevent them from dropping over the edge of the feeder. The tray can be extended to two different lengths depending on the size of original.
 Original stopper
Holds down originals to support outputting originals neatly.
 Original output tray
Scanned originals are output here.
 Original output indicator
If you place originals in the feeder while originals for another job remain in the original output tray, the indicator blinks to notify the user that originals remain.
 |
If a thick original such as a book or magazine is placed on the platen glass, do not press down hard on the feeder. Do not place any objects in the original output area. Doing so may cause damage to the originals. Regularly clean the feeder and platen glass in order to obtain proper print results. Regular Cleaning |
TIPS |
The Stamp mode is available when the optional Stamp Unit-B* is attached to the feeder. |