 (Settings/Registration)
  <Preferences>
  <Display Settings>
 (Settings/Registration)
  <Preferences>
  <Display Settings>
 |
Depending on the authentication method specified in personal authentication management, the Log In screen may be displayed before the screen set in <Default Screen after Startup/Restoration> is displayed. |
 |
When the login service is changed to Department ID Authentication and <Limit Functions> for <Department ID Management> is used, the <Home> screen or the login screen for entering the Department ID/PIN may be displayed before the screen set in <Default Screen after Startup/Restoration>, depending on the settings. |
 (Settings/Registration)
  <Preferences>
  <Display Settings>
 (Status Monitor).
 (Settings/Registration)
  <Preferences>
  <Display Settings>
 (Settings/Registration)
  <Preferences>
  <Display Settings>
 (Settings/Registration)
  <Preferences>
  <Display Settings>
 (Settings/Registration)
  <Preferences>
  <Display Settings>
 |
Some messages may not be displayed properly in the selected language. In this case, restart the machine. Some messages may not change even after the machine is restarted. If Server Authentication + Local Device Authentication are set using personal authentication management, and there is a difference between the language set on the machine and the one set in Active Directory, the sender's full name will not appear in e-mail messages sent to the recipient. |
 (Settings/Registration)
  <Preferences>
  <Display Settings>
 (Settings/Registration)
  <Preferences>
  <Display Settings>
 (Settings/Registration)
  <Preferences>
  <Display Settings>
 (Settings/Registration)
  <Preferences>
  <Display Settings>
 (Settings/Registration)
  <Preferences>
  <Display Settings>
 |
The accuracy of the approximate times that appear on the bottom line of the touch panel display may vary, depending on the status of the machine. The approximate time does not appear when the wait time is less than one minute. |
 (Settings/Registration)
  <Preferences>
  <Display Settings>
 (Settings/Registration)
  <Preferences>
  <Display Settings>
 (Settings/Registration)
  <Preferences>
  <Display Settings>
 (Settings/Registration)
  <Preferences>
  <Display Settings>
 |
If DepartmentID Authentication is set as the login service and <Department ID Management> is set to <On>, the Department ID is displayed when <At Screen Bottom> is selected. It is not displayed on the top of the screen. If User Authentication is set as the login service, <User Name> is displayed when <At Screen Bottom> is selected. |

 (Settings/Registration)
  <Preferences>
  <Display Settings>
 |
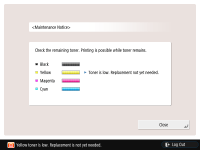
The following warning screen is displayed.  If you press <Close> on the warning screen to close the screen, you can perform normal operations. However, the warning screen will appear every time the machine returns from sleep mode or when the main power is turned ON. If you have already prepared a new toner cartridge, etc., and the notification becomes unnecessary, perform the <Delete Remaining Toner Error> operation. The message indicating the status remains on the bottom of the screen, regardless of this setting. |

 (Settings/Registration)
  <Preferences>
  <Display Settings>
 |
The warning screen will appear again when a different color toner becomes low, if <Display Remaining Toner Error Message> is set to <On>. |

 (Settings/Registration)
  <Preferences>
  <Display Settings>
 |
This setting is only valid when <Use IPv4> is set to <On>. |
 (Settings/Registration)
  <Preferences>
  <Display Settings>
 (Settings/Registration)
  <Preferences>
  <Display Settings>
 (Settings/Registration)
  <Preferences>
  <Display Settings>