Combining Jobs with Different Settings Into a Single Job (Merge Job Blocks)
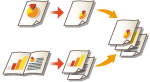 | You can scan multiple originals with different settings, and then combine the jobs into a single job and print it out. For example, scan one original document with the Hole Punch setting and another original document with the 2-sided setting, after that, you can combine these documents into a single job and add page numbers or attach covers to the whole output. |
1
Press <Copy>.
2
Press <Options> on the Copy Basic Features screen. Copy Basic Features Screen
3
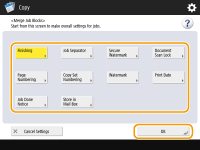
Press <Merge Job Blocks>.
4
Specify settings that are applied to all of the documents and press <OK>.
To configure <Finishing>, see Basic Copy Operations.
To configure <Job Separator>, see <Paper Output Settings>  <Job Separator Between Jobs> or <Job Separator Between Copies>.
To configure <Secure Watermark>, <Document Scan Lock>, see Restricting Copying of Confidential Documents.
To configure <Page Numbering>, <Copy Set Numbering>, <Watermark>, <Print Date>, see Functions Useful for Making and Managing Material.
To configure <Job Done Notice>, <Store in Mail Box>, see Useful Copy Functions.

You can select the paper source in which tab paper is loaded as the job separator.
When using tab paper as the job separator for the Merge Job Blocks mode, the tab paper cannot be printed on.
Tab paper cannot be inserted between jobs or copies.
5
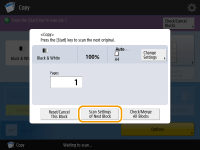
Place the first original, configure settings on the Copy Basic Features screen, and press  (Start).
(Start).Scanning starts. When scanning is complete, the screen appears prompting you to scan the next original.
If you want to keep the setting specified in this step for the next original, proceed to step 7.
If you want to change some of the settings such as copy ratio or density for the next original, press <Change Settings> on the screen, change the settings, and proceed to step 7.
6
Press <Scan Settings of Next Block>.
You can change or specify the following settings using <Change Settings> before scanning the next batch of originals (i.e., between batches): You need to set the necessary scan settings in advance, since you cannot change the settings in <Options> during the Job Build mode.
<Copy Ratio>
<2-Sided Original>
<Density>
<Original Type>
You cannot adjust the exposure while printing if <Secure Watermark> is set for the entire block.
7
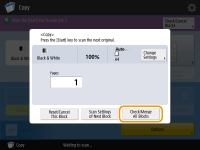
Place the next original, configure settings on the Copy Basic Features screen and press (Start).
(Start).Repeat steps 6 and 7 for the originals you want to combine.
To apply the last setting you used to the original, place the original and press (Start).
(Start).8
Press<Check/Merge All Blocks>.
9
Enter the number of copies and confirm the settings for the scanned documents.
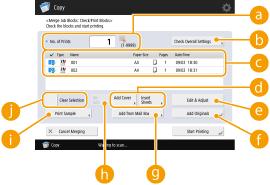
 <No. of Prints>
Enter the number of copies using the numeric keys.
 <Check Overall Settings>
You can check the settings specified in step 4.
 List of scanned documents
Displays the information of the scanned documents as a list.
The number in  appears as 1, 2, 3... in the order that the documents are scanned, and the copies are printed in order. If you want to change the order, press <Clear Selection> in
  and specify the order.
and specify the order. <Add Cover>/<Insert Sheets>
You can include covers and insert sheets (chapter pages).
 <Edit & Adjust>
You can preview pages, or delete specific pages or jobs.
 <Add Originals>
You can scan more originals to add to the output.
 <Add from Mail Box>
You can call documents from the Mail Box to add to the output. Making Simple Edits to Files
 <Details>
When selecting documents in , <Details> is displayed. You can confirm the settings for each document.
, <Details> is displayed. You can confirm the settings for each document. <Print Sample>
You can print a copy sample to check the result before making a large amount of copies. Checking the Copy Results
<Clear Selection>/<Select All>You can change the document order in .
.10
Press <Start Printing>.
Copying starts.
|
You cannot perform an interrupt copy job while scanning with the Merge Job Blocks mode. You cannot recall the Merge Job Blocks mode using <Previous Settings>. Maximum number of job blocks that can be scanned: 100 |