Generating the Key and Certificate for Network Communication
 | The machine can generate the key and certificate (server certificate) used for TLS encrypted communication. If you want to start using TLS encrypted communication immediately, it is convenient to use the key and certificate that are preinstalled in the machine. If necessary, have an administrator generate a key and certificate. Note, however, that TLS encrypted communication is not enabled simply by generating a key and certificate. Configuring the Key and Certificate for TLS |
 |
If you want to use a server certificate with a CA signature, you can generate the key along with a CSR, instead of the certificate. Generating a Key and CSR |
1
Press  (Settings/Registration).
(Settings/Registration).2
Press <Management Settings>  <Device Management> <Certificate Settings> <Generate Key> <Generate Network Communication Key>.
3
Configure the necessary items for the key, and press <Next>.
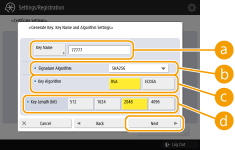
 <Key Name>
Enter a name for the key. Use a name that will be easy to find when displayed in a list.
 <Signature Algorithm>
Select the hash algorithm to use for the signature. The available hash algorithms vary depending on the key length (System Specifications). A key length of 1024 bits or more can support SHA384 and SHA512 hash algorithms. If <RSA> is selected for  , and <Key Length (bit)> is set to <1024> or more for
  , the SHA384 and SHA512 hash algorithms can be selected.
, and <Key Length (bit)> is set to <1024> or more for , the SHA384 and SHA512 hash algorithms can be selected.<Key Algorithm>Select the key algorithm. If <RSA> is selected, <Key Length (bit)> is displayed as a setting item for . If <ECDSA> is selected, <Key Type> is displayed instead.
. If <ECDSA> is selected, <Key Type> is displayed instead.<Key Length (bit)> / <Key Type>Specify the key length if <RSA> is selected for , or specify the key type if <ECDSA> is selected. In both cases, a higher value provides greater security but reduces the communication processing speed.
, or specify the key type if <ECDSA> is selected. In both cases, a higher value provides greater security but reduces the communication processing speed.4
Configure the necessary items for the certificate, and press <Generate Key>.
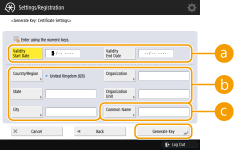 <Validity Start Date> / <Validity End Date>
Enter the validity start and end date.
<Country/Region>/ <State> / <City> / <Organization> / <Organization Unit>Select the country code from the list, and enter the location and the organization name.
<Common Name>Enter the IP address or FQDN.
When performing IPPS printing in a Windows environment, make sure to enter the machine's IP address.
A DNS server is required in order to enter the FQDN of the machine. Enter the IP address if a DNS server is not used.
|
Managing keys and certificatesYou can check the detailed settings or delete keys and certificates on the screen that is displayed when you press (Settings/Registration) If If If you select a key and certificate and press <Certificate Details>, detailed information about the certificate is displayed. You can also press <Verify Certificate> on this screen to check whether the certificate is valid. To delete keys and certificates, select the ones that you want to delete, and press <Delete> |