 (Settings/Registration)
  <Function Settings>
  <Receive/Forward>
  <Output Report>
 (Settings/Registration)
  <Function Settings>
  <Receive/Forward>
  <Output Report>
 (Settings/Registration)
  <Function Settings>
  <Receive/Forward>
  <Output Report>
 (Settings/Registration)
  <Function Settings>
  <Receive/Forward>
  <Common Settings>
 (Settings/Registration)
  <Function Settings>
  <Receive/Forward>
  <Common Settings>
 (Settings/Registration)
  <Function Settings>
  <Receive/Forward>
  <Common Settings>
 |
If this setting is set to <Off>, the image size of the received file is not reduced to fit the size of the paper. If the size of the image exceeds the printable area, the image is divided into equal sections and printed onto separate sheets of paper. If you select <Auto> in <Reduction Mode>, the image size is automatically reduced by a suitable reduction ratio. This ratio can range from the value set for <Reduction %>, up to 100% of the received document size. |

 (Settings/Registration)
  <Function Settings>
  <Receive/Forward>
  <Common Settings>
 |
This mode is only available under the following conditions: You must select the same paper drawer for printing two consecutive pages of a received document. The paper in the selected paper drawer must be large enough for two consecutive pages to be printed out. If you set <2 on 1 Log> to <On>, documents are printed with a dotted line in the middle. If you print the document with sender information, the dotted line is not printed in the area where the sender information is located. |

 (Settings/Registration)
  <Function Settings>
  <Receive/Forward>
  <Common Settings>
 |
When an e-mail without a body is received, the From information and Subject information (up to 24 characters for each) is printed at the top of the first page of the attachment file. |
 (Settings/Registration)
  <Function Settings>
  <Receive/Forward>
  <Common Settings>
 (Settings/Registration)
  <Function Settings>
  <Receive/Forward>
  <Common Settings>
 (Settings/Registration)
  <Function Settings>
  <Receive/Forward>
  <Common Settings>
 |
If you press <Common Settings>  set <Delete Failed TX Jobs> to <Off>, the documents with forwarding errors will be saved on the <Status Monitor> screen, and the documents will not be processed according to the settings you specified here. set <Delete Failed TX Jobs> to <Off>, the documents with forwarding errors will be saved on the <Status Monitor> screen, and the documents will not be processed according to the settings you specified here.If you select <Store/Print> when Memory Lock is set, the documents with forwarding errors will be saved. If you select <Store/Print> when Memory Lock is not set, the documents with forwarding errors will be printed. |
 (Settings/Registration)
  <Function Settings>
  <Receive/Forward>
  <Common Settings>
 (Settings/Registration)
  <Function Settings>
  <Receive/Forward>
  <Common Settings>
  <Set Fax/I-Fax Inbox>
1 | Press  (Settings/Registration). (Settings/Registration). | ||
2 | Press <Function Settings>  <Receive/Forward> <Receive/Forward>  <Common Settings>. <Common Settings>. | ||
3 | Press <Set Fax/I-Fax Inbox>. | ||
4 | Press <Set/Register Confidential Fax Inboxes>. | ||
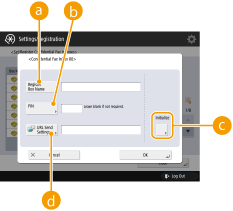
5 | Select the box number  specify each setting, and press <OK>. specify each setting, and press <OK>.  <Register Box Name> <Register Box Name>Register a name for the box.  <PIN> <PIN>Enter the PIN for the box.  <Initialize> <Initialize>Initializes the box.  <URL Send Settings> <URL Send Settings>Enables the URL for a box with documents saved can be sent via e-mail or checked on the Remote UI screen.
|

 (Settings/Registration)
  <Function Settings>
  <Receive/Forward>
  <Common Settings>
  <Set Fax/I-Fax Inbox>
 |
Since there is no way to check a registered PIN, make sure that you write down the PIN that you enter, and keep it in a safe place. |
 (Settings/Registration)
  <Function Settings>
  <Receive/Forward>
  <Common Settings>
  <Set Fax/I-Fax Inbox>
 (Settings/Registration)
  <Function Settings>
  <Receive/Forward>
  <Common Settings>
  <Set Fax/I-Fax Inbox>
 (Settings/Registration)
  <Function Settings>
  <Receive/Forward>
  <Common Settings>
  <Set Fax/I-Fax Inbox>
 1 | Press  (Settings/Registration). (Settings/Registration). | ||
2 | Press <Function Settings>  <Receive/Forward> <Receive/Forward>  <Common Settings>. <Common Settings>. | ||
3 | Press <Set Fax/I-Fax Inbox>. | ||
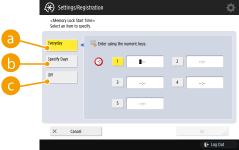
4 | Press <Memory Lock Start Time>, and specify the required settings.   <Everyday> <Everyday>Set the time that memory reception starts.  <Specify Days> <Specify Days>Set the day of the week and time that memory reception starts.  <Off> <Off>Select this when you do not want to set a memory reception start time.
|

 (Settings/Registration)
  <Function Settings>
  <Receive/Forward>
  <Common Settings>
  <Set Fax/I-Fax Inbox>
 1 | Press  (Settings/Registration). (Settings/Registration). | ||
2 | Press <Function Settings>  <Receive/Forward> <Receive/Forward>  <Common Settings>. <Common Settings>. | ||
3 | Press <Set Fax/I-Fax Inbox>. | ||
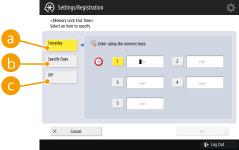
4 | Press <Memory Lock End Time>, and specify the required settings.   <Everyday> <Everyday>Set the time that memory reception ends.  <Specify Days> <Specify Days>Set the day of the week and time that memory reception ends.  <Off> <Off>Select this when you do not want to set a memory reception end time.
|

 (Settings/Registration)
  <Function Settings>
  <Receive/Forward>
  <Common Settings>
  <Set Fax/I-Fax Inbox>
  |
If you delete divided data, it cannot be combined to form a complete document, even if the remaining divided data is received later. Divided data cannot be printed as a regular image unless it has been combined. |
 (Settings/Registration)
  <Function Settings>
  <Receive/Forward>
  <Common Settings>
  <Set Fax/I-Fax Inbox>
 (Settings/Registration)
  <Function Settings>
  <Receive/Forward>
  <Common Settings>
 (Settings/Registration)
  <Function Settings>
  <Receive/Forward>
  <Fax Settings>
 |
To perform a communication using ECM, ECM needs to be set in both the sending machine and this machine. Even when you set ECM, errors can sometimes occur due to a poor telephone line connection. |
 (Settings/Registration)
  <Function Settings>
  <Receive/Forward>
  <Fax Settings>
 (Settings/Registration)
  <Function Settings>
  <Receive/Forward>
  <Fax Settings>
 (Settings/Registration)
  <Function Settings>
  <Receive/Forward>
  <Fax Settings>
 |
Set <Auto Adjust Communication Speed When Using VoIP> to <On> to send and receive faxes more accurately when the line or other party is prone to errors. The communication speed is limited to <14400 bps> or slower, which reduces errors. If <Auto Adjust Communication Speed When Using VoIP> is set to <Off>, the speed returns to the value displayed in <RX Start Speed>. |

 (Settings/Registration)
  <Function Settings>
  <Receive/Forward>
  <Fax Settings>
 |
Priority is given to the subaddress password if the received document is set with a subaddress, even if an RX password is set. |
 |
ITU-T stands for International Telecommunication Union-Telecommunication Standardization Sector, which is the group that makes recommendations toward the standardization of worldwide telecommunications. |