


Setting Screen and Operations for Scanning to Save
When you press <Scan and Store> on the <Home> screen, and then press <Mail Box>, <Advanced Box>, <Network>, or <Memory Media> to scan originals, the following setting screen is displayed.
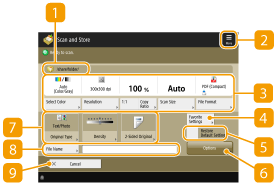
 Save location
For Mail Box, the box number and name is displayed next to the icon.
For Advanced Box/Network/Memory Media, the directory path is displayed next to the icon.
Press this icon to register the current settings in <Favorite Settings> of  or in the Personal button/Shared button. Registering Frequently Used Settings and Destinations as Personal Buttons/Shared Buttons on the <Home> Screen
or in the Personal button/Shared button. Registering Frequently Used Settings and Destinations as Personal Buttons/Shared Buttons on the <Home> Screen Current setting status and setting buttons
Displays setting status such as resolution, magnification, and scanning size. Make sure to confirm the settings in order to scan properly. To change the settings, press the button under the display section. For information on file formats, see System Options.
You can select the color mode for scanning by pressing <Select Color>. You can also select the following scan settings.
Mail Box: <Auto (Color/B&W)>, <Full Color>, <Black & White>
Other than Mail Box: <Auto (Color/Gray)>, <Auto (Color/B&W)>, <Full Color>, <Grayscale>, <Black & White>
Depending on the state of the color original, it may be detected as black and white when scanned, even if you set <Auto (Color/Gray)> or <Auto (Color/B&W)>. To avoid this, set the color mode to <Full Color>.
You can set the copy ratio to 100% by pressing <1:1>.
You can specify the copy ratio to enlarge/reduce the scanning size by pressing <Copy Ratio>.
When the size of the original cannot be detected with <Auto>, or when it is necessary to specify a particular size, press <Scan Size> and specify the size of the original to be scanned.
Set <Resolution> to high when you want to scan the original clearly, and set <Resolution> to low when you want to reduce the file size. You can select the following resolutions.
Other than Mail Box: See "Resolution for Scan" in "Push Scan". Send Functions
For Mail Box, the resolution is fixed to 600 dpi x 600 dpi.
Press <File Format> when you want to convert the scanned data into a digital file such as PDF. You can select the file format to convert to according to your purposes and environment.
<Favorite Settings>
Register frequently used scan settings here in advance to easily recall them when necessary.
 <Restore Default Settings>
Changes scan setting into setting values registered in <Change Default Settings>. <Scan and Store Settings> <Change Default Settings>
 <Options>
Enables you to specify the settings of functions that are not displayed in / . For details about each setting item, see Options.
/. For details about each setting item, see Options.Function setting buttons
Displays the most frequently used buttons. The setting status is displayed on the buttons. To change the settings, press the desired button.
If you press <Original Type>, you can manually select the scanning mode according to the type of originals, such as materials with only letters and magazines with pictures on them.
If you press <Density>, you can adjust the density of the original.
If you press <2-Sided Original>, you can automatically scan both the front and back sides of the original.
 <File Name>
Press to assign a file name for a file when saving.
You cannot use the following characters in a file name: \ / : , * ? " < > |. Also, you cannot use a . (period) or space for the first or last character of a file name.
If you do not specify anything, the saved date and time is automatically assigned as a file name. For example, if a file is saved as a JPEG at 1:05:12 p.m. on October 30, 2015, its name will be "20151030130512.jpg."
If a file name is too long, the string (path) indicating the file location may exceed the maximum of 256 characters, causing the file to not be specified.
If you enter a file name that already exists in the save location, (1) to (9) is added to the file name, for example, "a(1).pdf" (except for the files in the Mail Box).
If <Divide into Pages> is selected when specifying the file format, a three-digit page number is added to the end of a file name. For a file with the name "a.pdf," for example, the file is divided into "a_001.pdf," "a_002.pdf," and "a_003.pdf" when saved.
 <Cancel>
Cancels scan settings and returns to the file selection screen.
|
The number of pages remaining is displayed if a page limit is set with Department ID Management. For information on setting Department ID Management and page limits, see Configuring the Department ID Management Settings. 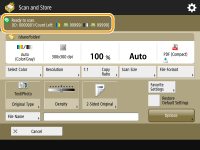 |