
Side Guide Plate Fixing Bracket-A
If you attach this to the POD Deck Lite-C, paper feed deviation can be controlled to achieve higher printing precision.
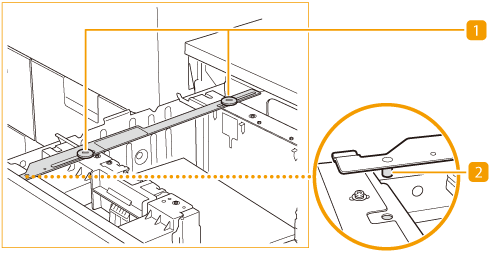
 Coin screws
Use these screws to fix the Side Guide Plate Fixing Bracket-A to the POD Deck Lite-C.
 Positioning pin
When attaching the registration plate to the POD Deck Lite-C, insert this pin into the matching hole.
Using the Side Guide Plate Fixing Bracket-A to Load Paper in the POD Deck Lite-C
 |
To use the Side Guide Plate Fixing Bracket-A, the POD Deck Lite-C is required. For the precautions and detailed procedure for use of the POD Deck Lite-C, see POD Deck Lite-C/Paper Deck Unit-E. When changing the paper size to use with the POD Deck Lite-C, you must change the paper size registration and replace the paper size label to use on the media sheet. For details, see Changing the Paper Size for the POD Deck Lite-C. You can use the Side Guide Plate Fixing Bracket-A when loading paper of size LTRR/A4R or larger. |
1
Open the paper deck.
1 | Press the open button. |
2 | Open the paper deck. The inside lifter automatically descends to the paper loading position. 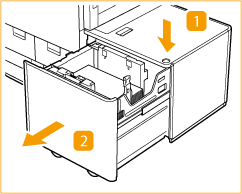 |

Depending on the use conditions, it may take some time for the paper deck to open after pressing the open button.
2
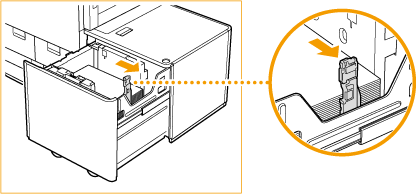
Hold the lever and slide the rear edge retainer until it does not catch on the paper to load.
3
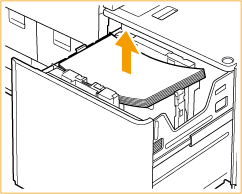
Remove all of the loaded paper.
4
After closing the paper deck, press the open button to open the paper deck again.
Closing and opening the paper deck returns the lifter to the position for paper loading.
5
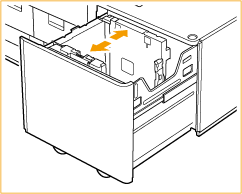
Squeeze the lever. Without releasing the lever, slide the outer size change plate and inner size change plate until it does not catch on the paper to set.
6
Load Paper.
1 | Prepare a paper stack of approximately 13/16" (20 mm) in height. |
2 | Load the paper stack against the left wall of the paper deck. 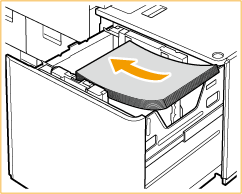 |
7
Slide the outer size change plate and inner size change plate to align them with the desired paper size.
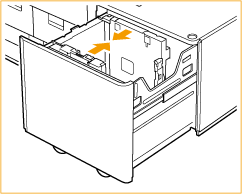

When sliding the size change plates, make sure that the paper stack stays in contact with the left wall of the paper deck.
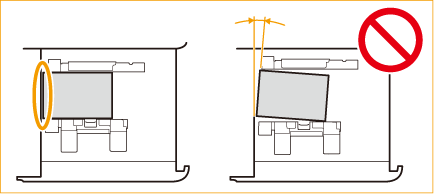
Put your hand on the paper to check whether it lies entirely flat. If the paper does not lie entirely flat, the distance between the size change plates is too small. Readjust the position of the plate(s).
8
Put the Side Guide Plate Fixing Bracket-A on the paper deck by inserting the positioning pin into the matching hole.
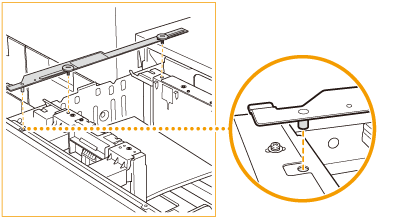
9
Position yourself to the left of the paper deck that is pulled out, and hold one of the size change plates to prevent it from moving. Tighten the coin screw on the left side ( ) first, and then that on the right side (
 ).
).
 ) first, and then that on the right side (
 ).
).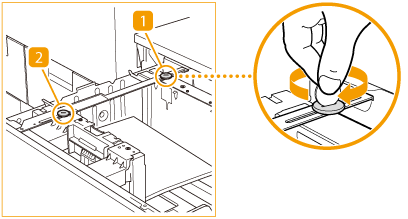

Be sure to tighten the coin screw on the left side ( ) first. If you tighten the coin screw on the right side (
 ) first, the size change plate may become inclined.
 ) first. If you tighten the coin screw on the right side (
 ) first, the size change plate may become inclined.
Be sure to fully tighten the coin screws. If they are tightened obliquely or loosely, the printing precision will be lower.
After tightening the two coin screws, check that the paper stack is in close contact against the left wall of the paper deck.
To achieve a still higher printing precision
1 | Check that the paper stack is in contact with the ridges on the left wall of the paper deck. Check that it is in contact with two or more of the ridges. 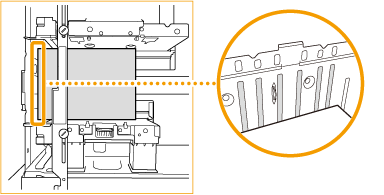 |
2 | Check that the paper stack is in contact with the ridges on the inner and outer size change plates. Check that it is in contact with one or more of the ridges on each of the inner and outer side change plates. 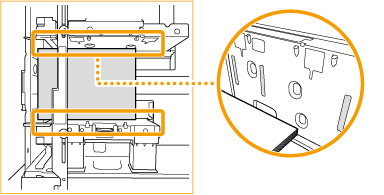 |
3 | Where there is a clearance between the paper stack and a ridge on the outer size change plate (clearance (  ) in the figure), check that it is in the range of 0.01" to 0.02" (0.1 to 0.5 mm) (roughly corresponding to the thickness of one to five sheets of plain paper of 20 lb bond (80 g/m²)). ) in the figure), check that it is in the range of 0.01" to 0.02" (0.1 to 0.5 mm) (roughly corresponding to the thickness of one to five sheets of plain paper of 20 lb bond (80 g/m²)).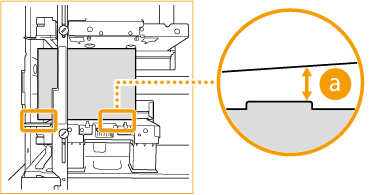 If the clearance (  ) exceeds 0.02" (0.5 mm), readjust the distance between the size change plates by loosening the coin screw on the near side, and then retighten the screw while holding the outer size change plate to prevent it from moving. ) exceeds 0.02" (0.5 mm), readjust the distance between the size change plates by loosening the coin screw on the near side, and then retighten the screw while holding the outer size change plate to prevent it from moving.If the clearance (  ) is less than 0.01" (0.1 mm), readjust the distance between the size change plates by loosening the coin screw on the near side, and then retighten the screw while holding the outer size change plate to prevent it from moving. ) is less than 0.01" (0.1 mm), readjust the distance between the size change plates by loosening the coin screw on the near side, and then retighten the screw while holding the outer size change plate to prevent it from moving.If you have readjusted the distance between the size change plates, check whether the paper stack is now in contact with two or more of the ridges on the left wall of the paper deck. |
10
Load all remaining paper into the paper deck.
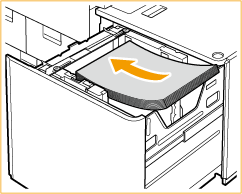

When loading paper, make sure that the height of the paper stack does not exceed 13/16" (20 mm). If the height of the paper stack exceeds 13/16" (20 mm), the edges of the paper stack may become curled or creased, and poor print quality may result.
Make sure that the additionally loaded paper stack rests neatly on the previously loaded stack.
11
Slide the rear edge retainer to align it with the size of the paper loaded.
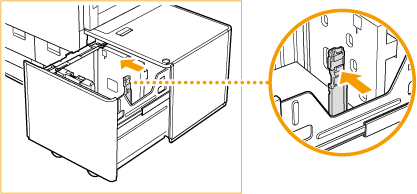

If the rear edge retainer is not aligned properly, paper may become jammed, the quality of the image may be degraded, or the inside of the machine may become dirty. Make sure to load paper with the rear edge retainer properly aligned with the paper size marks on the top and base of the paper deck.
12
Gently push the paper deck back into the machine until it clicks into place in the closed position.
The inside lifter automatically ascends, and prepares the paper deck for printing.