Configuring the IPSec Settings
By using IPSec, you can prevent third parties from intercepting or tampering with IP packets transported over the IP network. Because IPSec adds security functions to IP, a basic protocol suite used for the Internet, it can provide security that is independent of applications or network configuration. To perform IPSec communication with this machine, you must configure settings such as the application parameters and the algorithm for authentication and encryption. Administrator or NetworkAdmin privileges are required in order to configure these settings.

 |
Communication modeThis machine only supports transport mode for IPSec communication. As a result, authentication and encryption is only applied to the data portions of IP packets. Key exchange protocolThis machine supports Internet Key Exchange version 1 (IKEv1) for exchanging keys based on the Internet Security Association and Key Management Protocol (ISAKMP). For the authentication method, set either the pre-shared key method or the digital signature method. When setting the pre-shared key method, you need to decide on a passphrase (pre-shared key) in advance, which is used between the machine and the IPSec communication peer. When setting the digital signature method, use a CA certificate and a PKCS#12 format key and certificate to perform mutual authentication between the machine and the IPSec communication peer. For more information on registering new CA certificates or keys/certificates, see Registering a Key and Certificate for Network Communication. Note that SNTP must be configured for the machine before it uses this method. Making SNTP Settings |
 |
Regardless of the setting of <Format Encryption Method to FIPS 140-2> for IPSec communication, an encryption module which has already obtained FIPS140-2 certification will be used. In order to make IPSec communication comply with FIPS 140-2, you must set the key length of both DH and RSA for IPSec communication to 2048-bit or longer in the network environment that the machine belongs to. Only the key length for DH can be specified from the machine. Take note when configuring your environment, as there are no settings for RSA in the machine. You can register up to 10 security policies. |
1
Press  (Settings/Registration).
 (Settings/Registration).
2
Press <Preferences>  <Network>
  <TCP/IP Settings>
  <IPSec Settings>.
 <Network>
  <TCP/IP Settings>
  <IPSec Settings>.
3
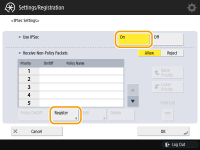
Set <Use IPSec> to <On>, and press <Register>.

4
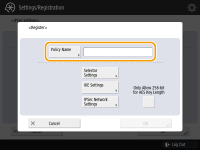
Specify a name for the policy.
Press <Policy Name>, enter the name, and press <OK>.

Canon multifunction printers support two key lengths for the AES encryption method: 128 bit and 256 bit. To restrict the key length to 256 bit and meet CC authentication standards, set <Only Allow 256-bit for AES Key Length> to <On>.
5
Configure the IPSec application parameters.
1 | Press <Selector Settings>. | ||||||||||||||
2 | Specify the IP address to apply the IPSec policy to. Specify the IP address of this machine in <Local Address>, and specify the IP address of the communication peer in <Remote Address>. 
| ||||||||||||||
3 | Specify the port to apply IPSec to. Press <Specify by Port Number> to use port numbers when specifying the ports that IPSec applies to. Select <All Ports> to apply IPSec to all port numbers. To apply IPSec to a specific port number, press <Single Port> and enter the port number. After specifying the ports, press <OK>. Specify the port of this machine in <Local Port>, and specify the port of the communication peer in <Remote Port>.  Press <Specify by Service Name> to use service names when specifying the ports that IPSec applies to. Select the service in the list, press <Service On/Off> to set it to <On>, and press <OK>.  | ||||||||||||||
4 | Press <OK>. |
6
Configure the authentication and encryption settings.
1 | Press <IKE Settings>. | ||||||||||
2 | Configure the necessary settings.   <IKE Mode> <IKE Mode>Select the operation mode for the key exchange protocol. When the operation mode is set to <Main>, security is enhanced because the IKE session itself is encrypted, but a higher burden is placed on the communication compared to <Aggressive>, which does not perform encryption.  <Validity> <Validity>Set the expiration period of the generated IKE SA.  <Authentication Method> <Authentication Method>Select one of the authentication methods described below.
 <Authentication/Encryption Algorithm> <Authentication/Encryption Algorithm>Select either <Auto> or <Manual Settings> to set how to specify the authentication and encryption algorithm for IKE phase 1. If you select <Auto>, an algorithm that can be used by both this machine and the communication peer is set automatically. If you want to specify a particular algorithm, select <Manual Settings> and configure the settings below.
| ||||||||||
3 | Press <OK>. |
 |
When <IKE Mode> is set to <Main> on the <IKE Settings> screen and <Authentication Method> is set to <Pre-Shared Key Method>, the following restrictions apply when registering multiple security policies. Pre-shared key method key: when specifying multiple remote IP addresses to which a security policy is to be applied, all shared keys for that security policy are identical (this does not apply when a single address is specified). Priority: when specifying multiple remote IP addresses to which a security policy is to be applied, the priority of that security policy is below security policies for which a single address is specified. |
7
Configure the IPSec communication settings.
1 | Press <IPSec Network Settings>. | ||||||
2 | Configure the necessary settings.   <Validity> <Validity>Set the expiration period of the generated IPSec SA. Make sure to set either <Time> or <Size>. If you set both, the setting with the value that is reached first is applied.  <PFS> <PFS>If you set the Perfect Forward Secrecy (PFS) function to <On>, the secrecy of the encryption key is increased, but the communication speed is slower. In addition, the PFS function must be enabled on the communication peer device.  <Authentication/Encryption Algorithm> <Authentication/Encryption Algorithm>Select either <Auto> or <Manual Settings> to set how to specify the authentication and encryption algorithm for IKE phase 2. If you select <Auto>, the ESP authentication and encryption algorithm is set automatically. If you want to specify a particular authentication method, press <Manual Settings> and select one of the authentication methods below.
| ||||||
3 | Press <OK>  <OK>. <OK>. |
8
Enable the registered policies and check the order of priority.
Select the registered policies from the list, and press <Policy On/Off> to turn them <On>.
Policies are applied in the order that they are listed, starting at the top. If you want to change the order of priority, select a policy in the list and press <Raise Priority> or <Lower Priority>.
If you do not want to send or receive packets that do not correspond to the policies, select <Reject> for <Receive Non-Policy Packets>.
9
Press <OK>.
10
Press  (Settings/Registration)
 (Settings/Registration)
  <Apply Set. Changes>
  <Yes>.
 (Settings/Registration)
 (Settings/Registration)
  <Apply Set. Changes>
  <Yes>.
 |
Managing IPSec policiesYou can edit policies on the screen displayed in step 3. To edit the details of a policy, select the policy in the list and press <Edit>. To disable a policy, select the policy in the list and press <Policy On/Off>. To delete a policy, select the policy in the list and press <Delete>  <Yes>. <Yes>. |