LDAP Server Authentication
If your system has an LDAP server installed, you can ensure that LDAP server authentication is carried out when the send function is used. This enables you to prevent unauthorized use by third parties and information disclosure. Once the authorization settings are enabled, the Authorized Send screen appears when the fax or scan function is used and operation can only continue if it is correctly authorized by the LDAP server. Use the settings described here to configure LDAP server authentication. For more information about registering the server to be used for authentication, see Registering LDAP Servers.
 |
For more information about the basic operations to be performed when setting the machine from the Remote UI, see Setting Up Menu Options from Remote UI. |
1
Start the Remote UI and log in to System Manager Mode. Starting Remote UI
2
Click [Settings/Registration] on the Portal page. Remote UI Screen
3
Select [TX Settings]  [Authentication Settings for Send Function].
 [Authentication Settings for Send Function].
4
Click [Edit].
5
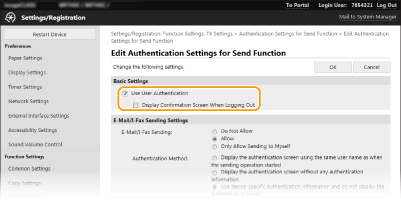
Select the [Use User Authentication] check box and select whether a confirmation screen is displayed at logout.

[Use User Authentication]
Select the check box to display the Authorized Send login screen when the fax or scan function is used (LDAP server authentication).
Select the check box to display the Authorized Send login screen when the fax or scan function is used (LDAP server authentication).
[Display Confirmation Screen When Logging Out]
Select the check box to display a screen that allows you to selectively log out when you are logged on for both Authorized Send and Department ID Management. If you clear this check box, no selection screen is displayed when you log out and you are logged out from both Authorized Send and Department ID Management.
Select the check box to display a screen that allows you to selectively log out when you are logged on for both Authorized Send and Department ID Management. If you clear this check box, no selection screen is displayed when you log out and you are logged out from both Authorized Send and Department ID Management.
6
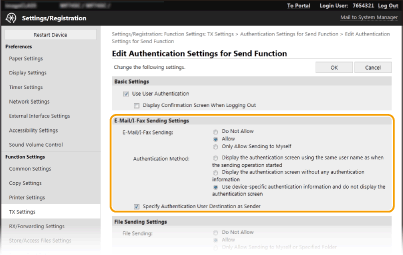
Configure the settings for sending e-mail/I-Faxes.

[E-Mail/I-Fax Sending]
Select whether to allow sending e-mail and I-Faxes.
Select whether to allow sending e-mail and I-Faxes.
[Do Not Allow] | Blocks sending e-mail and I-Faxes. <E-Mail> and <I-Fax> in the scan function can no longer be used. |
[Allow] | Permits outgoing e-mail and I-Faxes. |
[Only Allow Sending to Myself] | Blocks all outgoing e-mail and I-Faxes other than those to users with authorized e-mail addresses. The e-mail addresses of authorized users must be registered on the LDAP server. |
[Authentication Method]
When [Allow] or [Only Allow Sending to Myself] is selected in [E-Mail/I-Fax Sending], this allows you to specify whether an authentication screen is shown on the SMTP server when e-mail is sent.
When [Allow] or [Only Allow Sending to Myself] is selected in [E-Mail/I-Fax Sending], this allows you to specify whether an authentication screen is shown on the SMTP server when e-mail is sent.
[Display the authentication screen using the same user name as when the sending operation started] | Displays the authentication screen showing the same user name and password entered in the Authorized Send login screen. |
[Display the authentication screen without any authentication information] | Displays the authentication screen with the user name and password fields blank. |
[Use device-specific authentication information and do not display the authentication screen] | No authentication screen is displayed when e-mail or I-Faxes are sent. Authorization on the SMTP server is carried out using the user name and password set in [E-Mail/I-Fax Settings] Configuring E-Mail/I-Fax Communication Settings. |
[Specify Authentication User Destination as Sender]
Select the check box when the e-mail address of an authorized user will be set as the sender. The e-mail addresses of authorized users must be registered on the LDAP server. If you clear this check box, the e-mail address set in the [E-Mail/I-Fax Settings] is set as the sender.
Select the check box when the e-mail address of an authorized user will be set as the sender. The e-mail addresses of authorized users must be registered on the LDAP server. If you clear this check box, the e-mail address set in the [E-Mail/I-Fax Settings] is set as the sender.
7
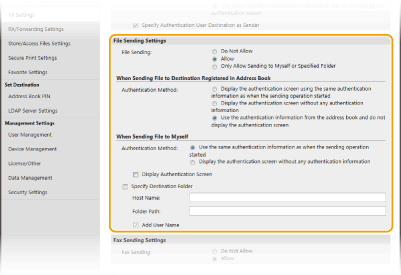
Configure the file transfer settings (for saving to shared folders and FTP servers).

[File Sending]
Select whether to allow saving to shared folders and FTP servers.
Select whether to allow saving to shared folders and FTP servers.
[Do Not Allow] | Blocks saving to shared folders and FTP servers. <File> in the scan function can no longer be used. |
[Allow] | Saving to shared folders and FTP servers is not blocked. |
[Only Allow Sending to Myself or Specified Folder] | Blocks all saving to shared folders and FTP servers other than specified folders. The data is saved to folders registered on the LDAP server or to the folder specified in [Specify Destination Folder]. |
 When [Allow] is specified in [File Sending]
[Authentication Method]
Allows you to specify whether an authentication screen is shown on the server when sending.
Allows you to specify whether an authentication screen is shown on the server when sending.
[Display the authentication screen using the same authentication information as when the sending operation started] | Displays the authentication screen showing the same user name and password entered in the Authorized Send login screen. |
[Display the authentication screen without any authentication information] | Displays the authentication screen with the user name and password fields blank. |
[Use the authentication information from the address book and do not display the authentication screen] | No authentication screen is displayed when sending. Authentication is carried out on the server using the user name and password set in the Address Book. |
 When [Only Allow Sending to Myself or Specified Folder] is specified in [File Sending]
[Authentication Method]
Allows you to specify whether an authentication screen is shown on the server when sending.
Allows you to specify whether an authentication screen is shown on the server when sending.
[Use the same authentication information as when the sending operation started] | Carries out authorization on the server using the user name and password entered in the Authorized Send login screen. Selecting the [Display Authentication Screen] check box displays the authentication screen with this user name and password already entered when you send the data. |
[Display the authentication screen without any authentication information] | Displays the authentication screen with the user name and password fields blank. |
[Specify Destination Folder]
Selecting this check box allows you to specify the folder where the data is saved. If the check box is not selected, the save destination is set based on authorized user information registered on the LDAP server.
Selecting this check box allows you to specify the folder where the data is saved. If the check box is not selected, the save destination is set based on authorized user information registered on the LDAP server.
[Host Name] | Enter a host name for the shared folder or FTP server. |
[Folder Path] | Enter a path name for the save destination folder (excluding the host name). When the [Add User Name] check box is selected, the user name used for authentication on the LDAP server is added to the path. |
8
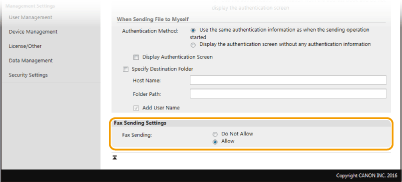
Configure the settings for sending faxes.

[Fax Sending]
Select whether to allow sending faxes. [Do Not Allow] prevents the user from sending faxes from the machine.
9
Click [OK].