Specifying E-Mail Settings
 | When attaching scanned originals to an e-mail, you can specify the subject, message, reply-to address, and priority for the e-mail before sending it. |
1
Place the original(s). Placing Originals
2
Select <Scan> in the Home screen. Home Screen
When the login screen appears, enter your user name and password and set up the authentication server. Logging in to Authorized Send.
3
Select <E-Mail> in the Scan Basic Features screen. Scan Basic Features Screen
4
Specify a destination, and configure the scan settings as necessary. Basic Operations for Scanning Originals
5
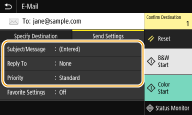
Specify the subject, message, reply-to address, and priority for the e-mail.

 To specify subject/message
1 | Select <Subject/Message> in the <Send Settings> tab. |
2 | Select <Subject>. |
3 | Enter the subject, and select <Apply>. On how to enter text, see Entering Text. |
4 | Select <Message>. |
5 | Enter the message, and select <Apply>. |
6 | Select <Apply>. |
 To specify reply-to address
Specify the reply-to address when you want to notify the recipient of an e-mail address different from that of the machine as the reply-to address. Select the target reply-to address from the destinations registered in the Address Book, and specify it. If the destination has not been registered in the Address Book, see Registering Destinations.
1 | Select <Reply To> in the <Send Settings> tab. |
2 | Select <Specify from Address Book>. |
3 | Select the check box for the desired reply-to address, and select <Apply>. |
 To specify priority
1 | Select <Priority> in the <Send Settings> tab. |
2 | Select a priority level. |
6
Select <Start>.
If the <Confirm Destination> screen is displayed, check whether the destination is correct, and then select <Start Scanning>.
Scanning of the original starts.
If you want to cancel, select <Cancel>  <Yes>. Canceling Sending Documents
 <Yes>. Canceling Sending Documents
 When placing originals in the feeder in step 1
When scanning is complete, the e-mails are sent.
 When placing originals on the platen glass in step 1
When scanning is complete, follow the procedures below (except if you selected JPEG as a file format).
1 | If there are additional pages of originals to be scanned, place the next original on the platen glass, and select <Scan Next>. Repeat this step until you finish scanning all of the pages. When there is only one page to be scanned, proceed to the next step. |
2 | Select <Start Sending>. The e-mails are sent. |

If the <SMTP Authentication> screen is displayed
Enter the user name and password, and select <Apply>.
 |
If you always want to scan with the same settings: Changing the Default Settings for Functions If you want to register a combination of settings to use when needed: Registering Frequently Used Settings If you want to specify the e-mail sender name: <Register Unit Name> |