Saving Documents in Memory Media
Follow the procedures below to convert scanned documents into a file format commonly supported by a computer to save in memory media. This method is convenient when you need to move files to a computer not connected to a network.
 |
You cannot store documents in the memory media if there is no free space available. |
1
Set the original. Placing Originals
2
Press <Scan and Store>. <Home> Screen
If <Select Option When Connecting Memory Media> is set to <On>, a shortcut to <Scan and Store in Memory Media> is displayed when you insert memory media. Press <Scan and Store in Memory Media> and proceed to step 4. <Select Option When Connecting Memory Media> Inserting a memory media
3
Press <Memory Media>.
4
Select the desired memory media.
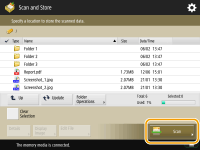
For information on the items on the screen and instructions on how to use them, see Working with Files and Folders in Memory Media.
5
Display the save location and press <Scan>.

6
Specify the scan settings as necessary.
For scan settings, see Setting Screen and Operations for Scanning to Save.
7
Press  (Start).
 (Start).
Originals are scanned and saved as files.
To cancel scanning, press <Cancel> or  (Stop)
  <Yes>.
 (Stop)
  <Yes>.
 When <Press the [Start] key to scan the next original.> is displayed
Place the next original to scan and press  (Start). After scanning all of the originals, press <Start Storing> to save the file.
 (Start). After scanning all of the originals, press <Start Storing> to save the file.
To check the result of saving, press  (Status Monitor)
  <Store>
  <Job Log>. If <NG> is displayed, the file is not saved successfully. Try the operation again.
 (Status Monitor)
  <Store>
  <Job Log>. If <NG> is displayed, the file is not saved successfully. Try the operation again.