Primary Fixing Assembly
This section describes how to clear a paper jam which occurs in the primary fixing assembly. The location of the primary fixing assembly is indicated in the following illustration.

NOTE |
The following illustration indicates the location of the paper jam. Please refer to it to remove the jammed paper.  |
Follow the procedure described below, while referring to the location of the paper jam and the directions that appear on the touch panel display, to remove the jammed paper.
1.
Open the front cover of the fixing station.
Open the right side of the front cover first.

2.
Open the guide (C-A1).

 CAUTION CAUTION |
When opening the guide, be careful not to get your fingers caught, as this may result in personal injury. |
3.
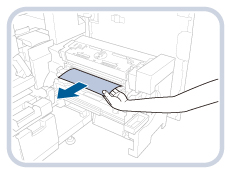
Remove any jammed paper.

IMPORTANT |
If large, thick paper has jammed, remove it by following the steps below. Removing without following the steps below may scratch the fixing part causing print stains. Open the C-B1 and C-B2 guides, and press lever C-B4 down. 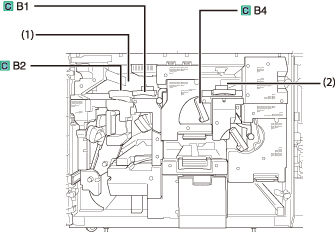 If the paper is in position (1), it can be removed. Move the paper from (2) slowly to (1) by hand, and remove. Close C-B1 and C-B2 guides and return the C-B4 to its original position. Continue the operation from step 4. |
4.
Close the guide (C-A1).

| CAUTION |
When closing the guide, be careful not to get your fingers caught, as this may result in personal injury. |
5.
Open the guide (C-A2).

| CAUTION |
When opening the guide, be careful not to get your fingers caught, as this may result in personal injury. |
6.
Remove the any remaining paper.

7.
Return the guide (C-A2) until it clicks into place.

| CAUTION |
When closing the guide, be careful not to get your fingers caught, as this may result in personal injury. |
8.
Lift up the guide (C-A3) and push it up into the machine.

| CAUTION |
When opening the guide, be careful not to get your fingers caught, as this may result in personal injury. |
9.
Remove any jammed paper.

10.
Lift up the guide (C-A3) slightly to close it.

| CAUTION |
When closing the guide, be careful not to get your fingers caught, as this may result in personal injury. |
11.
Tilt the lever (C-A4) to the left.

12.
Pull out the primary fixing unit until it stops.

| CAUTION |
The parts located around the fixing unit are subject to high-temperatures. When removing jammed paper, take care not to touch anything in this area, except for the cover. |
13.
Remove any jammed paper.
14.
Open the cover (C-A5).

15.
Remove any jammed paper.

| CAUTION |
The parts located around the fixing unit are subject to high-temperatures. When removing jammed paper, take care not to touch anything in this area, except for the cover. |
16.
Close the cover (C-A5) until it clicks into place.

| CAUTION |
When closing the cover, be careful not to get your fingers caught, as this may result in personal injury. |
17.
Close the primary fixing unit until it clicks into place.

18.
Return the lever (C-A4) to its original position.

19.
Close the front cover of the fixing station.
Close the left side of the front cover first.

| CAUTION |
When closing the front cover, be careful not to get your fingers caught, as this may result in personal injury. |
20.
Follow the instructions on the touch panel display.
NOTE |
The screen indicating the directions on how to clear the paper jam is displayed repeatedly until the paper jam is cleared. (See "Clearing Paper Jams.") |