Clearing Paper Jam in the Main Station and Sub Station (Inside the Main Unit)

(1) Sub Station (Primary Fixing Unit, Secondary Fixing Unit)
NOTE |
If it is difficult to remove the jammed paper, for reasons such as the paper not being visible, follow the instructions under (2), where you are closer to the paper feeding section. |
Follow the procedure described below, while referring to the location of the paper jam and the directions that appear on the touch panel display, to remove the jammed paper.
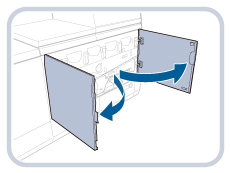
1.
Open the front cover of the fixing station.
Open the right side of the front cover first.

2.
Open the guide (C-B1).
CAUTION |
When opening the guide, be careful not to get your fingers caught, as this may result in personal injury. |
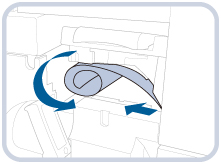
3.
Grip the lever to open the guide (C-B2).
CAUTION |
When opening the guide, be careful not to get your fingers caught, as this may result in personal injury. |
4.
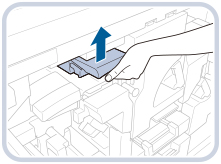
Pull the jammed paper until its tail edge becomes visible in the paper feeding direction, and roll it in the space made available by opening the C-B2 guide.

5.
Remove the rolled paper.
6.
Lift up the guide (C-B2) and close it.
CAUTION |
When closing the guide, be careful not to get your fingers caught, as this may result in personal injury. |
7.
Close the guide (C-B1).
CAUTION |
When closing the guide, be careful not to get your fingers caught, as this may result in personal injury. |
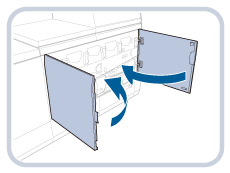
8.
Close the front cover of the fixing station.
Close the left side of the front cover first.

9.
Follow the instructions on the touch panel display.
NOTE |
If there is not enough space for pulling out the paper, do so while holding the C-B2 guide lifted up. Lifting up the C-B2 guide can cause it to unlock, and may result in your hand getting caught. While following the instructions, be sure to support the lifted guide with your hand. If it is difficult to remove the rolled paper, pull it out together with the primary fixing unit to remove. |
(2) Sub Station (Primary Fixing Unit, Secondary Fixing Unit) and Main Station
NOTE |
If it is difficult to remove the jammed paper, for reasons such as the paper not being visible, follow the instructions under (3), where you are closer to the paper feeding section. Paper jam in this location occurs only when thick paper is delivered through the reverse unit. |
Follow the procedure described below, while referring to the location of the paper jam and the directions that appear on the touch panel display, to remove the jammed paper.
1.
Open the front cover of the fixing station.
Open the right side of the front cover first.
2.
Open the guide (C-A1).

CAUTION |
When opening the guide, be careful not to get your fingers caught, as this may result in personal injury. |
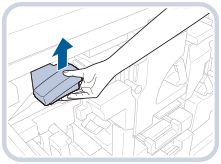
3.
Pull the jammed paper until its tail edge becomes visible in the paper feeding direction, and roll it in the space made available by opening the C-A1 guide.
4.
Close the guide (C-A1).

CAUTION |
When closing the guide, be careful not to get your fingers caught, as this may result in personal injury. |
5.
Close the front cover of the fixing station.
Close the left side of the front cover first.
CAUTION |
When closing the front cover, be careful not to get your fingers caught, as this may result in personal injury. |
6.
Follow the instructions on the touch panel display.
NOTE |
If it is difficult to remove the rolled paper, pull it out together with the secondary fixing unit to remove.  |
(3) Main Station and Sub Station (Primary Fixing Unit)
Follow the procedure described below, while referring to the location of the paper jam and the directions that appear on the touch panel display, to remove the jammed paper.
1.
Open the front cover of the marking engine.
Open the right side of the front cover first.
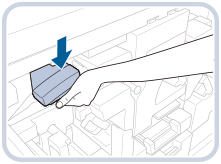
2.
Pull the jammed paper until its lead edge becomes visible on the opposite side of the paper feeding direction, and roll it in the B-F section.

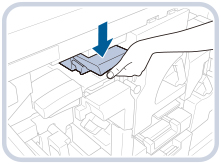
3.
Remove the rolled paper.
4.
Close the front cover of the marking engine.
Close the left side of the front cover first.
CAUTION |
When closing the front cover, be careful not to get your fingers caught, as this may result in personal injury. |
5.
Follow the instructions on the touch panel display.
NOTE |
If the paper is still in the paper delivery unit, pull out the delivery unit while holding the rolled paper, and then remove the paper. Pulling out the delivery unit without holding the rolled paper may cause the paper to tear and leave pieces of paper inside the machine.  |