User's Guide (Product Manual)
Contents
Search
Read on smartphone
Previous
Next
Expand all
Collapse all
Portal Top
Manual top
Setting Up
Preparations Required Before Use
Preventing Unauthorized Access
Setting up Using the Setup Guide
Logging in as an Administrator
Setting the Date/Time
Setting up the Network Environment
Canceling the Network Setting Lock
Selecting Wired LAN or Wireless LAN
Connecting to a Wired LAN
Connecting to a Wireless LAN
Setting Up the Connection Using WPS Push Button Mode
Setting Up the Connection Using WPS PIN Code Mode
Setting Up Connection by Selecting a Wireless Router
Setting Up a Connection by Specifying Detailed Settings
Checking the SSID and Network Key
Setting an IP Address
Setting an IPv4 Address
Setting an IPv6 Address
Setting the IPv4 Address of the Sub Line
Adapting to the Network Environment
Making Ethernet Settings
Setting the Wait Time When Connecting to a Network
Making DNS Settings
Making SMB Settings
Making WINS Settings
Registering the LDAP Server
Monitoring and Controlling via SNMP
Other Network Settings
Installing Drivers
Fax Line Settings
Setting E-mail/I-Fax Communication
Connecting to the Other Devices
Basic Operations
Parts and Their Functions
Front Side
Interior
Feeder
Multi-Purpose Tray
Paper Drawer
Control Panel
Turning ON the Machine
Turning OFF the Machine
Placing Originals
Loading Paper
Basic Paper Loading Method
Loading Envelopes
Loading Preprinted Paper
Using the Touch Panel Display
Basic Screens on the Touch Panel Display
Items Displayed on the <Home> Screen
Items Displayed in the Timeline
Basic Operation of the Touch Panel Display
Entering Characters
Logging into the Machine
List of Items That Can Be Personalized
Specifying Paper Size and Type
Specifying Paper Size and Type in the Paper Drawer
Specifying Paper Size and Type in the Multi-purpose Tray
Registering Frequently Used Paper Size and Type for the Multi-purpose Tray
Fixing the Paper Size and Type to Use with the Multi-Purpose Tray
Registering Free Size Paper (Custom Size Paper)
Automatically Selecting the Appropriate Paper Source for a Specific Function
Customizing the Touch Panel Display
Customizing the <Home> Screen
Creating a Shortcut for a Frequently Used Function
Registering a Combination of Frequently Used Functions
Customizing the Basic Features Screen
Registering Frequently Used Settings and Destinations as Personal Buttons/Shared Buttons on the <Home> Screen
Registering Personal Buttons/Shared Buttons
Switching the Displayed Language
Registering Shortcuts for Frequently Used Settings/Registered Items
Customizing the Screen Display Appearance and the Operational Conditions
Canceling Send/Print Jobs
Setting Sounds
Entering Sleep Mode
Registering Destinations
About the Address Books of the Machine
Registering Destinations in the Address Book
Registering Multiple Destinations as a Group
Editing the Registered Destinations in the Address Book
Registering a Destination in a One-Touch Button
Registering a Group in a One-Touch Button
Editing the Registered Destinations in One-Touch Buttons
Copying
Copy Basic Features Screen
Basic Copy Operations
Cancelling Copying
Enhancing and Adjusting Copy Quality
Selecting the Type of Original for Copying
Adjusting Sharpness for Copying (Sharpness)
Erasing Dark Borders When Copying (Erase Frame)
Copying Efficiently
Copying Multiple Originals onto One Sheet (N on 1)
Copying a Facing Page Original as Two Separate Pages
Copying Different Size Originals Together (Different Size Originals)
Copying Separately Scanned Originals Together (Job Build)
Checking the Copy Results
Copying Immediately by Interrupting Other Jobs
Functions Useful for Making and Managing Material
Finishing by Collating/Grouping
Other Finishing Functions
Making Booklets
Making Booklets (Booklet Copying)
Setting Binding Margins
Useful Copy Functions
Copying Free Size Originals
Shifting the Image
Notifying You of the Completion of Copying by E-Mail
Making ID Card Copies
Reducing Copying Operations
Recalling Previously Used Copy Settings (Previous Settings)
Recalling Settings
Restrictions Regarding the Combination of Functions
Faxing
Fax Basic Features Screen
Basic Operations for Sending Faxes
Canceling Sending Faxes
Receiving Faxes
Sending Faxes Successfully
Checking Scanned Images Before Sending (Preview)
Checking the Connection to the Recipient Before Sending (Direct Send)
Sending Faxes Manually (Manual Sending)
Notifying You by E-Mail of the Completion of Sending
Simplifying Sending Operations
Sending Different Size Originals Together (Different Size Originals)
Sending Separately Scanned Documents Together (Job Build)
Recalling Previously Used Settings for Sending (Previous Settings)
Useful Functions When Sending
Sending at a Specified Time
Saving a Copy of a Sent Document
Various Receiving Methods
Saving Received Documents in the Machine (Memory Reception)
Keeping Received Documents Private
Forwarding Received Documents Automatically
Checking Status and Log for Sent and Received Documents
Sending Faxes from Your Computer (PC Fax)
Sending PC Faxes
Using Internet Faxes (I-Fax)
Sending I-Faxes
Receiving I-Faxes
Using Remote Faxes
Printing
Printing From a Computer
Canceling Printing
Checking the Printing Status and History
Advanced Functions for Printing
Printing Documents Retained in the Machine (Forced Hold Printing)
Printing at a Specified Time (Scheduled Printing)
Various Printing Methods
Directly Printing Files without Opening Them
Printing Using a Virtual Printer
Printing From Memory Media (Media Print)
Scanning
Scan Basic Features Screen
Basic Operations for Scanning Originals
Checking Status and Log for Scanned Documents
Scanning Clearly
Adjusting Image Quality
Adjusting Density
Adjusting Sharpness When Scanning (Sharpness)
Erasing Dark Borders When Scanning (Erase Frame)
Scanning Efficiently
Sending/Saving Different Size Originals Together (Different Size Originals)
Scanning a Facing Page Original and Storing/Sending it as Two Separate Pages
Sending/Saving Separately Scanned Documents Together (Job Build)
Useful Scanning Functions
Checking Scanned Originals Before Sending/Saving (Preview)
Sending/Saving at a Specified Time
Notifying You by E-Mail of the Completion of Sending/Saving
Scanning with the OCR Function
Enhancing the Security of Electronic Files
Recalling Previously Used Settings for Sending/Saving (Previous Settings)
Setting a File Name
Specifying E-Mail Settings
Using Your Computer to Scan (Remote Scan) (Windows)
Using Color Network ScanGear 2
Scanning Originals from an Application
Using WSD
Scanning Originals Using WSD (WSD Scan)
Using Storage Space
Working with Other Devices
Saving Documents in Other Devices
Working with Files and Folders in Other Devices
Printing Files in Other Devices
Working with Data in Memory Media
Saving Documents in Memory Media
Working with Files and Folders in Memory Media
Printing Files in Memory Media
Setting Screen and Operations for Scanning to Save
Setting Screen and Operations for Printing Saved Files
Storage Locations and File Formats for Each Mode
Linking with Mobile Devices
Connecting with Mobile Devices
Connecting Directly
Utilizing the Machine through Applications
Using AirPrint
Printing with AirPrint
Scanning with AirPrint
Faxing with AirPrint
If AirPrint Cannot Be Used
Using Google Cloud Print
Configuring the User Settings for Google Cloud Print
Printing with Default Print Service (Android)
Managing the Machine
Applying a Security Policy to the Machine
Using a Password to Protect the Security Policy Settings
Configuring the Security Policy Settings
Security Policy Setting Items
Managing Users
Configuring the Personal Authentication Management Settings
Registering User Information in the Local Device
Importing/Exporting User Data
Adding and Editing User Information in a CSV File
Registering Server Information
Configuring the Authentication Functions
Using Personal Authentication to Manage Printing/Faxing/Remote Scanning via a Computer
Using Other Convenient Personal Authentication Management Functions
Setting the Department ID Management
Changing the System Manager ID and PIN
Configuring the Department ID Management Settings
Using Department IDs to Manage Printing or Remote Scanning via Computer
Configuring Personal Folders
Using ACCESS MANAGEMENT SYSTEM
Deleting User Setting Information
Configuring the Network Security Settings
Restricting Communication by Using Firewalls
Specifying IP Addresses in Firewall Settings
Specifying MAC Addresses in Firewall Settings
Setting a Proxy
Configuring the Key and Certificate for TLS
Generating the Key and Certificate for Network Communication
Configuring the IPSec Settings
Configuring the IEEE 802.1X Authentication Settings
Restricting the Machine's Functions
Restricting Access to Address Book and Sending Functions
Restricting Use of the Address Book
Limiting Available Destinations
Restricting the Fax Sending Functions
Restricting Printing from a Computer
Restricting the Use of Memory Media
Adding a Digital Signature to Sent Files
Generating a Device Signature Certificate
Registering a User Signature Certificate
Managing the Machine from a Computer (Remote UI)
Starting the Remote UI
Checking the Status and Logs
Turning OFF/Restarting the Machine
Registering Destinations via the Remote UI
Sharing an Address List with Specific Users
Registering User Groups
Registering a Key and Certificate for Network Communication
Configuring the Expiration Check Method for Received Certificates
Generating a Key and Certificate Signing Request (CSR)
Retrieving/Updating a Certificate from an SCEP Server
Managing Stored Files
Managing the Logs
Importing/Exporting the Setting Data
Importing/Exporting All Settings
Importing/Exporting the Settings Individually
Address Book Items
Updating the Firmware
Updating the Firmware (Distribution)
Setting Scheduled Updates
Displaying Messages from the Administrator
Configuring the Visual Message Function
Sending E-Mail Notification When an Error Occurs
Installing System Options
Synchronizing Settings for Multiple Canon Multifunction Printers
Starting Setting Synchronization
Switching the Machines to Synchronize
Initializing All Data/Settings
Functions Linked to Cloud Service
Settings/Registration
Settings/Registration Table
Preferences
Paper Settings
Display Settings
Timer/Energy Settings
Network
External Interface
Accessibility
Volume Settings
Adjustment/Maintenance
Adjust Image Quality
Maintenance
Function Settings
Common
Copy
Printer
Output Report
Custom Settings
UFR II
PCL
PS
Imaging
PDF
XPS
Utility
Send
Receive/Forward
Store/Access Files
Print
Set Destination
Management Settings
User Management
Device Management
License/Other
Data Management
Security Settings
<Preferences>
<Paper Settings>
<Display Settings>
<Timer/Energy Settings>
<Network>
<External Interface>
<Accessibility>
<Adjustment/Maintenance>
<Adjust Image Quality>
<Maintenance>
<Function Settings>
<Common>
<Copy>
<Printer>
<Send>
<Receive/Forward>
<Store/Access Files>
<Print>
<Set Destination>
<Management Settings>
<User Management>
<Device Management>
<License/Other>
<Data Management>
<Security Settings>
Maintenance
Regular Cleaning
Cleaning the Exterior
Cleaning the Platen Glass
Cleaning the Feeder
Replacing the Toner Cartridge
Replacing the Drum Unit
Replacement Parts
Checking the Remaining Amount of Consumables
Adjusting Print and Finish Quality
Adjusting Gradation
Adjusting Density
Adjusting Image Size
Reducing Image Blurring in High Humidity and High Temperature Environments
Setting the Print Operation When the Pressure Roller for Fixing Is at High Temperature
Setting the Print Operation When Rotating the Output
Paper Type Management Settings
Checking the Number of Pages for Copy/Print/Fax/Scan
Printing Reports and Lists
Troubleshooting
If the Machine Does Not Operate
Cannot Print
Problems with Printing Results
Problems with Faxes
Problems with Scanning
Problems with the Network
Problems with Security
Other Problems
A Message or a Number Starting with "#" (an Error Code) Is Displayed
A Message Saying to Contact a Local Authorized Canon Dealer Is Displayed
Countermeasures for Each Message
Countermeasures for Each Error Code
Clearing Paper Jams
Paper Jams in the Feeder
Paper Jams in the Main Unit or the Paper Source
Implementing Security Measures
Various Security Functions
Appendix
Third Party Software
Notice
Feature Highlights
Operability
Utilizing Personalization
Productivity
Image Quality
Manageability
Reliability
Office Compatibility
The List of System Functions and Items
Home
Copy
Fax
Scan and Send
Scan and Store
Access Stored Files
Fax/I-Fax Inbox
Print
Changing Login Services
Basic Windows Operations
System Specifications
Fax Function
Send Functions
Printer Functions
Management Functions
System Environment
Network Environment
System Options
Hardware Specifications
Main Unit
Feeder
Available Paper
Cassette Feeding Module-AK
Options
Optional Equipment
Manuals and Their Contents
Using User's Guide
Screen Layout of User's Guide
Viewing User's Guide
Manual Display Settings
Enter keyword(s) here
Portal Top
>
Manual top
>
Maintenance
>
Adjusting Print and Finish Quality
>
Adjusting Image Size
6ECF-0HH
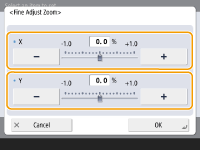
If the size of the copied image slightly differs from the original, use the following procedure to make fine adjustment of the image size. You can adjust the magnification of the horizontal width and vertical width, respectively.
1
Press
<Adjustment/Maintenance>
<Adjust Image Quality>
<Fine Adjust Zoom>.
2
Adjust the image size.
Set the magnification of <X> for horizontal width adjustment, and the magnification of <Y> for vertical width adjustment.
3
Press <OK>.
LINKS
Basic Copy Operations
Find manuals for other products
If you can't find what you're looking for, you can search here.
If you can't find what you're looking for, please use the search function.
imageRUNNER 2425i / 2425
User's Guide (Product Manual)
请务必阅读本手册。
支持的浏览器
Cookie
USRMA-4811-02
2022-02
Copyright CANON INC. 2022
本网站使用 Cookie 提供其内容和功能以及提高质量等目的。您可以在
此处
查看关于我们如何使用 Cookie 的详细信息。如果您选择“拒绝”,则只会记录和存储提供网站内容和功能所需的 Cookie。
接受
拒绝