
Sending I-Faxes
1
Place the original. Placing Originals
2
Press <Scan and Send>. <Home> Screen
3
Specify the destination on the Scan Basic Features screen. Scan Basic Features Screen
Specifying Destinations from the Address Book
Specifying Destinations from One-Touch Buttons
Entering Destinations Manually
Specifying Destinations in the LDAP Server

You can only change destinations from <Details> specified using the New Destination and destinations obtained via an LDAP server.
If the server machine is performing the System Manager information settings, authentication between the server machine and the client machine is performed while the client machine is obtaining the Remote Address Book/one-touch buttons. Authentication is performed by matching the System Manager ID and System Manager PIN set by the server machine and client machine. Changing the System Manager ID and PIN
The availability of the Remote Address Book/one-touch buttons depends on the status of the System Manager information settings for the server machine and client machine, as shown below.
The availability of the Remote Address Book/one-touch buttons depends on the status of the System Manager information settings for the server machine and client machine, as shown below.
When the server machine is performing the System Manager information settings | When the client machine is performing the System Manager information settings | The System Manager ID and System PIN for the server machine and client machine match | Can use the Remote Address Book/One-Touch Button |
Performing | Performing | Matches | Yes |
Does Not Match | No | ||
Not Performing | - | No | |
Not Performing | Performing | - | Yes |
Not Performing | - | Yes |
Specifying Destinations from the Address Book
1
Press <Address Book>.
2
Select the destination and press <OK>.
If an access number is set when the destination is registered, press <Access No.> and enter the access number using the numeric keys. The corresponding destination is displayed in the Address Book.
To use the Remote Address Book, press <To Remote Address Book>. When <Change Address Book> is displayed, press <Change Address Book>  <Remote>.
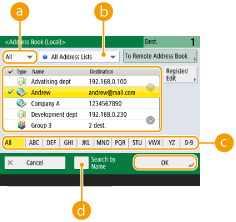
 Destination type drop-down list
Pressing and
and displays I-fax and group destinations, respectively.
anddisplays I-fax and group destinations, respectively. Address list drop-down list
Enables you to display a specific group of destinations. When you are logged in to the machine with personal authentication management, selecting <Personal Addr. List> displays your personal Address Book.
 Search buttons by first letter
Enables you to narrow down a search by the first letter of the destination name.
 <Search by Name>
Enables you to search the destination by the name you are entering.
|
To use the Remote Address Book, it is necessary to configure the server machine settings. Set to open the Remote Address Book externally on the server machine. |
Back to Top
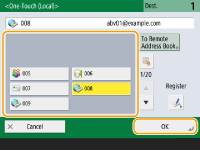
Specifying Destinations from One-Touch Buttons
1
Press <One-Touch>.
2
Select the desired one-touch button and press <OK>.
To specify the destination using a one-touch button number (one-touch number), press  and enter the number for the desired one-touch button.
and enter the number for the desired one-touch button.To use the Remote Address Book, press <To Remote Address Book>.
|
The destinations registered in the one-touch buttons of the server machine are updated in the following times: When a fax job has been sent on the client machine When you press the Reset key on the client machine When Auto Reset is activated on the client machine |
Back to Top
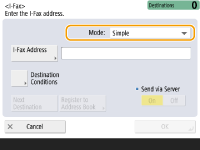
Entering Destinations Manually
You can specify destinations manually that are not registered in the Address Book or one-touch buttons.
1
Press <New Destination> <I-Fax>.
2
Select the transmission mode.
If you want to set the machine so that you can check the sending result of a document on the <Status Monitor> screen, select <Full>. If not, select <Simple>. Note that the recipient also needs to support the transmission mode in order to check the sending result. Depending on the recipient's machine, sending an I-fax is not allowed unless you select <Simple>.
If you send an I-fax to a destination that does not support the transmission mode, the <Status Monitor> screen displays <Awaiting result...> even if sending is complete. This message is displayed until the time set for <Full Mode TX Timeout> passes. <Full Mode TX Timeout>
3
Enter the I-fax destination.
Press <I-Fax Address>, enter the destination, and then press <OK>. The destination needs to be specified in a format such as "adv01@example.com." To send to a device within the same network, enter the destination in a format such as "adv01@192.168.11.100 (recipient's name@IP address)."
4
Press <Destination Conditions>.
5
Specify the receiving conditions the recipient supports and press <OK>.
Be sure to check the receiving functions the recipient supports before specifying the conditions.
To add another I-fax address, press <Next Destination> and repeat steps 2 through 5.
In <Compression Method>, the compression ratio of files increases in the order of MH→MR→MMR, and shortens transmission time.
In <Divide Data>, select <On> to divide large amounts of document data for sending. If the recipient does not have the function to combine divided data, select <Off>. For the <Off> setting, a transmission error occurs when the size of send data exceeds a certain value. <Maximum Data Size for Sending>

Specifying the conditions the recipient does not support may cause a transmission error.
You can press <Register to Address Book> to register the entered destination. Set the required conditions, and specify <Name> and <Address Book>. For information on the settings, see Registering Destinations in the Address Book.
6
Press <OK>.
|
To send to a device within the same networkWhen sending an I-fax to a device within the same network, you can send directly to the device without going through the mail server. Set <Send via Server> to <Off> before sending an I-fax. |
Back to Top
Specifying Destinations in the LDAP Server
You can search and specify destinations registered in the LDAP server.
1
Press <Address Book>.
2
Press <To LDAP Server>.
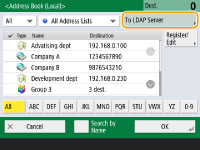
When <Change Address Book> is displayed, press <Change Address Book> <LDAP Server>.
If the network password input screen is displayed, enter the user name and password and press <OK>.
3
When searching destinations in the LDAP server, press either <Search by Name> or <Search by Conditions>.
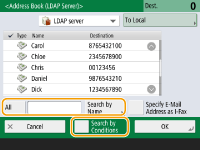
■When searching by name
Press <Search by Name> enter the text to search press <OK>.
You can specify attributes used when performing "Search by Name" for a destination from the LDAP server. <Settings for Search by Name When Using LDAP Server>
■When searching by conditions
Press <Search by Conditions>, specify the search conditions on the screen, and press <Start Searching>.
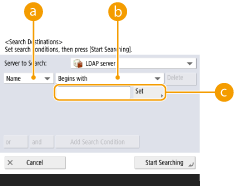 Search categories
Select a criterion to search for destinations from name, fax number, organization name, and organization unit (department name, etc).
Search conditionsSelect a search condition such as a destination name that contains "John" and a department name that begins with "Development."
Search charactersPress <Set> and enter search characters for the search condition.
To search with multiple conditions
You can search destinations with multiple conditions. Specify the first search condition, press <Add Search Condition>, and then select <or> or <and> for the next condition.
To change conditions and search again
Press <Delete> to delete the specified contents, and specify the conditions again.
4
Select destination and press <Specify E-Mail Address as I-Fax> <OK>.
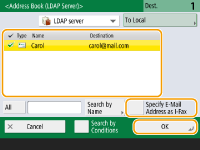
5
Check the displayed message and press <OK>.
6
Press <Details>.
7
Specify the receiving conditions the recipient supports and press <OK>.
Press <Destination Conditions> and select the functions the recipient supports. Be sure to check the receiving functions the destination before specifying the conditions.
In <Compression Method>, the compression ratio of files increases in the order of MH→MR→MMR, so shortens transmission time.
In <Divide Data>, select <On> to divide send large amounts of document data for sending. If the recipient does not have the function to combine divided data, select <Off>. For the <Off> setting, a transmission error occurs when the size of send data exceeds a certain value. <Maximum Data Size for Sending>
Specifying the conditions the recipient does not support may cause a transmission error.
8
Press <OK>.
Back to Top
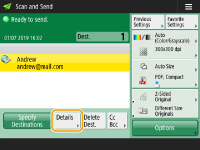
4
Press <Options> and specify the scan settings as necessary.
See the following for details.
5
Press  .
.
.Originals are scanned and sending starts.
To cancel scanning, press <Cancel> or  <Yes>.
 When <Press the [Start] key to scan the next original.> is displayed
Place the next original to scan and press . When scanning all of the originals is complete, press <Start Sending> to send the I-fax.
. When scanning all of the originals is complete, press <Start Sending> to send the I-fax.To cancel sending, press <To Status Mntr.> select a document <Cancel> <Yes>.
|
To check the total number of specified destinationsThe total number of specified destinations is displayed on the top of the screen. This enables you to confirm that the number of destinations is correct before sending. 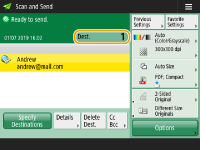 To send with the sender informationYou can send with the sender's name and I-fax address. <TX Terminal ID> To check the statuses for sent documentsOn the <Status Monitor> screen, you can check the statuses for sent documents. This screen enables you to send faxes again or cancel sending after checking the statuses. Checking Status and Log for Sent and Received Documents When <Display Notification When Job Is Accepted> is set to <On>, the <Status Monitor> screen can be displayed from the following screen that is shown after a send job is received. <Display Notification When Job Is Accepted> 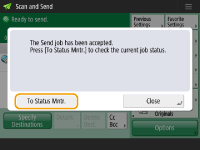 To print the report for the results of sendingOn the Scan Basic Features screen, pressing <Options> To set this for each job from <Options>, it is necessary to select <For Error Only> or <Off> in <TX Result Report>, and then set <Allow Printing from Options> to <On>. To send files securelyUsing TLS communication enables you to send an encrypted file. Configuring the Key and Certificate for TLS |
TIPS |
Checking scanned images before sendingYou can check scanned images on the preview screen before sending. Checking Scanned Originals Before Sending/Saving (Preview) Registering frequently used settingsYou can combine frequently used destinations and scan settings into a button of the machine for later use. By pressing the registered button when scanning originals, you can quickly complete your settings. Registering a Combination of Frequently Used Functions |