Editing Files in the Mail Box
You can edit documents saved in the Mail Box. This storage space enables you to rename and delete saved files, as well as combine multiple files into a single file or insert a file into another one.
1
Press <Access Stored Files>. <Home> Screen
2
Press <Mail Box>.
3
Select the desired box.
You can also enter the box number using the numeric keys to directly specify the desired box.
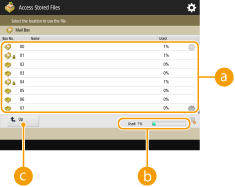
 Mail box list
Displays icons indicating the statuses of the boxes, box numbers, box names, and the amount of memory consumed by each box.
Icon types displayed are as follows:
 Mail box with files saved
 Mail box with no files saved
 Mail box with passwords set Specifying the Mail Box Settings
 <Used>
Displays the total amount of memory consumed by all the boxes.
 <Up>
<Up>Press to move to the upper level from the current one.
4
Operate files.
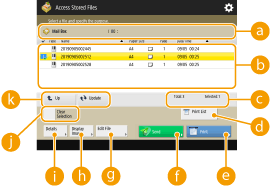 Mail box information
Displays the number and name of the box displayed.
Files saved in the boxDisplays whether files are selected, icons indicating the file type, names, scanning sizes, number of pages, and saved dates/times.
Press <Name> or <Date/Time> to sort the list of files and folders by name or date/time in ascending ( ) or descending (
 ) order.
) or descending () order.If you log in with personal authentication management, the sorting condition that was last used is retained. List of Items That Can Be Personalized
When files are selected, numbered icons are displayed in the order you select the files. If you are printing multiple files at the same time, they are printed in that order.

Files saved from a printer driver (Saving Data on Computers) contain print settings. Note that if you edit files, such as combining and inserting files, all the print settings for each file are canceled.
Total number of files and number of selected filesDisplays the total number of files saved and the number of files in the selection.
 <Print List>
Prints a list of documents saved in the box displayed. You can check the names, paper sizes, and the number of pages of documents.
 <Print>
Prints files. Printing Files in the Mail Box
 <Send>
Sends files or saves files to a file server. Sending Files in the Mail Box
 <Edit File>
Press to rename files or combine multiple files.
 <Display Image>
Displays the preview image of a file. You can also print after checking the preview image and deleting unnecessary pages.
 <Details>
Displays the detailed information of a file, such as the number of pages and paper size.
 <Select All (Max 100 Files)>/<Clear Selection>
If files are not selected in , <Select All (Max 100 Files)> is displayed. If one or more files are selected, <Clear Selection> is displayed. Press <Select All (Max 100 Files)> to select up to 100 files in the box at the same time or <Clear Selection> to deselect them.
, <Select All (Max 100 Files)> is displayed. If one or more files are selected, <Clear Selection> is displayed. Press <Select All (Max 100 Files)> to select up to 100 files in the box at the same time or <Clear Selection> to deselect them. Display switch button
Press <Up> to move to the upper level from the current one. To update the contents of the displayed screen, press <Update>.
 To change a file name
1 | Select a file and press <Edit File> |
2 | Enter a file name and press <OK>. |
To display the preview image of a file
1 | Select a file and press <Display Image>. |
2 | After checking the preview image, press <Back>. To print the file, press <Print>. |
To check the detailed information of a file
1 | Select a file and press <Details>. |
2 | After checking the detailed information, press <OK>. |
To delete a file
1 | Select a file and press <Edit File> |
2 | Press <Yes>. |
To scan and save documents
1 | Set the original. Placing Originals |
2 | Press <Edit File> |
3 | Specify the scan settings as necessary and press  (Start). (Start).For scan settings, see Setting Screen and Operations for Scanning to Save. |
To move/duplicate files to another box
1 | Select a file and press <Edit File> |
2 | Select a mail box and press <Move> or <Duplicate>. When a file is duplicated, the file name will be the same as that of the original file. |
To combine multiple files into one file
The files in the same box can be combined into one file. Note that if the resolution settings of each file do not match, you cannot combine files.
1 | Select the files to combine, and press <Edit File> The files are combined in the order they are selected. |
2 | Enter a file name. Press <File Name>, enter the name, and press <OK>. If you do not specify anything, the saved date and time is automatically assigned as a file name. For example, if a file is saved at 1:05:12 p.m. on October 30, 2015, its name will be "20151030130512." |
3 | Press <Start Merging>. All the print settings for each file are canceled, and the settings registered in <Change Default Settings> are applied to a new file. <Change Default Settings> |
To insert a file into another one
The files in the same box can be inserted. Note that if the resolution settings of each file do not match, you cannot insert files.
1 | Select the file where you want to insert another file, and press <Edit File> |
2 | Specify the file to insert and the position to insert it, and press <Next>. 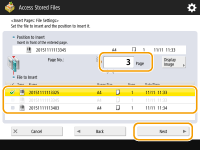 Enter the page number where you want to insert the file using the numeric keys. |
3 | Enter a file name. Press <File Name After Insertion>, enter the name, and press <OK>. If you do not specify anything, the saved date and time is automatically assigned as a file name. For example, if a file is saved at 1:05:12 p.m. on October 30, 2015, its name will be "20151030130512." |
4 | Check the page order and press <Start Inserting>. All the print settings for each file are canceled, and the settings registered in <Change Default Settings> are applied to a new file. <Change Default Settings> |
To delete pages
1 | Select a file and press <Edit File> |
2 | Specify the pages to delete.  To delete only one page, press <Single Page> and enter the corresponding page number. To delete multiple pages at the same time, press <Multiple Pages> |
3 | Press <Start Deleting> |