Embedding Invisible Text (Forced Secure Watermark)
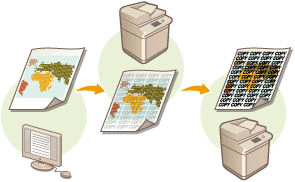
When the Forced Secure Watermark function is enabled, the machine forcibly embeds invisible text such as "CONFIDENTIAL" or "TOP SECRET" in the background of printed or copied documents. The embedded text becomes visible when the documents are copied, alerting users to unauthorized duplication or the risk of information leakage. Use this function to discourage the copying of documents that include personal or sensitive information. Administrator or DeviceAdmin privileges are required in order to configure these settings.

1
Press  (Settings/Registration).
 (Settings/Registration).
2
Press <Function Settings>  <Common>
  <Print Settings>
  <Secure Watermark Settings>
  <Forced Secure Watermark>.
 <Common>
  <Print Settings>
  <Secure Watermark Settings>
  <Forced Secure Watermark>.
 3
Select the functions for which Forced Secure Watermark is enabled.
Press <Set> for the functions that you want to use Secure Watermark for. When <Set> is selected for <Access Stored Files>, the Secure Watermark is embedded in stored files when they are printed.
4
Specify the text to embed.
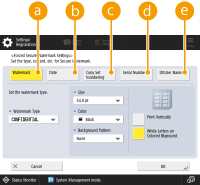
Select one of the items described below to embed as the watermark text.

 <Watermark>
In the <Watermark Type> drop-down list, select the text to embed. If you want to embed your own text, select <Custom>, press <Enter>, and enter the desired text.
 <Date>
Embed the date that the print or copy is made. Select the display format in the <Date Format> drop-down list.
 <Copy Set Numbering>
You can embed a five-digit control number in the background, only when copy set numbering is specified for prints or copies. A separate control number is embedded for each set. Enter the first control number in <Starting Number>.
 <Serial Number>
Embed the serial number of the machine.
 <ID/User Name>
Embed the name or Department ID of the logged in user. The "CONFIDENTIAL" watermark is embedded if user management is not performed for individual users or Department IDs.
5
Configure the print settings, and press <OK>.
Set the text style.
To add a background pattern such as polka dots or mesh, select the desired pattern in the <Background Pattern> drop-down list.
To rotate the text and print it sideways, press <Print Vertically>.
To print white text on a colored background, press <White Letters on Colored Background>.
6
Press <OK>.
If you want to configure Secure Watermark for additional functions, return to step 3.
 |
You can adjust the density of the watermark and background. After pressing <Secure Watermark Settings> in step 2, print a sample sheet from <Adjust Background/Character Contrast>. Examine the sheet, and press  / / to adjust accordingly. to adjust accordingly.You can also set the Secure Watermark mode when printing from the printer driver. <Printer Driver Secure Watermark> |