Viewing Inspection Results
This section describes the procedure for viewing the inspection results of finished inspection jobs.
1.
From the main screen, select the inspection job for which you want to view the inspection results
NOTE |
Finished inspection jobs are grayed out in the list. |
2.
Display the [Confirm Inspection Results] screen using any of the following methods
Click [Confirm Inspection Results] from [Inspection] in the menu bar.
Click [Results] for the selected inspection job.
Right-click the selected inspection job and click [Confirm Inspection Results].
The [Confirm Inspection Results] screen is displayed.
3.
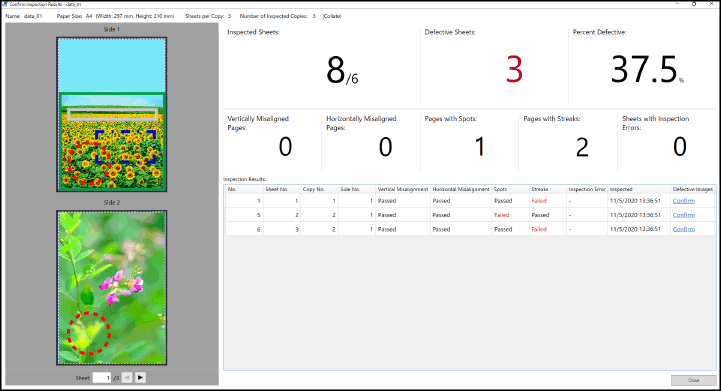
View the inspection results

[Name] | Displays the name of the inspection job. |
[Number of Inspected Copies] | Displays the number of copies inspected as specified in the job settings. |
[Inspected Sheets] | Displays the number of sheets of output paper inspected. |
[Defective Sheets] | Displays the number of sheets of output paper judged as having quality problems. |
[Percent Defective] | Displays the proportion of defective sheets among the inspected number of sheets. |
[Vertically Misaligned Pages] | Displays total number of faces where vertical misalignment was detected. |
[Horizontally Misaligned Pages] | Displays total number of faces where horizontal misalignment was detected. |
[Pages with Spots] | Displays total number of faces where spots were detected. |
[Pages with Streaks] | Displays total number of faces where streaks were detected. |
[Sheets with Inspection Errors] | Displays the number of sheets of output paper that could not be inspected for some reason. |
4.
If the [Defective Sheets] field is not zero, check the content of the [Inspection Results]
The details of the inspection results for each face are displayed in the printing order of the output paper judged as defective. You can also view the images with quality problems.
[No.] | Displays a numerical value indicating the sheet number from the start of the print job of the output paper that was judged as defective. |
[Sheet No.] | Displays a numerical value indicating the sheet number within the copy displayed in [Copy No.] of the output paper that was judged as defective. |
[Copy No.] | Displays a numerical value indicating the copy from the start of the print job in which the output paper that was judged as defective was included. |
[Side No.] | Displays a numerical value indicating which face of the output paper was judged as defective. |
[Vertical Misalignment] / [Horizontal Misalignment] / [Spots] / [Streaks] | [Failed] is displayed in the fields of the inspection items that were judged as defective. If there were no problems, [Passed] is displayed. If the page could not be inspected, [-] is displayed. |
[Inspection Error] | If a page could not be inspected for some reason, [Inspection Error] is displayed. If it could be inspected, [-] is displayed. |
[Inspected] | Displays the date and time when the inspection was executed. |
[Defective Images] | Click [Confirm] to view the images that were judged as defective. |
5.
Click [Close]
The [Confirm Inspection Results] screen closes.
Re-execute an inspection of the number of sheets judged as defective if needed.
IMPORTANT |
An inspection job cannot be executed again after it has been executed once. To reuse an inspection job that has already executed, you can create an inspection job that is performed as an additional inspection. |
Confirm Defective Images
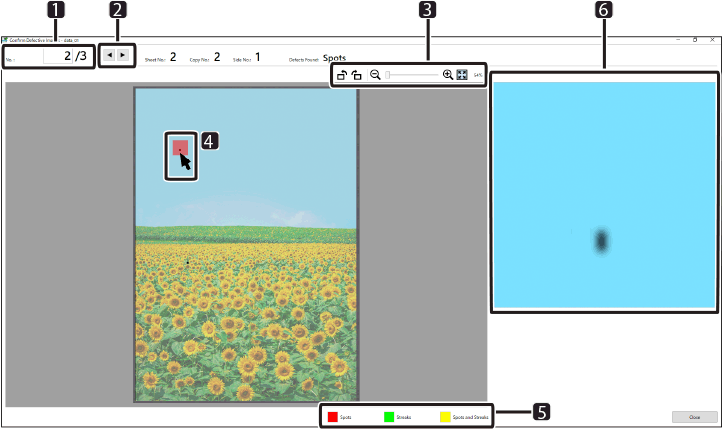
Click [Confirm] in [Inspection Results] on the [Confirm Inspection Results] screen, to display the [Confirm Defective Images] screen.

 | The number in the text box shows which of the entries in the [Inspection Results] on the [Confirm Inspection Results] screen is currently displayed on the screen. The number on the right side is the total number of faces judged as defective. |
 | Click the icons to display the previous or next defective image. |
 | Refer to the following for details on each icon. |
 | Image that was judged as defective. The colored area is the area judged as having problems. The meanings of the colors are displayed in the  area. When the mouse pointer is moved over the image, the portion of the image near the pointer is displayed enlarged in the area. When the mouse pointer is moved over the image, the portion of the image near the pointer is displayed enlarged in the  area. area. |
View the images judged as defective, and if the judgment was not as you intended, check the defective image and the inspection settings using the following procedure, and change the inspection settings if needed.
1.
With the [Confirm Defective Images] screen displayed, select, from the main screen, the inspection job for which the inspection results are being displayed
NOTE |
If the [Confirm Defective Images] screen was opened from the inspection results on the [Inspection] screen, the main screen cannot be operated. If this happens, close the [Inspection] screen, then open the [Confirm Inspection Results] screen from the main screen, and then open the [Confirm Defective Images] screen from there. |
2.
Display the [Confirm Inspection Settings] screen using any of the following methods
Click [Confirm Inspection Results] from [Inspection] in the menu bar.
Click [Settings] for the selected inspection job.
Right-click the selected inspection job and click [Confirm Inspection Settings].
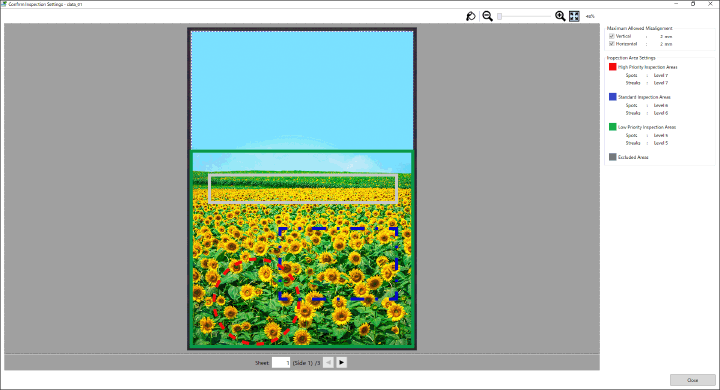
The [Confirm Inspection Settings] screen is displayed.

The master images and settings are displayed.
Refer to the following for details on the toolbar icons.
3.
Check whether the inspection settings are appropriate
Visually compare the printed matter, the inspection results displayed on the [Confirm Defective Images] screen, and the inspection settings displayed on the [Confirm Inspection Settings] screen, and check whether the intended results were obtained.
For the procedure of changing the inspection settings and performing the inspection again, refer to the following.
4.
Click [Close]
The [Confirm Inspection Settings] screen closes.