Registering Multiple Destinations as a Group
 | Multiple destinations registered in the Address Book(Registering Destinations in the Address Book) can be combined into a group. You can use this feature to send documents and back up data at the same time because different types of destinations can be registered in the same group. For example, you can register e-mail addresses and file server IP addresses together in one group, or fax numbers and I-fax addresses in another one. |
 |
To register a group that contains destinations for your own use, you need to log into the machine. Logging into the Machine You cannot register new destinations in a group address. Register destinations in the Address Book in advance. Only destinations in the same address list can be grouped. Destinations registered in a different address list cannot be grouped. You can register up to 256 destinations in a group address. Since each address entry is treated as a single entry, if you register a fax number in a group address, the fax number and group address entry are counted as two separate entries. |
1
Press <Dest./Fwd. Settings>. <Home> Screen
2
Press <Register Destinations>.
3
Press <Register New Destination>.
4
Press <Group>.
5
Press <Name>  enter the group name, and press <OK>.
6
Select the address list.
 (Items shown on the screen may differ depending on your model and options.) |
You can create a group from the destinations registered in the selected address list. For example, if you select <Address List 2>, you cannot add a destination registered in <Address List 1> to the group. The created group is registered in the address list you select in this step.
If you want to register a group that contains destinations for your own use, select <Personal Address List>.
If you want to register destinations in a group which only an administrator can edit, select <Address List for Admin.>.
7
Select the destinations you want to include in the group.
1 | Press <Add from Address Book>. |
2 | Select the destinations you want to register in a group, and press <OK>. 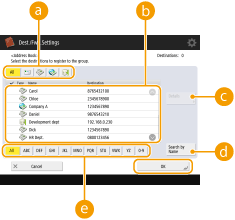  Destination type button Destination type buttonSelect  (e-mail), (e-mail),  (fax), (fax),  (I-fax) or (I-fax) or  (file) to filter the destinations displayed in the address list ( (file) to filter the destinations displayed in the address list ( ). Press <All> to display all registered destinations.Destination ). Press <All> to display all registered destinations.DestinationDestinations registered in the address list that you selected in step 6 are displayed. From this list, select the destinations you want to register in a group. When destinations are managed by access numbers, they are not displayed in the list unless you enter the access number (Restricting Access to Destinations Registered in the Address Book) after pressing <Access No.>.  <Details/Edit> <Details/Edit>Select a destination and press <Details/Edit> if you want to check the settings of the destination. Press <OK> to return to the previous screen.  <Search by Name> <Search by Name>Enter the destination name. Press <Search by Name> again to return to the previous screen.  First letter button First letter buttonSelect the alphanumeric button for the first character of the destination name. Press <All> to display all registered destinations. |
8
Press <OK> <Close>.
When destinations are managed by access numbers, enter the access number (Restricting Access to Destinations Registered in the Address Book) after pressing <Next> in step 8.
If you try to send to a file server in which <Confirm Before Sending> is set to <On>, a screen appears prompting you to enter a user name and password. In this case, enter the previously set password. If you want to register a file server in a group address, set <Confirm Before Sending> to <Off>. You cannot send to a group address including a file server in which <Confirm Before Sending> is set to <On>.