Configuring the IEEE 802.1X Authentication Settings
In a network environment that uses IEEE 802.1X authentication, unauthorized network access is blocked by a LAN switch (authenticator) that only grants access privileges to client devices (supplicants) that are authorized by the authentication server (RADIUS server). To connect this machine to an IEEE 802.1X network, settings such as the authentication method used by the authentication server must be configured on the machine. Administrator or NetworkAdmin privileges are required in order to configure these settings.

IEEE 802.1X Authentication Method
The machine supports the authentication methods described below. You must register a CA certificate before using any of these authentication methods. Registering a CA Certificate
 EAP-TLS (Extensible Authentication Protocol-Transport Level Security)
The machine and the authentication server authenticate each other by mutually sending certificates. A CA certificate must be registered on the machine to verify the certificate (server certificate) sent from the authentication server. In addition, a PKCS#12 format key and certificate (client certificate) must be specified in this setting, so that the authentication server can authenticate the machine. Register these items before configuring the settings (Registering a Key and Certificate). This authentication method cannot be used in combination with the other methods.
EAP-TTLS (EAP-Tunneled TLS)
Only the authentication server sends a certificate. A CA certificate must be registered on the machine to verify the certificate (server certificate) sent from the authentication server. In addition, a user name and password need to be specified in these settings, so that the authentication server can authenticate the machine. Microsoft Challenge Handshake Authentication Protocol Version 2 (MS-CHAPv2) or Password Authentication Protocol (PAP) can be selected as the internal authentication protocol to support EAP-TTLS.
PEAP (Protected EAP)
Only the authentication server sends a certificate. A CA certificate must be registered on the machine to verify the certificate (server certificate) sent from the authentication server. In addition, a user name and password need to be specified in these settings, so that the authentication server can authenticate the machine. Only MS-CHAPv2 can be selected as the internal authentication protocol to support PEAP.
Setting the IEEE 802.1X Authentication Method
1
Press  (Settings/Registration).
(Settings/Registration).2
Press <Preferences>  <Network> <IEEE 802.1X Settings>.
3
Set <Use IEEE 802.1X> to <On>, configure the necessary settings, and press <Next>.
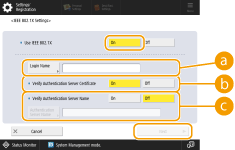
 <Login Name>
Enter the name (EAP Identity) of the login user to receive IEEE 802.1X authentication.
 <Verify Authentication Server Certificate>
Set this setting to <On> when verifying server certificates sent from an authentication server.
 <Verify Authentication Server Name>
To verify a common name in the server certificate, select <On> in <Verify Authentication Server Name>, and enter the name of the authentication server registered by the login user in <Authentication Server Name>.
4
Select the authentication method and configure the necessary settings.
Selecting EAP-TLS
1 | Press <On> for <Use TLS>, and press <Key and Certificate>. |
2 | In the list, select the key and certificate to use, and press <Set as Default Key> |
3 | Press <OK>. |
Selecting EAP-TTLS
1 | Press <On> for <Use TTLS>. |
2 | Select <MSCHAPv2> or <PAP>, and press <OK>. |
3 | Enter the user name and password. Press <User Name> or <Password>, and enter the information. If you enter a name for <User Name>, disable <Same User Name as Login Name>. If you want to set <User Name> to the same login name that was entered in step 3, press <Same User Name as Login Name>. <Confirm> is displayed when you enter a password and press <OK>. For confirmation, enter the password again and press <OK>. |
Selecting PEAP
1 | Press <On> for <Use PEAP>. |
2 | Enter the user name and password. Press <User Name> or <Password>, and enter the information. If you enter a name for <User Name>, disable <Same User Name as Login Name>. If you want to set <User Name> to the same login name that was entered in step 3, press <Same User Name as Login Name>. <Confirm> is displayed when you enter a password and press <OK>. For confirmation, enter the password again and press <OK>. |
5
Press <OK>.
6
Press (Settings/Registration) (Settings/Registration) <Apply Set. Changes> <Yes>.
(Settings/Registration) (Settings/Registration)