Erasing Dark Borders When Copying (Erase Frame)
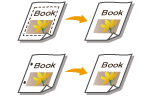 | When copying originals that are smaller than the output paper size, frame lines of the originals may appear in the copied image. When copying thick books, dark borders may appear. <Erase Frame> enables you to erase these frame lines and dark borders. You can also set the machine to not copy punch holes in the originals. |
 |
Place originals with punch holes on the platen glass. Placing them in the feeder may result in damage. |
1
Place the original. Placing Originals
2
Press <Copy>. <Home> Screen
3
Press <Options> on the Copy Basic Features screen. Copy Basic Features Screen
4
Press <Erase Frame>.
5
Specify erasing type and width.
 Erasing the frames in copies of documents
1 | Press <Erase Original Frame> and set <Original Size>. 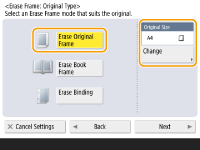 If the size displayed in <Original Size> is different from the size of the original you set, press <Change> to select the size. |
2 | Press <Next>. |
3 | Enter the width of the frame to erase. |
Erasing the dark borders in copies of books
You can erase the dark borders both in the center and contour lines that appear when you copy facing pages in a book.
1 | Press <Erase Book Frame> and confirm <Original Size>. 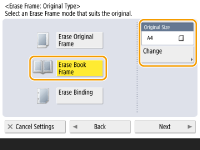 If the size displayed in <Original Size> is different from the size of the book you set, press <Change> to select the size. |
2 | Press <Next>. |
3 | Press <Center> or <Sides>, and enter each erasing width. |
Erasing punch holes in copies of documents
1 | Press <Erase Binding>. 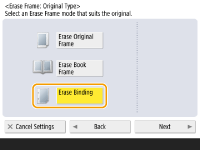 |
2 | Press <Next>. |
3 | Specify the position of the punch holes, and enter the erasing width. |

If you want to adjust the width for each border independently, press <Erase Original Frame> or <Erase Book Frame>, and then press <Adjust Independently> to enter the erasing widths.
6
Press <OK>  <Close>.
7
Press  (Start).
(Start).Copying starts.