Forwarding Received Documents Automatically
 | You can set to forward received documents to specified destinations. Fax numbers as well as e-mail addresses and shared folders in computers can be specified as forwarding destinations. |
Forwarding All Documents Automatically (Forwarding All)
The machine forwards all received documents to specified destinations. This method is useful when you want to get faxes even if you are out of the office. You can also set to print forwarded documents or receive an e-mail notifying you that forwarding documents is complete.
Forwarding Automatically by Specified Conditions (Conditional Forwarding)
The machine forwards received documents that only match the specific conditions, such as sender's fax number and received dates/times. For example, you can set conditions such as forwarding documents from Company A to all branch offices and forwarding documents received on holidays to e-mail addresses. Just like with the Forwarding All method above, you can also set to print forwarded documents or receive an e-mail notifying you that forwarding documents is complete.
Configuring Forwarding Settings
To use automatic forwarding, it is necessary to specify the forwarding destination and file format, etc., in advance.
1
Press  (Settings/Register)
  <Function Settings> <Receive/Forward> <Common Settings> <Forwarding Settings>.
(Settings/Register)  |
You can also display the <Forwarding Settings> screen by pressing <Dest./Fwd. Settings>(<Home> Screen) |
2
Press <Register>.
3
Press <Condition Name> and enter the name.
4
Press <Conditions> and specify the conditions for the destinations to forward.
A document will be forwarded if it is received from a destination that meets the conditions specified here.
Example: Forwarding a fax from 1111111111
<Receive Method>: <Fax: Line Shared>
<Fax Number>: Select <Equals> from the drop-down list and enter "1111111111."
Example: Forwarding an I-fax to xxxxx@canon.com
<Receive Method:>: <I-Fax>
<To:>: Select <Equals> from the drop-down list and enter "xxxxx@canon.com".
|
You cannot change <Receive Method> after registering <Forwarding Settings>. To use forwarding settings with <Receive Method> changed, you have to register the forwarding settings again. |
5
Press <Forwarding Destination> and specify the destination to forward to. Registering Destinations in the Address Book
|
A destination in <Personal Addr. List> cannot be specified as the forwarding destination. When <Acquire Address Book> is set to <On>, forwarding destinations can also be selected from a remote address book. About the Address Books of the Machine You can store received fax/I-fax files in the Confidential Fax Inbox by specifying it as a forwarding destination. If a Confidential Fax Inbox is selected as the forwarding destination, the following settings cannot be used. File Name Store/Print Received File Forwarding Done Notice File Format If you select a fax number as the forwarding destination, the subaddress and password registered in the Address Book are ignored. |
6
Press <OK>.
This completes the registration.
7
Select the registered forwarding settings and press <Validate/Invalidate> to switch the forwarding conditions to <On>.
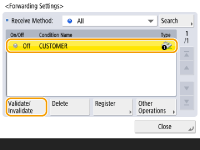

When a forwarding destination is deleted from the address book, <Validate/Invalidate> automatically switches to <Off>. To resume forwarding with the same conditions, specify the destination again and switch the forwarding conditions to <On>.
|
You cannot specify a WebDAV server as an I-fax forwarding destination. If you specify a destination for which <Confirm Before Sending> is enabled as a forwarding destination, the screen to enter the password does not appear. The registered password is used and forwarding is performed. Registering Destinations Documents with forwarding errors are handled according to the <Handle Files with Forwarding Errors> settings. You can store up to 1,000 forwarding settings. |
 |
Selecting <Forward without Conditions> enables you to forward all received documents that do not meet the specified conditions to the desired destination. You can forward to multiple destinations by specifying a group destination in <Forwarding Destination>. <Specify Fwd. Time> enables you to specify the time and day to perform forwarding. If you set <Forwarding Done Notice>, you can send a notification that forwarding was performed. You can select <Notice Only for Errors>, so that you are not notified of a successful forwarding. If you set <Store/Print Received File> to <On>, you can store or print the received file by following the Memory Lock settings. The received file is stored if Memory Lock is <On> and it is printed if Memory Lock is <Off>. |