Working with Files and Folders in Memory Media
You can create folders and delete files saved in memory media from the machine. For example, you can save a file created on a computer in memory media, and delete it from the machine after printing.
1
Press <Access Stored Files>. <Home> Screen
2
Press <Memory Media>.
3
Select the desired memory media.

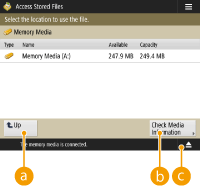
 <Up>
<Up>Press to move to the upper level from the current one.
 <Check Media Information>
Enables you to check the serial number and the free space of the memory media.


Press to remove the memory media. Be sure to press this button to safely remove the memory media. For instructions on how to remove, see Removing the memory media.
4
Operate files and folders.

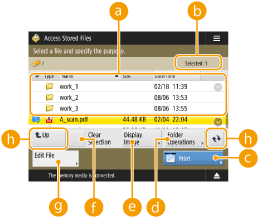
 Files and folders saved
Displays whether files or folders are selected, icons indicating the file type or folder, names, file sizes, and saved dates/times.
Press <Name> or <Date/Time> to sort the list of files and folders by name or date/time in ascending ( ) or descending (
 ) order.
 ) or descending (
 ) order.
If you log in with personal authentication management, the sorting condition that was last used is retained. List of Items That Can Be Personalized
When files are selected, numbered icons are displayed for each file, in the order selected. If you are printing multiple files at the same time, they are printed in that order.
 Number of selected files
Displays the number of files in the selection.
 <Print>
Prints files. Printing Files in Memory Media
 <Folder Operations>
Press this in the following cases.
When checking <Details> for a folder that exists in the displayed level
When performing <Create Folder> in the displayed level
When performing <Delete> for a folder that exists in the displayed level

The following items can be checked in <Details>. You can also press <Rename Folder> to rename the folder.
Folder Name
Location
Updated
 <Display Image>
Displays the preview image of a file. You can also print after checking the preview image and deleting unnecessary pages.
 <Clear Selection>
Deselects all the files selected in  .
.
 .
. <Edit File>
Press to display the menu for adding a file or displaying the details for, deleting, or renaming the selected file.
You can press <Details> to display the following items. You can also press <Change File Name> to rename the file.
File Name
Location
File Type
Size
Updated
 Display switch button
Press <Up> to move to the upper level from the current one. To update the contents of the displayed screen, press  .
.
 To change a file name
1 | Select a file and press <Edit File>  <Change File Name>. <Change File Name>. |
2 | Enter a file name and press <OK>. |
 To display the preview image of a file
1 | Select a file and press <Display Image>. |
2 | After checking the preview image, press <Back>. |
 To check the detailed information of a file
1 | Select a file and press <Edit File>  <Details>. <Details>. |
2 | After checking the detailed information, press <OK>. |
 To delete a file
1 | Select a file and press <Edit File>  <Delete>. <Delete>. |
2 | Press <Yes>. |

You can select and delete up to 32 files at a time.
 To scan and save documents
1 | Set the original. Placing Originals |
2 | Press <Edit File>  <Add Files (Scan and Store)>. <Add Files (Scan and Store)>. |
3 | Specify the scan settings as necessary and press  . .For scan settings, see Setting Screen and Operations for Scanning to Save. |
 To create a folder
1 | Press <Folder Operations>. |
2 | Press <Create Folder>. |
3 | Enter a folder name and press <OK>. |
4 | Press <OK>. |
 To change a folder name
1 | Display a folder whose name you want to change and press <Folder Operations>. |
2 | Select a folder and press <Details>. |
3 | Press <Rename Folder>. |
4 | Enter a folder name and press <OK>. |
5 | Press <OK>. |
 To check the detailed information of a folder
1 | Display a folder whose information is to be checked and press <Folder Operations>. |
2 | Select a folder and press <Details>. |
3 | After checking the detailed information, press <OK>. |
}