Registering User Information in the Local Device
 | To perform personal authentication management, you must first register user information in the database of the machine. |
1
Start the Remote UI. Starting the Remote UI
2
Click [Settings/Registration] on the portal page. Remote UI Screen
3
Click [User Management]  [Authentication Management].

Disabling "Administrator"
"Administrator" is registered as the default administrator name (user name). This user cannot be deleted but it can be disabled after adding a user with "Administrator" privileges. If the "Administrator" user is disabled, you cannot change settings that only the "Aministrator" user can configure, on the control panel of the machine.
4
Click [Add User].
To edit user information
Click [Edit] for the user information that you want to edit, make the necessary changes, and click [Update].
To delete user information
Select the check box for the user information that you want to delete, and click [Delete] [OK].
5
Enter the necessary information.
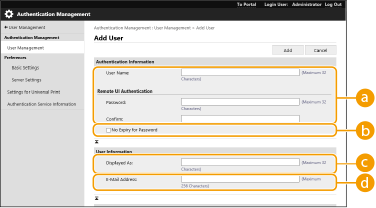
 [User Name:] / [Password:] / [Confirm:]
Enter the user name and password. For confirmation, enter the password again in [Confirm:]. Single-byte or double-byte characters can be used for the user name.
When a detailed password policy is set, enter a password that complies with the password policy. Setting a Password Policy
 [No Expiry for Password]
Select the check box to set the password of the user to register to have no expiration date.
 [Displayed As:]
Enter the name of the user. The display name is displayed as the user name for forced hold printing.
 [E-Mail Address:]
Enter the e-mail address that the user is using on devices such as computers.
It is also possible for general users to change their own password.
Selecting the [Allow e-mail address settings] check box enables general users to specify e-mail addresses. Configuring the User Login Methods and Authentication Devices
6
Specify other required settings.
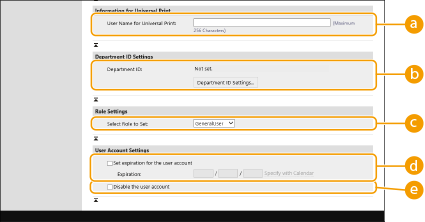 [User Name for Universal Print:]
If [Settings/Registration] [Network Settings] [Settings for Universal Print] is enabled, you can enter the email address or phone number used in the Microsoft 365 account of the user with which Universal Print jobs are associated.
[Department ID:]When using Department ID Management, you must click [Department ID Settings...] and select the Department ID from the list to assign to the user. First, register the necessary Department IDs in [Register New Department...] on the list screen. If the Department ID that you specify here is later deleted, make sure to change this setting. Configuring the Department ID Management Settings
[Select Role to Set:]The user privileges (roles) listed below can be selected. Also specify the settings here when adding an administrator. The available setting items vary depending on the privileges (Settings/Registration).
[Administrator] | Allows all operations as an administrator of the machine. |
[GeneralUser] | Allows general user privileges. |
[Set expiration for the user account]When setting a period of validity for the account, select the check box and enter a value for [Expiration].
 [Disable the user account]
Select the check box to temporarily disable the account.
7
Click [Add].
 |
Batch importing/batch exportingThis setting can be imported/exported with models that support batch importing of this setting. Importing/Exporting the Setting Data This setting is included in [Settings/Registration Basic Information] when batch exporting. Importing/Exporting All Settings |
 |
Check for unregistered Department IDsIf you click [Check Unregistered Department ID...] on the screen displayed in step 4, you can find out Department IDs that are not registered in the machine by checking Department IDs assigned to the users against Department IDs registered in the machine. Batch settings for Department IDsIf you click [Batch Settings for Department ID...] on the screen displayed in step 4, you can create new Department IDs and apply settings for all users. If the user name is comprised of numbers and is seven digits or fewer, the same number is assigned to the same user as the Department ID. If the password of the same user is registered as a number that is seven digits or fewer, it is also set as the PIN for that Department ID. If the user name and password do not meet the above conditions, a Department ID is automatically assigned starting from 0000001, and 0 (none) is set for the PIN. Registering the Department ID as the User NameIf you click [Add User Using Department ID...] on the screen in step 4, a new user with the same name as the Department ID is registered. When keyboard authentication is used, authentication can be performed using numeric key entry only. |