
Setting Static Routing
You can set static routing to manually specify the network route.
For example, when sending data from a machine connected to other networks via a router with both the main line and sub line, the data can be sent via the gateway of the sub line instead of the gateway of the main line that is normally used.
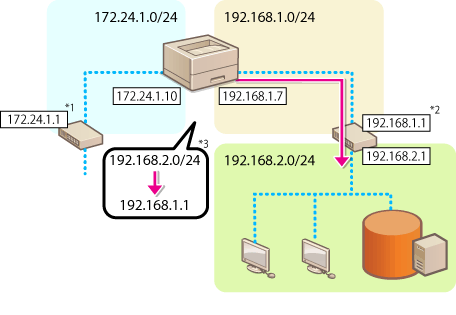
*1 Main line gateway
*2 Sub line gateway
*3 Static routing settings
|
When connecting to another network via a router, enter the gateway address in [IPv4 Settings]/[Sub Line Settings: Basic Settings] in advance. Setting an IPv4 Address Setting the IPv4 Address of the Sub Line |
1
Start the Remote UI. Starting the Remote UI
2
Click [Settings/Registration] on the Portal page. Remote UI Screen
3
Click [Network Settings]  [Static Routing Settings].
4
Select [Use Static Routing].
5
Click [Register] in the line of the static routing information to register.
[Edit] or [Delete] is displayed for lines that already have information registered.
6
Enter [Destination Address] and [Gateway Address] click [OK] [OK].
Press each button and enter the required setting.
|
The route order is displayed in [Priority] on the static routing settings screen. You can register up to 16 devices that can be connected. The success/failure of the static routing settings is displayed in [Routing Registration]. When failure is indicated in [Routing Registration], select the static routing settings that failed and set the address and gateway address again. |