Monitoring and Controlling the Machine with SNMP
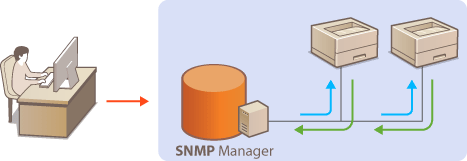
Simple Network Management Protocol (SNMP) is a protocol for monitoring and controlling communication devices in a network by using Management Information Base (MIB). The machine supports SNMPv1 and security-enhanced SNMPv3. You can check the status of the machine from a computer when you print documents or use the Remote UI. You can enable either SNMPv1 or SNMPv3, or both at the same time. Specify the settings for each version to suit your network environment and the purpose of use.

SNMPv1
SNMPv1 uses information called "community" to define the scope of SNMP communication. Because this information is exposed to the network in plain text, your network will be vulnerable to attacks. If you want to ensure network security, disable SNMPv1 and use SNMPv3.
SNMPv3
With SNMPv3, you can implement network device management that is protected by robust security features. Note that TLS must be enabled for the Remote UI before configuring SNMPv3 (Configuring the Key and Certificate for TLS).
 |
SNMP management software, when installed on a computer on the network, enables you to configure, monitor, and control the machine remotely from the computer. For more information, see the instruction manuals for your management software. |
1
Start the Remote UI. Starting the Remote UI
2
Click [Settings/Registration] on the Portal page. Remote UI Screen
3
Click [Network Settings]  [SNMP Settings].
 [SNMP Settings].
4
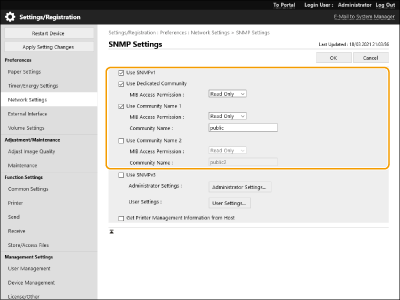
Specify SNMPv1 settings.
If you do not need to change SNMPv1 settings, proceed to the next step.

[Use SNMPv1]
Select the check box to enable SNMPv1. You can specify the rest of SNMPv1 settings only when this check box is selected.
Select the check box to enable SNMPv1. You can specify the rest of SNMPv1 settings only when this check box is selected.
[Use Dedicated Community]
The exclusive community is a community (group) prepared for managers using device management software. Select the check box to use Dedicated Community, and specify [MIB Access Permission]. If you do not need to use Dedicated Community, deselect the check box.
The exclusive community is a community (group) prepared for managers using device management software. Select the check box to use Dedicated Community, and specify [MIB Access Permission]. If you do not need to use Dedicated Community, deselect the check box.
[Use Community Name 1]/[Use Community Name 2]
Select the check box to specify a community name. If you do not need to specify a community name, deselect the check box.
Select the check box to specify a community name. If you do not need to specify a community name, deselect the check box.
[MIB Access Permission]
For each community, select [Read/Write] or [Read Only] for the access privileges to MIB objects.
For each community, select [Read/Write] or [Read Only] for the access privileges to MIB objects.
[Read/Write] | Permits both viewing and changing the values of MIB objects. |
[Read Only] | Permits only viewing the values of MIB objects. |
[Community Name]
Enter alphanumeric characters for the name of the community.
Enter alphanumeric characters for the name of the community.
5
Select [Use SNMPv3] and configure SNMPv3.
If you do not need to change SNMPv3 settings, proceed to the next step.
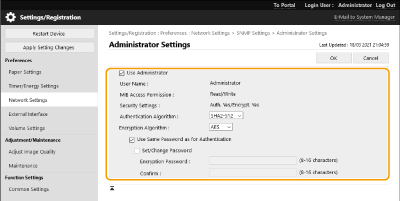
1 | Click [Administrator Settings].  [Use Administrator] Select the check box to use the Administrator user. [Authentication Algorithm] and [Encryption Algorithm] cannot be changed. [Use Same Password as for Authentication] Select the check box to use the same password as the password used in user authentication. | ||||
2 | Click [OK]. | ||||
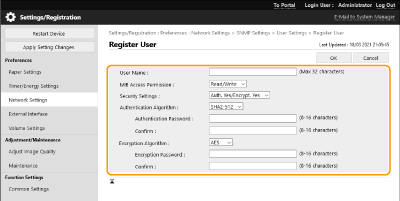
3 | Click [User Settings]  [Register]. [Register]. [User Name] Enter alphanumeric characters for the user name. [MIB Access Permission] Select [Read/Write] or [Read Only] for the access privileges to MIB objects.
[Security Settings] Select [Auth. Yes/Encrypt. Yes], [Auth. Yes/Encrypt. No], or [Auth. No/Encrypt. No] for the desired combination of authentication and encryption settings. [Authentication Algorithm] Select [MD5], [SHA1] or [SHA2] according to your environment. For [SHA2], select from four hash lengths (224 bit, 256 bit, 384 bit, or 512 bit). [Encryption Algorithm] If you have selected [Auth. Yes/Encrypt. Yes] in [Security Settings], select the appropriate encryption algorithm for your network environment. [Authentication Password]/[Encryption Password] Use alphanumeric characters to enter the password in [Authentication Password] or both [Encryption Password] and [Confirm], depending on the settings in [Security Settings]. Set this for each algorithm (authentication/encryption). | ||||
4 | Click [OK]. | ||||
5 | Click [Network Settings]  [SNMP Settings]. [SNMP Settings]. |
6
Specify Printer Management Information Acquisition Settings.
With SNMP, the printer management information, such as printing protocols and printer ports, can be monitored and obtained regularly from a computer on the network.

Select the check box to enable monitoring of the printer management information of the machine via SNMP. To disable monitoring of the printer management information, clear the check box.
[Get Printer Management Information from Host]
Select the check box to enable monitoring of the printer management information of the machine via SNMP. To disable monitoring of the printer management information, deselect the check box.
7
Click [OK].
 |
Disabling SNMPv1If SNMPv1 is disabled, some of the functions of the machine become unavailable, such as obtaining machine information via the printer driver. Using the control panelYou can enable or disable the SNMP settings from <Set>. <SNMP Settings> |
Enabling Both SNMPv1 and SNMPv3 |
If both versions of SNMP are enabled, it is recommended that MIB access permission in SNMPv1 be set to [Read Only]. MIB access permission can be set independently in SNMPv1 and SNMPv3 (and for each user in SNMPv3). Selecting [Read/Write] (full access permission) in SNMPv1 negates the robust security features that characterize SNMPv3 because most of the machine settings can then be controlled with SNMPv1. |