Sending I-Faxes
To send a fax to a computer or another I-Fax-compatible device, specify an e-mail address instead of a fax number as the destination. If you send an I-Fax to a computer, it is sent as an e-mail attachment in TIFF format. And in the same way as when you send e-mail to a computer, you can specify multiple destinations and specify Cc and Bcc destinations.
1
Place the original(s). Placing Originals
2
Select <Scan> in the Home screen. Home Screen
If the login screen appears, specify the user name, the password, and the authentication server. Logging in to Authorized Send
3
Select <I-Fax> in the Scan Basic Features screen. Scan Basic Features Screen
4
Specify the destination.
Specifying from Address Book
Specifying from Coded Dial Numbers
Entering Destinations Directly
Specifying Destinations in an LDAP Server
Specifying from Address Book
 | The Address Book enables you to specify a destination by selecting from a list of registered destinations or by searching by name for destinations with recipient names. |
 |
You need to register destinations in the Address Book before using this feature. Registering Destinations |
1
Select <Address Book> in the <Specify Destination> tab.
2
Select <To>.
3
Select an index. Index
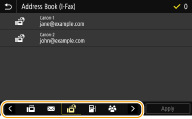
4
Select the check box for the desired destination, and select <Apply>.
 |
If a destination is selected from <Address Book> in the Home screen, the Basic Features screen for I-Fax sending can be displayed while the selected destination remains being specified. |
Back to Top
Specifying from Coded Dial Numbers
 | Three-digit numbers (coded dial numbers) are assigned to addresses in the Address Book. You can specify an address simply by entering its coded dial number. |
|
To use coded dial numbers, the destination must be registered in the Address Book beforehand. Registering Destinations |
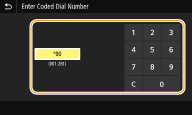
1
Select <Coded Dial> in the <Specify Destination> tab.
2
Select <To>.
3
Enter a three-digit number.
If you have entered an incorrect value, use  to clear it.

If a confirmation screen appears
When <Confirm When Coded Dial TX> is set to <On>, a screen is displayed that shows the destination and the name for the number. (For Group Dial, the destination name and the number of destinations are shown.) Check the contents and if everything is correct, select <OK>. To specify a different destination, select <Cancel> and then re-enter the three-digit coded dial number. Displaying Destinations in Address Book
Back to Top
Entering Destinations Directly
For a destination that is not registered in the Address Book, specify it by entering an I-Fax address.
1
Select <Use Keyboard> in the <Specify Destination> tab.
2
Enter the I-Fax address, and select <Apply>.
On how to enter text, see Entering Text.
Back to Top
Specifying Destinations in an LDAP Server
 | If your office has an LDAP server installed, you can specify a destination using user information in the server. Access the LDAP server via the machine to search for the appropriate user information and specify it as destination. |
|
You need to specify the settings for connecting to an LDAP server beforehand. Registering LDAP Servers |
1
Select <LDAP Server> in the <Specify Destination> tab.
2
Select the LDAP server you are using.
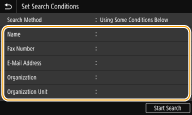
3
Select conditions for user information to be searched.
Name, fax numbers, e-mail addresses, organization names, and organization unit are available criteria for searching destinations.
4
Enter the search target character string, and select <Apply>.
On how to enter text, see Entering Text.
To specify multiple search criteria, repeat steps 3 and 4.
5
Select <Search Method>.
6
Select conditions to display the search result.

<Using All Conditions Below>
Searches and displays the users that meet all the search criteria specified in steps 3 and 4.
Searches and displays the users that meet all the search criteria specified in steps 3 and 4.
<Using Some Conditions Below>
If users that meet even one of the criteria specified in steps 3 and 4 are found, displays all those users.
If users that meet even one of the criteria specified in steps 3 and 4 are found, displays all those users.
7
Select <Start Search>.
The users meeting your search criteria are displayed.
If the authentication screen appears when you select <Start Search>, enter the user name of the machine and the password registered in the LDAP server, and select <Apply>. Registering LDAP Servers
8
Select the check box for the user that you want to specify as destination, and select <Apply>.
Back to Top
If a screen on which a destination is already specified appears
You can only send to your own e-mail address. To send to other destinations, you must configure the send function authentication settings so that e-mail transmission is not restricted. Contact your administrator for details. LDAP Server Authentication.
Specifying destinations from the transmission records
You can also recall previously used destinations. Recalling Previously Used Settings for Sending/Saving (Recall Settings)
5
Specify multiple destinations, including Cc/Bcc destinations, as necessary.
Select the method used to specify destinations in the <Specify Destination> tab, and then specify the destination.
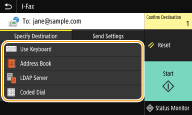
If you selected <LDAP Server> or <Specify Myself as Destination>, the destination is specified in the <To> field.
<Cc> and <Bcc> addresses can only be selected using <Address Book> or <Coded Dial>.
 To delete destinations
If you specified multiple destinations, you can delete destinations as necessary.
1 | Select <Confirm Destination>. |
2 | Select the check box for the destination to be deleted, and select <Remove from Dest.>. If you select the Group check box, you can view the destinations registered in the group by selecting <Details> |
3 | Select <Yes>. |
6
Specify the scanning settings as necessary.
For more information about each setting, see Sending Data by E-Mail/Saving Data to a Shared Folder or FTP Server or Scanning Clearly.
7
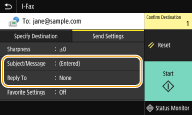
Specify the subject, message, and reply-to address for the e-mail as necessary.
To specify subject/message
1 | Select <Subject/Message> in the <Send Settings> tab. |
2 | Select <Subject> |
3 | Enter the subject, and select <Apply>. |
4 | Select <Message>. |
5 | Enter the message, and select <Apply>. |
6 | Select <Apply>. |
To specify reply-to address
Specify the reply-to address when you want to notify the recipient of an e-mail address different from that of the machine as the reply-to address. Select the target reply-to address from the destinations registered in the Address Book, and specify it. If the destination has not been registered in the Address Book, see Registering Destinations.
1 | Select <Reply To> in the <Send Settings> tab. |
2 | Select <Specify from Address Book>. |
3 | Select the check box for the desired reply-to address, and select <Apply>. The reply-to address that can be specified is always one of the e-mail addresses registered in the Address Book. |
8
Select <Start>.
If the <Confirm Destination> screen is displayed, check whether the destination is correct, and then select <Start Scanning>.
Scanning of the original starts.
If you want to cancel, select <Cancel>  <Yes>. Canceling Sending Faxes
When placing originals in the feeder in step 1
When scanning is complete, the I-Faxes are sent. Select <Close> to end the procedure.
When placing originals on the platen glass in step 1
When scanning is complete, follow the procedure below.
1 | If there are additional pages of originals to be scanned, place the next original on the platen glass, and select <Scan Next Original>. Repeat this step until you finish scanning all of the pages. When there is only one page to be scanned, proceed to the next step. |
2 | Select <Start Sending>. The I-Faxes are sent. |
If the <SMTP Authentication> screen appears
Enter the user name and password, and select <Apply>.
File name of a sent document
The file name of a sent document is automatically assigned based on the following format: communication management number (four digits)_sent date and time_document number (three digits).file extension name. An arbitrary character string can be added in front of the file name. Configuring a File Name
Checking the communication status
Setting <Display Notif. When Job Is Accepted> to <On> displays a screen prompting confirmation of the communication status. When you select <Status Monitor>, you can check the sending status. <Display Notif. When Job Is Accepted>
If a Send Error Occurs
Error notifications are sometimes sent to the e-mail address set to the machine. If you leave it as-is, it may result in an insufficient remaining capacity of mailbox depending on your mail server. It is recommended that you clear the mailbox periodically.
To clear the mailbox

When the mailbox is cleared, all e-mail in the server mailbox is deleted. When you specify the e-mail account that you use usually, you should first check whether any e-mail in the mailbox needs to be kept.
1 | Start the Remote UI and log in to System Manager Mode. Starting Remote UI |
2 | Click [Settings/Registration] on the Portal page. Remote UI Screen |
3 | Select [TX Settings] |
4 | Click [Clear] in [Clear Mail Box]. |
5 | Read the message that is displayed, and click [OK]. E-mail is deleted from the mailbox. |
|
If you always want to send with the same settings: Changing the Default Settings for Functions If you want to register a combination of settings to use when needed: Registering Frequently Used Settings If you want to specify the I-Fax sender name: <Register Unit Name> |