Other Changes to the User's Guide
Linking with Mobile Devices  Utilizing the Machine through Applications
The description of Chrome OS has been added.
Printing from Chrome OS
You can perform printing from Chrome OS without downloading a dedicated application or installing a driver. To print with the machine, it is necessary to enable Mopria®.
Confirming Mopria® settings
Log in to the Remote UI with Administrator privileges [Settings/Registration] [Network Settings] [Mopria Settings] select the [Use Mopria] check box [OK]
 |
If you enable the Mopria® setting, <Use Network Link Scan> also changes to <On>. To use the Mopria® scan service, <Use Network Link Scan> must be set to <On>. |
Printing
1
Before printing, make sure that the machine is turned ON and connected to a Chromebook.
For information on checking the connection status, see "Setting up the Network Environment" in the "User's Guide."
See the Chromebook Help page (https://support.google.com/chromebook/answer/7225252) for more information on printing.
 |
You can also connect the machine to a Chromebook using a USB cable. See the Chromebook website (https://support.google.com/chromebook/answer/7225252) for information on the connection procedure. |
|
Printing from Chrome OS may not be available, depending on your country or region. |
Appendix MEAP Managing MEAP Applications
The description in " [MEAP Application Management]" of step 3 has been changed (description of the bottom row of the table under the second bullet point changed).
[MEAP Application Management]" of step 3 has been changed (description of the bottom row of the table under the second bullet point changed).[Installed] | The MEAP application has been installed, but it is not ready for use. Even if you restart the machine after stopping the use of the MEAP application, [Installed] is displayed. |
[Started] | The MEAP application is ready for use. |
[Stopped] | The MEAP application is not ready for use. |
[Starting] | The MEAP application is starting. |
[Stopping] | The MEAP application is stopping. |
Appendix System Specifications System Environment
Mail server software has changed (the fifth and sixth bullet points changed).
Compatible mail forwarding server software | Microsoft Exchange Server 2010 Microsoft Exchange Server 2013 Microsoft Exchange Server 2016 Microsoft Exchange Server 2019 Sendmail 8.14.7 Qpopper 4.1.0 |
Compatible mail receiving server software | Microsoft Exchange Server 2010 Microsoft Exchange Server 2013 Microsoft Exchange Server 2016 Microsoft Exchange Server 2019 Sendmail 8.14.7 Qpopper 4.1.0 |
Appendix System Specifications Printer Functions
The description in "Functions That Can Be Used with Each Page Description Language and File Format" has been changed (description of the second annotation changed).
*2 You can set this only to [Black & White].
Introduction (About the Machine) Hardware Specifications Main Unit
The description in "Memory Capacity" has been changed (description of RAM changed).
Memory Capacity | RAM: 5 GB (Main CPU Side: 2 GB, Image Processing CPU Side: 2 GB + 1 GB (reserved for image processing)) Storage Disk: Standard: 256 GB Maximum: 1 TB*6 |
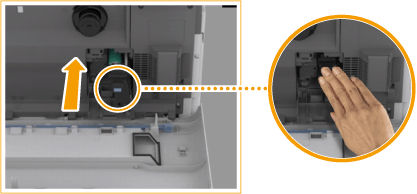
Introduction (About the Machine) Main Unit Maintenance Replacing the Drum Unit
An "IMPORTANT" section has been added to step 6 in the "Procedure for Replacing the Drum Unit."
6
Remove the protective cover.
First push in the slider on the right side of the gray protective cover toward the back of the main unit until it cannot go any further, and then pull out the protective cover.
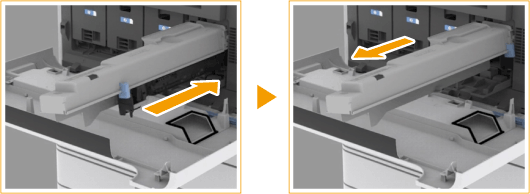

After removing the protective cover, check that the drum unit is pushed fully into the main unit. Failing to push the drum unit in fully will cause a malfunction.

Setting Up Setting up the Network Environment
The description in "NOTE" after step 6 has been changed.
 |
When <Sleep Mode Energy Use> is set to <Low>Depending on the utility software, communication may fail if the machine is in sleep mode. Return the machine from sleep status. |
Setting Up Setting up the Network Environment Selecting the Network Connection Method
The description in "IMPORTANT" has been changed (description of the first and second bullet points deleted and the third bullet point added in "If you selected <Wireless LAN> or <Wired LAN + Wireless LAN>").
|
When using a sub line, see "Cautions When Using the Sub Line" in the User's Guide. If you selected <Wireless LAN> or <Wired LAN + Wireless LAN>The settings of <Wireless LAN Settings> are cleared. You cannot set wireless LAN as the main line and wired LAN as the sub line. Set <Sleep Mode Energy Use> to <High>. Cautions When Using Wired LAN (Sub Line)Set <Sleep Mode Energy Use> to <High>. |
Setting Up Setting up the Network Environment Adapting to the Network Environment Making SMB Settings
The description of "<Require Encryption for Connection>" in step 3 of “Setting the SMB Server” has been changed.
<Require Encryption for Connection>" in step 3 of “Setting the SMB Server” has been changed.<Require Encryption for Connection>To request a connection with SMB v3.0 encrypted communication when connecting to an SMB server, press <On>.
Setting Up Setting up the Network Environment Adapting to the Network Environment Making SMB Settings
The description of “NOTE” in “Setting the SMB Server” has been changed.
 |
If you set <Require Encryption for Connection> to <On>, you will become unable to connect to the machine from client operating systems that do not support SMB v3.0 encrypted communication. |
Setting Up Setting up the Network Environment Adapting to the Network Environment Making SMB Settings
The description of " <Require Encryption for Connection>" in step 3 of “Setting the SMB Client” has been changed.
<Require Encryption for Connection>" in step 3 of “Setting the SMB Client” has been changed.<Require Encryption for Connection>To request a connection with SMB v3.0 encrypted communication when connecting to an SMB server, press <On>.
Setting Up Setting up the Network Environment Adapting to the Network Environment Making SMB Settings
The description of “IMPORTANT” in “Setting the SMB Client” has been changed (the first bullet point changed).
|
When <Require Encryption for Connection> is set to <On>, the machine can only connect to SMB servers that support SMB v3.0 encrypted communication. When <1.0> and <2.0> are set to <On> for <Specify SMB Client Version> but <3.0> is not set to <On>, the machine cannot connect to SMB servers that do not support SMB v3.0 encrypted communication. Use the same version of SMB with the SMB server and SMB client. SMB cannot be used if the versions differ. |
Setting Up Setting the Advanced Space of the Machine Setting Advanced Space to Public
The description of " <Require Encryption for Connection>" in step 1 of “If you set to <By SMB> and set the <Authentication Management> setting to <On>” in step 5 of “Advanced Space Batch Settings” has been changed.
<Require Encryption for Connection>" in step 1 of “If you set to <By SMB> and set the <Authentication Management> setting to <On>” in step 5 of “Advanced Space Batch Settings” has been changed.<Require Encryption for Connection>To request a connection with SMB v3.0 encrypted communication when connecting to an SMB server, press <On>.
Basic Operations Setting Sounds
The description in "Adjusting the Volume for Sending/Receiving Faxes" has been changed.
You can adjust the volume of the communication sounds during fax transmission and the sound produced for the fax sending/receiving result. You can also set whether to sound a tone indicating the result of Fax Memory Lock sending/receiving.
Basic Operations Setting Sounds
The description of  <Alarm Volume> and <Monitor Volume> in Step 2 of "Adjusting the Volume for Sending/Receiving Faxes" has been changed.
<Alarm Volume> and <Monitor Volume> in Step 2 of "Adjusting the Volume for Sending/Receiving Faxes" has been changed. <Alarm Volume>Adjust the volume of the tone that sounds when the sending or receiving faxes is complete (except when printing received faxes) and the volume of the tone that sounds when a fax is canceled or ends due to an error. To mute the sound, press  several times to set the volume to the far left.
several times to set the volume to the far left. <Monitor Volume>Adjust the volume of the following tones. To mute the sound, press several times to set the volume to the far left.
several times to set the volume to the far left.The tone that sounds when sending faxes
The tone that sounds when printing of a received fax is complete, and the tone that sounds when a fax ends due to an error
Basic Operations Entering Sleep Mode
The description in "NOTE" of "Energy Consumption in Sleep Mode" has been changed.
 |
When using a wireless LAN or Bluetooth also while in sleep modeSet <Sleep Mode Energy Use> to <High>. |
Managing the Machine Managing Users Configuring the Personal Authentication Management Settings Importing/Exporting User Data
The description of "NOTE” in “ [Import Method:]" in step 5 of “Automatically Importing User Data” has been changed (the fifth bullet point changed).
[Import Method:]" in step 5 of “Automatically Importing User Data” has been changed (the fifth bullet point changed).[Import Method:]Select whether to import only updated or added user data, or all user data.
If you select [Perform full import] and a user with the same user name is already registered, the user information is overwritten.
When importing information of a user who accesses the Advanced Space with SMB, specify the appropriate value in the "password" column. If you export the data from the machine and import it to the other machine without performing the above operation, authentication may fail. (The value is "********" when exported.)
When performing a complete import, any users not listed in the imported files are deleted from the machine. However, "-----" and "Administrator", which are registered by default, will remain even if they are not listed in the imported files.
"User Authentication Format" is the only file format that is supported. Also, the "uid" column is required.
Note that if you are using a server that does not support SMB v3.0 encrypted communication, user data travels unencrypted across communication paths while it is being obtained.
Managing the Machine Managing the Machine from a Computer (Remote UI) Managing the Logs
The description of "NOTE" in step 5 of “Exporting Logs Automatically” has been changed (the eighth bullet point changed).
|
After automatic exporting of the audit logs has succeeded, the collected audit logs are automatically deleted. Audit logs cannot be deleted manually. After automatic exporting and deleting of the audit logs have succeeded, each log is generated. If other log collections do not occur by the next automatic export time, the audit log will not be automatically exported. You can also manually export audit logs from the Remote UI. If automatic exporting fails, the machine will retry multiple times. An error message is displayed on the control panel of the machine if automatic exporting fails even once. Specify an SMB server for Windows Server 2012 or later, or Windows 8 or later. If the machine is turned OFF, exporting will not be performed, even at the specified time. Also, it will not be performed when the machine recovers. If the machine is in the Sleep mode, it will automatically recover and perform exporting at the specified time. Note that if you are using a server that does not support SMB v3.0 encrypted communication, audit log data travels unencrypted across communication paths while it is being automatically exported. Depending on your environment, automatic exporting of logs may be performed later than the specified time. |
Settings/Registration <Preferences> <Timer/Energy Settings>
The Setting Description in "<Sleep Mode Energy Use>" has been changed (<Compensate for Network Comm.> deleted).
Item | Setting Description | DeviceAdmin | NetworkAdmin | Can be set in Remote UI | Device Information Delivery Available | Import All Function | Name of Item When Exporting with the Remote UI |
<Sleep Mode Energy Use> | <Low>, <High> | Yes | Yes | Yes | Yes | C | Settings/Registration Basic Information |
Settings/Registration <Preferences> <Timer/Energy Settings>
The description in "NOTE" in "<Sleep Mode Energy Use>" has been changed (description of the first bullet point changed).
|
When performing wireless communication while <Wireless LAN Settings> or <Use Bluetooth> is enabled, <Sleep Mode Energy Use> must be manually set to <High>. If the energy consumption level is set to <Low>, communication failure may occur, depending on the network utility software you are using. To avoid this, press the Energy Saver key to cancel the Sleep mode before using the machine. |
Settings/Registration <Preferences> <Network>
The description in "NOTE" of "<Select Interface>" has been changed.
|
If you set this to <Wireless LAN> or <Wired LAN + Wireless LAN>, <Sleep Mode Energy Use> must be manually set to <High>. |
Settings/Registration <Preferences> <Network> <Bluetooth Settings>
The description in "NOTE" of "<Use Bluetooth>" has been changed.
|
If you set this to <On>, <Sleep Mode Energy Use> must be manually set to <High>. |
Settings/Registration <Preferences> <Network> <TCP/IP Settings>
The description in "<Specify SMB Server Version>" has been changed (description of the bottom row of the table deleted).
Item | Setting Description | DeviceAdmin | NetworkAdmin | Can be set in Remote UI | Device Information Delivery Available | Import All Function | Name of Item When Exporting with the Remote UI |
<Specify SMB Server Version> | <1.0>: <On>, <Off> | Yes | Yes | Yes | No | C | Settings/Registration Basic Information |
<2.0>: <On>, <Off> | Yes | Yes | Yes | No | C | Settings/Registration Basic Information | |
<3.0>: <On>, <Off> | Yes | Yes | Yes | No | C | Settings/Registration Basic Information |
Settings/Registration <Preferences> <Network> <TCP/IP Settings>
The description in "<Specify SMB Client Version>" has been changed (description of the bottom row of the table deleted).
Item | Setting Description | DeviceAdmin | NetworkAdmin | Can be set in Remote UI | Device Information Delivery Available | Import All Function | Name of Item When Exporting with the Remote UI |
<Specify SMB Client Version> | <1.0>: <On>, <Off> | Yes | Yes | Yes | No | C | Settings/Registration Basic Information |
<2.0>: <On>, <Off> | Yes | Yes | Yes | No | C | Settings/Registration Basic Information | |
<3.0>: <On>, <Off> | Yes | Yes | Yes | No | C | Settings/Registration Basic Information |
Adjusting Print and Finish Quality Setting the Dither Pattern
The description in Step 2 has been changed (description of the third bullet point changed).
2
Select the dither pattern.
<Pattern 1>: The default setting.
<Pattern 2>: This setting enhances reproduction of edge areas of the printed image.
<Pattern 3>: This setting is ideal for reproducing finely detailed color images.
<Pattern 4>: This setting enhances reproduction of highlight areas of color images.
Introduction (About the Machine) Main Unit Maintenance Replacing the Drum Unit
An "IMPORTANT" section has been added to step 6 in the "Procedure for Replacing the Drum Unit."
6
Remove the protective cover.
First push in the slider on the right side of the gray protective cover toward the back of the main unit until it cannot go any further, and then pull out the protective cover.
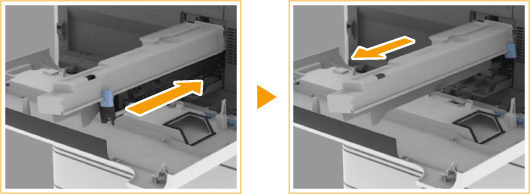
After removing the protective cover, check that the drum unit is pushed fully into the main unit. Failing to push the drum unit in fully will cause a malfunction.