Configuring E-Mail Print Settings
0YRY-017 0UUY-00Y 0UW1-00Y 1100-017 0X7F-017 0X7H-017 10XJ-017 0X6E-017 0X6W-017 1106-017 0X7C-017 0X7A-017 10YY-017 0WXY-017 0X7E-017 10H3-017 0WR6-017 0WR7-017 108A-017 1116-017 10H4-017 0WR5-017 0WR8-017 0YWJ-016 0YWH-017 0YWR-016 0YWK-017 0YWE-017 0YWF-017 0YAS-017 PMW-STCM
This section describes how to specify the settings for receiving and printing e-mails on this machine. Use a computer to specify the settings for receiving e-mails and the control panel of the machine to specify the settings for printing e-mails. Administrator privileges are required in order to configure these settings.
1
Start the Remote UI. Starting the Remote UI
2
Click [Settings/Registration] on the Portal page. Remote UI Screen
3
Click [Send]  [Network Settings - E-Mail Settings].
 [Network Settings - E-Mail Settings].
4
Specify the settings for E-Mail Print.
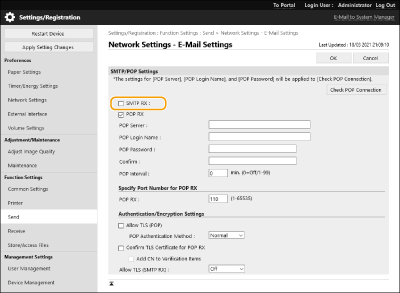
 When performing E-Mail Print by using SMTP protocol
If e-mails are sent to the machine via SMTP, the machine prints the e-mails immediately after receiving them. Enable this function when you want to forward fax documents from Canon multifunction printers to this machine and print them on the machine.


[SMTP RX]
Select the check box to enable E-Mail Print by using the SMTP protocol.
Select the check box to enable E-Mail Print by using the SMTP protocol.
 When performing E-Mail Print from POP mail server
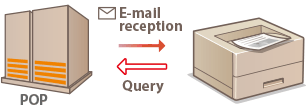
When the e-mail receiving starts, all e-mails stored in the mailbox of the mail server are printed. If you send e-mails that you want to print to the machine in advance, you can automatically print the e-mails at regular time intervals or print all stored e-mails in an arbitrary timing.


We recommend using the mail address exclusively for E-Mail Print because all e-mails received into the machine are deleted from the mail server.
Conditions of use for POP protocol
The POP mail server must support the UIDL command. For details, contact your network administrator or server administrator.

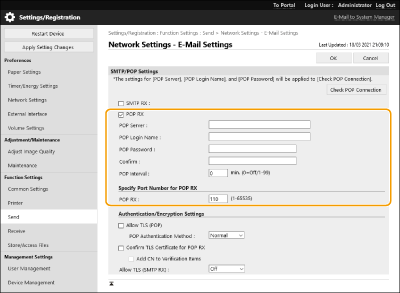
[POP RX]
Select the check box to enable E-Mail Print from the POP mail server. You can also specify this setting by using <Use POP RX> in the setting menu of the control panel.
Select the check box to enable E-Mail Print from the POP mail server. You can also specify this setting by using <Use POP RX> in the setting menu of the control panel.
[POP Server]
Enter the mail server name or IP address for receiving e-mails.
Enter the mail server name or IP address for receiving e-mails.
[POP Login Name]
Enter up to 32 alphanumeric characters for the user name used to connect to the mail server.
Enter up to 32 alphanumeric characters for the user name used to connect to the mail server.
[POP Password]/[Confirm]
When setting a password for connecting to the mail server, enter the same password in [POP Password] and [Confirm] using up to 32 alphanumeric characters.
When setting a password for connecting to the mail server, enter the same password in [POP Password] and [Confirm] using up to 32 alphanumeric characters.
[POP Interval]
Specify the interval for automatically connecting to the mail server in minutes. New e-mails in the mailbox of the mail server are automatically received and printed at the specified time intervals. You can also specify this setting by using <POP Interval> in the setting menu of the control panel.
Specify the interval for automatically connecting to the mail server in minutes. New e-mails in the mailbox of the mail server are automatically received and printed at the specified time intervals. You can also specify this setting by using <POP Interval> in the setting menu of the control panel.

Preventing E-mails from Being Automatically Received
Set [POP Interval] to [0]. If you set [0], you must manually receive e-mails.
[POP RX]
Specify the port number of the mail server that receives e-mails.
Specify the port number of the mail server that receives e-mails.
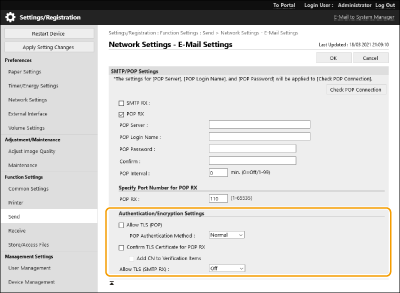
 Setting authentication and encryption

[Allow TLS (POP)]
Select the check box to encrypt the communication with the POP server using TLS.
Select the check box to encrypt the communication with the POP server using TLS.
[POP Authentication Method]
Set the authentication method of the POP server. Select [APOP] to encrypt the password when performing authentication or [POP AUTH] to perform user authentication via e-mail reception (POP).
Set the authentication method of the POP server. Select [APOP] to encrypt the password when performing authentication or [POP AUTH] to perform user authentication via e-mail reception (POP).
[Confirm TLS Certificate for POP RX]
Select the check box to confirm whether the TLS server certificate is valid when receiving with POP. The machine verifies that the certificate has not expired or been revoked and checks the certificate chain for problems.
Select the check box to confirm whether the TLS server certificate is valid when receiving with POP. The machine verifies that the certificate has not expired or been revoked and checks the certificate chain for problems.
[Add CN to Verification Items]
Select the check box to also check the CN (Common Name) when checking the certificate used for POP reception.
Select the check box to also check the CN (Common Name) when checking the certificate used for POP reception.
[Allow TLS (SMTP RX)]
Select [Always TLS] or [On] to encrypt communication with TLS when receiving e-mail or I-fax using the SMTP server function.
Select [Always TLS] or [On] to encrypt communication with TLS when receiving e-mail or I-fax using the SMTP server function.
5
Click [OK].