
Long Sheet Jams through the Marking Engine to the Fixing Station (1-sided Printing)
Check the paper jam location on the screen, and follow the procedure below to remove the paper.
The positions of each unit and area, "B lever," "D1 guide," etc. in the procedure are as shown in the figure.

 |
Remove paper from the toner-unfixed-paper feeding unit (right) (B). The toner on the paper may scatter, causing the inside of the main unit to become dirty and the quality of the image to be affected. |
1
Open the fixing station front cover in the order of left and right.

2
Prepare to pull out the long sheet.
 | Open the cooling unit (B) lever. 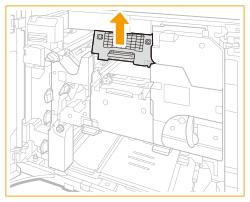 |
 | Open the feeding guide (D1) lever. 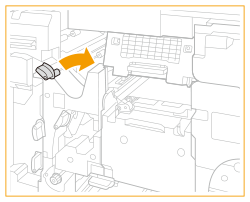 |
 | Open the decurler unit (D2) lever.  |
3
Open the front cover of the main station.

4
In the left side of the toner-unfixed-paper feeding unit, pull out the long sheet gently while bending it.

If you apply too much force and pull out the long sheet in the wrong direction, the paper may break in the middle.
Your hands may become dirty by pulling out the toner-unfixed paper. Wash away the toner on your hands with water soon after finishing the operation.
 | Pull out the paper on the side of the fixing station gently in the direction of the arrow while bending it. 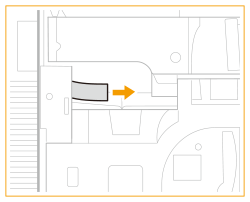 |
 | Pull out the paper on the side of the toner-unfixed-paper feeding unit gently in the direction of the arrow while bending it.  |
 | When pulling out the paper completely, remove it toward you. |
5
Close the front cover of the main station.
6
Check whether or not paper pieces remain around the feeding guide (D1).
 | Check whether or not paper pieces remain in the decurler unit (D2). If paper pieces are left, remove those. 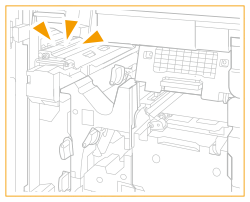 |
 | Close the D2 lever. |
 | Check whether or not paper pieces remain in the feeding guide (D1). 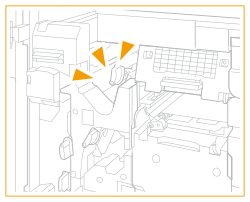 |
 | Close the D1 lever. |
 | Check whether or not paper pieces remain in the cooling unit (B). If paper pieces are left, remove those.  |

Leave the B lever open. Close after checking for a paper jam in the fixing unit.
7
Check whether or not paper pieces remain around the fixing unit.
 |
There is a hot part around the fixing unit. Be careful not to touch the guide when removing the paper. |
 | Tilt the C1 lever to the left to release the lock. |
 | Holding the C1 lever, pull the fixing unit out. 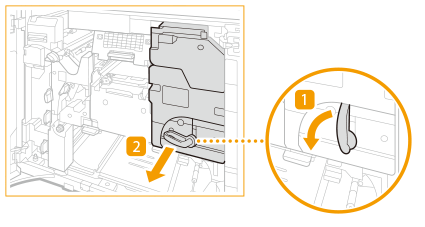 |
 | Check whether or not paper pieces remain in the entrance of the fixing unit (C2). If paper pieces are left, remove those.  |
 | Open the C3 guide. |
 | Hold the C3 guide open by hand and check whether or not paper pieces remain. If paper pieces are left, remove those.   When you release the C3 guide, it closes. |
 | Open the C4 cover. |
 | Check whether or not paper pieces remain inside of the fixing unit. If paper pieces are left, remove those. 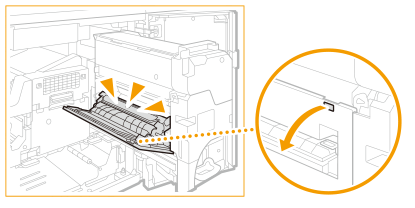 |
 | Close the C4 cover. |
 | Gently push the fixing unit back into the machine holding the C1 lever.  When pushing in the fixing unit, the C1 lever you hold may move so that it pops up, but this is not a malfunction. Push it all the way in and proceed to the next step. |
 | Turn the C1 lever to the right to lock.  |
 | Close the B lever of the cooling unit. |
8
Close the fixing station front cover in the order of right and left.
Continue following the instructions on the screen to proceed with the interrupted operation or continue clearing paper jams.