
Stack Bypass-D
If you want to use temporary paper types that are not loaded in the paper drawer, or use special paper types, you can use the "Stack Bypass-D."
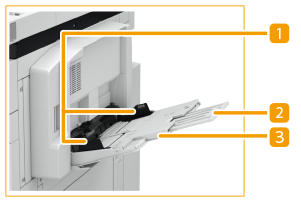
 | Paper Guides Adjust the paper guides to match the size of the paper. |
 | Tray Extension Pull out the tray extension if the paper size is large. |
 | Paper Tray Open the paper tray when loading paper. |
 |
For information on basis weight and paper size that can be used, see items for the "Stack Bypass-D" in Available Paper. |
Loading Paper in the Multi-Purpose Tray
1
Open the paper tray.
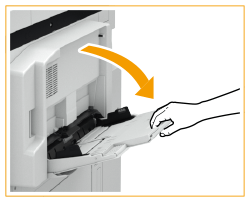
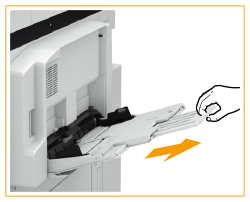
Pull out the tray extension when loading large-sized paper.
2
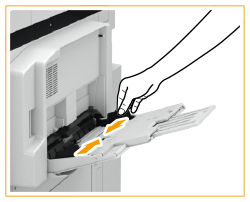
Adjust the paper guides to match the size of the paper.
3
Prepare paper.
Fan the paper stack well, and tap it on a flat surface to align the edges.
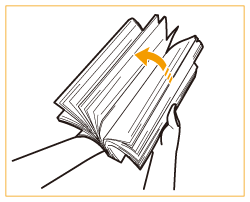

Fan all four sides of the paper stack well.
Make sure that there is enough air between them.
In particular, separate each sheet completely when using transparencies or translucent films.
Feed coated paper one sheet at a time.
4
Insert the paper into the multi-purpose tray until the paper stops.
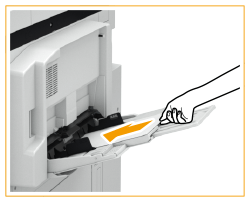
Load the paper with the print side face up.
The screen for specifying the paper size and type is displayed when the paper is fully inserted.

Do not exceed the load limit line when loading paper
Make sure that the paper stack does not exceed the load limit line ( ). Loading too much paper can cause paper jams.
 ). Loading too much paper can cause paper jams.
The number of sheets that can be loaded at a time depends on the paper type. For details, see Available Paper.
Depending on the type of heavy paper you want to load, if you load multiple sheets of heavy paper into the multi-purpose tray, a paper jam may occur. In this case, load only one sheet of heavy paper at a time. If a paper jam still occurs, adjust the curl correction level in the range of +1 to +5. (See Curl Correction for Each Paper Drawer )
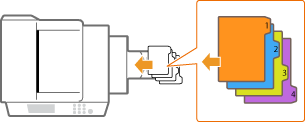
When you load tab paper into the multi-purpose tray, load right order tab paper face up, with the tabs facing the opposite direction of the feeding direction.
5
Check the paper size and paper type, and press <OK>.
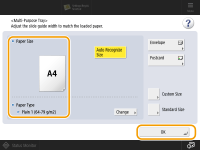
If you load free size paper, or if the displayed size or type is different from the actual paper that is loaded, see Specifying Paper Size and Type in the Multi-purpose Tray (Optional).
 |
Printing on the back side of printed paper (2nd Side of 2-Sided Page)You can print on the back side of printed paper. Flatten any curls on the printed paper and insert it into the multi-purpose tray, with the side to print face up (previously printed side face down). Then press <2nd Side of 2-Sided Page> on the screen for selecting the paper type. Use only the paper printed with this machine. Loading Transparencies/Clear FilmIf a multiple sheet feed or paper jam occurs, load each sheet separately. If you leave transparencies, or translucent film loaded in the paper drawers or in the multi-purpose tray, the sheets may stick together and cause a multiple sheet feed or a paper jam. When printing is complete, return the remaining transparencies, or translucent film to their original package for storage, avoiding locations subject to high temperatures and humidity. |
Loading Envelopes in the Multi-Purpose Tray
 |
For information on envelope that can be loaded to the "Stack Bypass-D," see Available Paper. |
1
Prepare for loading envelopes. Before Loading Envelopes
2
Adjust the position of the paper guides.
3
Load the envelopes.
Load the envelopes as indicated below, with the front side (the non-glued side) face up.
Yougatanaga 3, ISO-C5, Monarch, DL, COM10 No. 10
Close the flaps, and load the envelopes so that their flaps are on the far side.
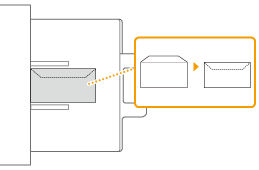
Nagagata 3, Kakugata 2
Load the envelopes so that their flaps are on the right side.
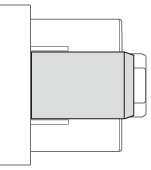

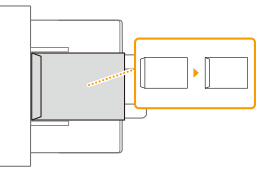
If the envelopes cannot be fed normally, if a paper jam occurs, or if the envelopes become creased,fold the flaps inside the envelopes or rotate the envelopes and load them.

180-degree rotation
Nagagata 3, Kakugata 2 | ||
 |
When printing, check that the orientation of the loaded paper matches the orientation shown onthe print settings screen of the printer driver. For more information, see the online help.
If you copy on the envelopes, rotate the original before placing it.
If you rotate ISO-C5 by 90 degrees, set 229 x 162 mm by custom size before making an output.

Make sure that the paper stack does not exceed the load limit line ( ). If the envelopes are not fed properly even if they have been prepared according to the procedures, load the envelopes individually in the multi-purpose tray instead of loading several sheets together.
 ). If the envelopes are not fed properly even if they have been prepared according to the procedures, load the envelopes individually in the multi-purpose tray instead of loading several sheets together.
Do not print on the reverse side of the envelopes (the side with the glued areas).

When using Kakugata 2, if envelopes become wrinkled, fold and insert the flaps into eachenvelope, and load the envelopes with the long edge of the envelopes facing the machine.
4
Align the paper guides against the edges of the envelope.
Move the paper guides inward until they are aligned securely against the edges of the envelope.