
Specifying Paper Size and Type in the Multi-purpose Tray (Optional)
This mode can be set when the Stack Bypass-D are attached. Stack Bypass-D
|
If <Paper Feed Mode for Printer Driver Jobs with MP Tray> is set to <Mode A (Prioritize Printer Driver Settings)>, printer driver settings are prioritized when the multi-purpose tray is specified as the paper source for jobs from the printer driver. A paper jam or other printing problems may occur if the size and type of paper specified in the printer driver do not match those of the actual paper loaded in the multi-purpose tray. |
1
Load the paper in the multi-purpose tray. Loading Paper in the Multi-Purpose Tray
The screen for specifying the paper size and type is displayed.
2
Specify the paper size.
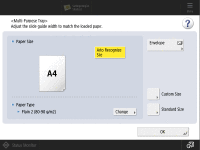
When loading standard size paper, the paper size is automatically detected. The paper sizes for automatic detection can be fixed to A/B size, inch size, or A/K size. <Paper Size Group for Auto Recognition in Drawer>

If the displayed paper size is different from the loaded paper size, the paper may not be loaded properly. Load the paper again. Loading Paper in the Multi-Purpose Tray
Even when paper is loaded correctly, some small standard sizes may not be detected correctly. In this case, press <Standard Size> and select the paper size.
 When loading standard size paper
1 | Press <Standard Size>. |
2 | Select the paper size and press <OK>. |
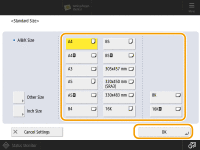

Press <Inch Size> to select an inch paper size.
Press <Other Size> to select from other paper sizes.
When loading custom size paper
1 | Press <Custom Size>. |
2 | Specify the length of the <X> side and <Y> side. |
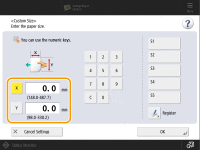
Press <X> or <Y> to enter the length of each side using the numeric keys. If you register the paper size you use frequently on buttons <S1> to <S5>, you can call them up with a simple press. Registering Free Size Paper (Custom Size Paper) | |
3 | Press <OK>. |
When loading envelopes
1 | Press <Envelope>. |
2 | Select the type of envelopes. 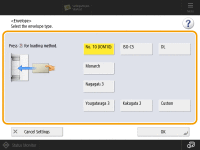 To register a custom size envelope, press <Custom> Press <OK> and proceed to step 5. |
3
Press <Change> in <Paper Type>.
4
Select the paper type and press <OK>.
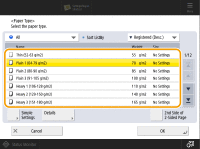
If the paper type of the paper that you have loaded is not listed on the detailed setting screen, you can register it in the paper type list. Paper Type Management Settings
While you are registering the custom paper type for a paper source, the paper type settings are protected and you cannot change the detailed information for custom paper type or delete the custom paper type in <Paper Type Management Settings> in <Preferences> (Settings/Registration).
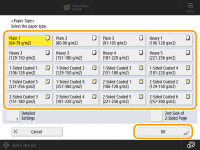
You can also select the paper type from the simple setting screen by pressing <Simple Settings>.
5
Press <OK>.
 |
If a screen other than that for specifying the paper size and type is displayedIf a message prompting you to adjust the paper guide is displayed, adjust the width of the paper guide again and press <OK>. |