
Replacing the Toner Cartridge
When toner starts running low or has run out, a message is displayed prompting you to prepare a new toner cartridge or perform toner cartridge replacement. Prepare a new toner cartridge or perform toner cartridge replacement according to the displayed message.
|
Store toner containers as described belowStore toner containers in the following conditions: Storage temperature range: 20-27 ºC Storage humidity range: 15 % to 60 % RH (relative humidity, condensation-free)* * Even within the approved storage humidity range, water droplets (condensation) may develop inside the toner container if the temperatures inside and outside the toner container differ. Condensation will adversely affect the print quality. Store unopened until immediately prior to use. Do not store toner containers in the following Locations: Locations exposed to open Flames Locations exposed to direct sunlight Locations exposed to excessively salty air Locations heavily exposed to corrosive gases (e.g. aerosol sprays or ammonia) Very hot and/or humid Locations Locations subject to dramatic changes in temperature and humidity likely to cause condensation Very dusty Locations Locations within the reach of Children Locations close to products that emit magnetism |
 |
For details about each message, see Countermeasures for Each Message. For information on the product numbers for toner cartridges, see Consumables. You can check the current amount of toner remaining. Checking the Remaining Toner Level |
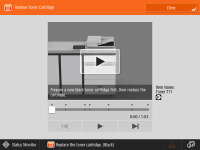
Procedure for Replacing the Toner Cartridge
When replacing toner cartridges, follow the instructions shown in the video along with those written below.
 |
When replacing multiple toner cartridges at the same time, replace them in the order black, yellow, magenta, cyan. |
1
Press  .
.
.When the black toner has run out completely, this procedure is not necessary.
2
Open the toner replacement cover.
Put your fingers on the dent in the center of the toner replacement cover, and pull the cover towards you to open it. The replacement cover (small cover) of the slot will open for the toner in need of replacement.

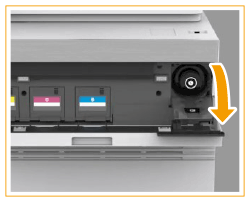

Do not open the small cover by force, as doing so may damage the machine.
3
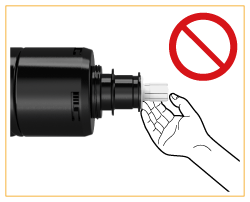
Pull out the toner cartridge.

Never touch the tip of the toner cartridge or make sure to avoid applying shocks to the toner cartridge by hitting it against something, etc. Doing so may cause the toner to leak.
4
Remove the new toner cartridge from its box.

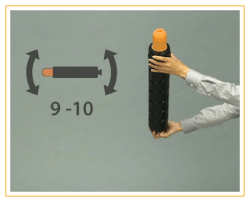
5
Hold the new toner cartridge horizontally, and gently tilt it from side to side about 10 times.
Shaking the toner cartridge evens out the toner inside.
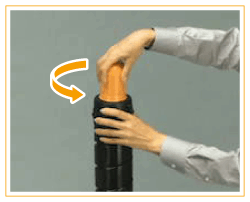
6
Remove the cap from the new toner cartridge.
Place the new toner cartridge standing up and remove the protective cap by turning it in the direction of the arrow.
7
Install the new toner cartridge.
Before installing the toner cartridge, confirm that the color of the toner cartridge and the color indicated on the small cover are the same.
8
Close the small cover.

|
The small cover cannot be closed unless the toner cartridge has been pushed in as far as it will go. Do not try to force the cover closed, as doing so may cause it to break. |
9
Close the toner replacement cover.
|
You can set the machine to display a message indicating that the remaining toner is low. If printing was interrupted because toner ran out, it will automatically resume when you replace the toner cartridge. If the color and density of printing differ after replacing the toner cartridge, perform adjustment. |