
Adjusting the Image Position Automatically (Optional)
If the "Sensing Unit-B" is equipped, you can perform periodic automatic adjustment of the image position at any point during the printing process for the custom paper type.
|
In the following cases, you may not be able to adjust the image accurately enough by using the automatic adjustment function. When you use paper sheets that have not been properly cut When you feed paper or switch between paper decks during the printing process The Sensing Unit may not be able to detect markers on colored paper, translucent film, label paper, pre-punched paper, paper that has logos or patterns already printed on it (preprinted paper), or long sheets. The paper sheets in the paper deck may shrink or stretch due to changes in temperature and humidity. If you need to print a job with automatic adjustment of the image position, we recommend doing so as quickly as possible before the conditions for the initial adjustment change. When performing automatic adjustment by printing markers in the margin area, the markers may not be detected if the images are too close. Make sure you leave a gap that is about 1 mm wide. Do not use this function with paper that has logos or patterns already printed on it (preprintedpaper) or if the paper sheets are dirty. |
 |
We recommend using a single paper deck for jobs with automatic adjustment. When you perform the procedure for automatic adjustment of the image position with the custom paper type, the adjustment settings are saved after the job is printed. |
1
Press <Change> under <Adjust Image Position>.
2
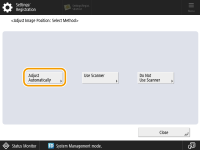
Press <Adjust Automatically>.
3
Set the number of test pages you want to print, and then press <Next>.
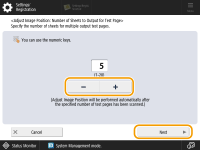

If you want to prioritize accuracy, we recommend setting the number of test pages to 10.
4
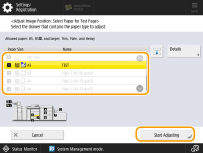
Select the location of the paper you want to adjust, and then press <Start Printing>.
The test pages are printed, and the window shown in step 2 reappears on the screen after the adjustment procedure is completed.