Registering Destinations in the Address Book
 | You can register a recipient's fax number or an e-mail address that can be used when sending scanned originals in the Address Book. You can also register an I-fax destination, a file server folder location (IP address and path), and the storage (Advanced Box) of a Canon multifunction printer* in the Address Book as a destination. * Available only for the imageRUNNER ADVANCE series |
 |
To register a destination for your own use, you need to log in with personal authentication management. Managing Users Registering/editing/deleting of destinations can also be performed from the following screens: <Address Book> on the Fax Basic Features screen <Address Book> on the Scan Basic Features screen |
1
Press <Dest./Fwd. Settings>. <Home> Screen
2
Press <Register Destinations>.
3
Press <Register New Destination>.
4
Select functions you want to register.
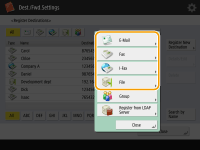
Select the functions to use for the destination, from <Fax>, <E-Mail>, <I-Fax>, or <File>.
5
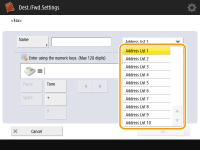
Press <Name>  enter the destination name, and press <OK>.
6
Select the address list from <Personal Address List>, User Group Address Lists, <Address List 1> to <Address List 10> and <Address List for Admin.>.
 (Items shown on the screen may differ depending on your model and options.) |
If you want to register the destination for your own use, select <Personal Address List>.
If you want to register the destination which only an administrator can edit, select <Address List for Admin.>.
If you want to share the destination with a registered user group, select a registered User Group Address List.
<Address List 1> to <Address List 10> can be regarded as 10 separate address books. Classifying an address list by departments or by business partners makes them easier to find when specifying a destination. It is also easier to manage an address list if you change their names to department name or business partner name (<Rename Address List>).
You can also manage User Group Address Lists by enabling only the administrator to register/edit destinations from the Remote UI. <Use User Group Address List>
7
Configure settings depending on the function selected in step 4.
 Fax
Fax
1 | Enter the fax number. 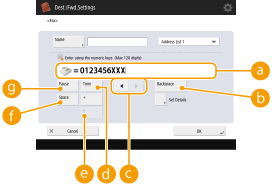  Fax number field Fax number fieldEnter the fax number using the numeric keys. Enter  to to  as necessary.<Backspace> as necessary.<Backspace> Delete numbers to the left of the cursor in the fax number field ( ) one by one.  / / Press when moving the fax number field cursor ( ) to the left or right. <Tone> <Tone>If you press this button, the character "T" (tone) is inserted. Even if you are using pulse dial, numbers following "T" will be sent using tone dial.  <R> key <R> keyIf the machine is connected to a PBX (Private Branch Exchange), press this button before entering the destination. If this button is not available, you need to register the R-key settings. <R-Key Setting>  <Space> <Space>Enter a blank space between numbers to make them easier to read. <Pause>If you press this button, the character "P" (pause) is inserted. When sending a fax overseas, insert pauses after the international access code or fax number. This helps to improve the connection.  You cannot insert a pause at the beginning of a number. |
2 | Press <Set Details> and specify settings as necessary. 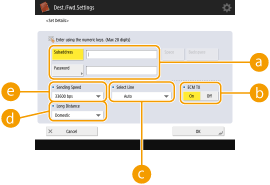 <Subaddress>/<Password> <Subaddress>/<Password>Specify when sending or receiving documents to increase security by attaching a subaddress and password to all of your fax transactions. Basic Operations for Sending Faxes <ECM TX>Select <On> to correct image errors. Select <Off> if the recipient's fax machine does not support the Error Correction Mode (ECM).  To send faxes using ECM, it is also necessary to set <ECM TX> to <On>. <Select Line>If you have additional telephone lines, you can select the line to use for sending a fax. <Long Distance>If transmission errors occur frequently when you make overseas calls, select <Long Distance (1)>. If errors persist, change the setting to <Long Distance (2)> or <Long Distance (3)>. <Sending Speed>Depending on the recipient's fax machine or the status of the line, a transmission error may occur due to the transmission speed. If errors occur frequently, lower this setting value. Although there are items you can set in the fax setting (Fax Basic Features Screen), it is convenient to set them here if you want to change the sending conditions for each destination. Set <Auto Adjust Communication Speed When Using VoIP> to <On> to send and receive faxes more accurately when the line or other party is prone to errors. If you set this to <On>, the communication speed is limited to 14,400 bps or slower, which reduces errors. |
E-mail
1 | <E-Mail Address> 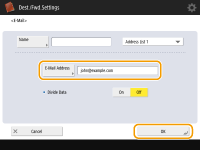 |
2 | Select <On> or <Off> in <Divide Data>. If the size of the data being sent exceeds the maximum limit (<Maximum Data Size for Sending>), select whether you want to divide the data by size or by page. If you select <On>, the data is divided into smaller sizes that do not exceed the limit and is sent in several sections. The recipient's e-mail software must be able to combine the data received. If you select <Off>, the number of pages to be sent at one time decreases and the total transmission is divided into several sections. For example, 10 pages of data are transmitted twice, 5 pages each time. Therefore, your counterpart receives two e-mails. However, if you send data that cannot be separated into pages, such as JPEG, a transmission error occurs. When the domain to use is fixed, you can skip domain entry. You can register a domain name to <Auto Add Specified Domain to Dest. Without Domain> and enable <When Sending E-Mail> in advance to automatically add a domain when sending, without the need to enter "@" and the domain name. You can register frequently used domain names in <Registered Characters> on the keyboard, and you can recall them when entering an e-mail address. <Registered Characters for Keyboard> |
I-fax
1 | Specify settings as necessary. 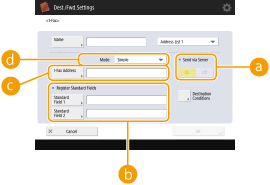 <Send via Server> <Send via Server>Specify whether or not to send I-faxes to destinations via the mail server. Select <On> if you want to send I-faxes via the mail server. Select <Off> if you want to send data directly to a recipient on the same local area network (LAN). By sending directly to a recipient, you can send large amounts of data without placing a burden on the mail server. To send an I-fax that is not in an IP address format such as "user name@[the recipient's IP address]" without using a mail server, settings such as an MX (Mail eXchange) record need to be configured on the DNS server. Ask your Network administrator whether or not this type of setting is available. When you set <Off> in <Send via Server>, you are required to set <On> in <Use Send via Server> in advance. If this setting is <Off>, the setting in <Send via Server> cannot be changed. It is recommended to set <Allow MDN Not via Server> to <On>. Even if you set <Send via Server> to <Off>, delivery confirmation of documents sent using the Full mode is carried out via the server. <Register Standard Fields>This setting is required for using an Internet fax service. If you do not use an Internet fax service, this setting is not necessary. For more information, contact your Internet service provider. <I-Fax Address>Enter the I-fax address using the following format: adv01@example.com. When sending to a recipient on the same network, use the following format: adv01@[192.168.11.100] (the recipient device name@[IP address]). When the domain to use is fixed, you can skip domain entry. You can register a domain name to <Auto Add Specified Domain to Dest. Without Domain> and enable <When Sending I-Fax> in advance to automatically add a domain when sending, without the need to enter "@" and the domain name. You can register frequently used domain names in <Registered Characters> on the keyboard, and you can recall them when entering an I-fax address. <Registered Characters for Keyboard> <Mode:>You can select the type of sending results that are displayed when  (Status Monitor) is pressed. Select <Full> if you want to check whether an I-fax is delivered to the recipient's machine, or select <Simple> if you want to check whether an I-fax is delivered to a mail server. Note that you cannot confirm the delivery status if the recipient's machine does not support the <Mode:> function. (Status Monitor) is pressed. Select <Full> if you want to check whether an I-fax is delivered to the recipient's machine, or select <Simple> if you want to check whether an I-fax is delivered to a mail server. Note that you cannot confirm the delivery status if the recipient's machine does not support the <Mode:> function.If you send an I-fax using the <Full> mode to a machine that does not support the <Full> mode, <Awaiting result...> is displayed when you press (Status Monitor) to check the delivery status, even if the transmission is complete. It continues to be displayed until the time set in <Full Mode TX Timeout> passes.You can check the delivery status by pressing (Status Monitor) | |
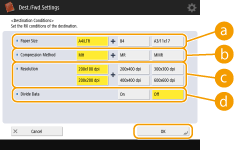
2 | Press <Destination Conditions>
<Paper Size>Set the paper size that the recipient can receive. Specify this setting after checking whether the paper size of the data to send matches the specifications of the recipient's device. <A4/LTR>: Sends with the A4/LTR size. <A4/LTR> + <B4>: Sends with the A4/LTR size or B4 size. <A4/LTR> + <A3/11x17>: Sends with the A4/LTR size or A3/11" x 17" size. <A4/LTR> + <B4> + <A3/11x17>: Sends with the A4/LTR size, B4 size, or A3/11" x 17" size. If the paper size of the scanned data is smaller than the sizes set in <Paper Size>, the data is sent with the smallest paper size set in <Paper Size> with blank margins. If the paper size of the scanned data is larger than the sizes set in <Paper Size>, the data is reduced and sent with the largest paper size set in <Paper Size>. Set the destination conditions according to the specifications of the recipient's machine. If the paper size of the data to send is larger than the paper sizes that can be used with the recipient's device, the image may be clipped or cut off. <Compression Method>Select compression method. The compression rate is highest for MMR, followed by MR, and then MH. The higher the compression rate, the shorter the required transmission time. <Resolution>Select a higher value to increase the resolution and image quality. However, the higher the resolution, the longer the required transmission time. <Divide Data>If the size of the data being sent exceeds the maximum limit (<Maximum Data Size for Sending>), select whether you want to divide the data by size or by page. If you select <On>, the data is divided into smaller sizes that do not exceed the limit and is sent in several sections. The recipient's device must be able to combine the data received. If you select <Off> in <Send via Server> ( ) in step 1 for configuring the I-fax setting, the data is sent without being divided, even if it exceeds the maximum limit. Set the destination conditions according to the specifications of the recipient's machine. If you set conditions that the recipient's machine does not support, a transmission error may occur. |
File server/Advanced Box
1 | Enter the host name of the file server/Advanced Box which transmits data. 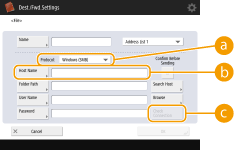 Ask your Network administrator about the information on the file server/Advanced Box. <Protocol>Select a protocol for the file server from <Windows (SMB)>, <FTP> and <WebDAV>. When sending a document to the Advanced Box, select <Windows (SMB)> or <WebDAV>. If you select <Windows (SMB)>, the <Search Host> and <Browse> buttons are displayed. You can easily specify a file server/Advanced Box by searching or viewing the network. You can only use <Browse> if <1.0> is set to <On> in <Specify SMB Client Version>. You can register up to five Directory servers used in <Browse>. <Host Name>Enter the host name of the file server/Advanced Box. If you select <FTP> for the protocol, enter <Host Name> as follows. When TLS is disabled Example: To save to the Shared Space: ftp://host name/share To save to the Personal Space: ftp://host name/users When TLS is enabled Example: To save to the Shared Space: ftps://host name/share To save to the Personal Space: ftps://host name/users When sending a document to the Advanced Box, enter <Host Name> as follows. If you select <Windows (SMB)> for the protocol Example: To save to the Shared Space: \\192.168.100.50\share To save to the Personal Space: \\192.168.100.50\users If you select <WebDAV> for protocol When TLS is disabled Example: To save to the Shared Space: http://<IP address or host name> To save to the Personal Space: http://<IP address or host name> When TLS is enabled Example: To save to the Shared Space: https://<IP address or host name> To save to the Personal Space: https://<IP address or host name> <Check Connection>Press this button after entering the host name to confirm the connection with the file server/Advanced Box. If you are using a login service such as personal authentication management, it is necessary to enter <User Name> and <Password>. |
2 | Configure the file server/Advanced Box information. 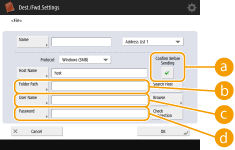 Ask your Network administrator about the file server/Advanced Box information and the folder. <Confirm Before Sending>By enabling <Confirm Before Sending>, a screen requiring password entry is displayed before sending, even if a password is entered in ( ).<Folder Path>Specify the folder's directory to which data is sent. When sending a document to the Advanced Box with <WebDAV> selected for the protocol, enter <Folder Path> as follows. Example: To save to the Shared Space: /share To save to the Personal Space: /users <User Name>Enter the login user name of the file server/Advanced Box. <Password>Enter the login password of the file server/Advanced Box. When the file server/Advanced Box destination is included in the group (Registering Multiple Destinations as a Group), clear the check box in . If the check box is selected, you cannot send data.If you specify the destination for which you activate <Confirm Before Sending> as the forwarding destination, the screen to enter the password does not appear. The registered password is used and forwarding is performed. You can use different authentication information from the user name in ( ) and password in () to register to the address book. For more information, see <Information Used for File TX/Browsing Authentication>.If you set <Protocol> to <Windows (SMB)> or <FTP>, specifying a folder that does not exist in <Folder Path> will result in the folder being automatically created and files being stored within. However, a sending error will occur if you specify a folder with multiple levels. When checking a WebDAV connection, the HEAD method of HTTP is used to check the connection. The folder specified in <Folder Path> is accessed using the HEAD method. If access via the HEAD method is prohibited for the corresponding folder, an error occurs for the connection check. Examples of settings that prohibit access via the HEAD method are indicated below. IIS7: Access cannot be performed via the HEAD method unless [Source] is selected in the access permissions for the WebDAV authoring rules of the target folder. Apache: Access cannot be performed via the HEAD method unless HEAD is described using the [Limit] directive in httpd.conf. Advanced Box WebDAV server: Access via the HEAD method is always prohibited. |
 | |||||||||||||||
To send to the Advanced Box of a machine from the same machine, it is recommended that you specify a loopback address. If you specify a loopback address, you can use the following functions: You can use the URI sending function to notify a user via e-mail that a file has been saved. Notifying You by E-Mail of the Completion of Sending/Saving Even if <Prohibit Writing from External> is set to <On>, users with the Administrator privileges can store in the Advanced Box. <Prohibit Writing from External> When sending using a loopback address, enter <Host Name> as follows.
| |||||||||||||||
8
Press <OK> <Close>.
When destinations are managed by access numbers, enter the access number (Restricting Access to Destinations Registered in the Address Book) after pressing <Next> in step 8.
If you try to send to a file server/Advanced Box in which <Confirm Before Sending> is set to <On>, a screen appears prompting you to enter a user name and password. In this case, enter the previously set password. If you want to register a file server/Advanced Box in a group address, set <Confirm Before Sending> to <Off>. You cannot send to a group address including a file server/Advanced Box in which <Confirm Before Sending> is set to <On>.
|
Multiple destinations registered in the Address Book can be combined into a group. For details, see Registering Multiple Destinations as a Group. To change or delete the information of destinations registered in the Address Book, see Editing the Registered Destinations in the Address Book. UPN can be used only if you are sending to a computer belonging to a domain operated with Active Directory. |
TIPS |
If the LDAP server has already been registered in the machine (Registering the LDAP Server), you can search for destinations and register them in the Address Book. Press <Dest./Fwd. Settings> When the user name and password are correct but the search result is empty, check the time setting both on the LDAP server and the machine. If the time setting between the LDAP server and the machine differs by five minutes or more, a search cannot be performed. If multiple destinations are displayed as search results, you can register up to 256 of them at one time. The information that can be obtained via the LDAP server consists of only names and fax numbers/addresses. Register other information from <Details/Edit> as necessary. You cannot search for destinations on an LDAP server from both the control panel and the Remote UI at the same time. When searching for destinations on an LDAP server from the control panel of the machine, you can specify four search conditions. On the other hand, when searching for destinations on an LDAP server from the Remote UI, you can only specify one search condition. You may need to enter the user name and password. Enter the user name and password of the machine registered in the LDAP server. If authentication information is not used, search with the user name and password fields in the Remote UI left blank. Specifying/registering destinations from the send historyYou can specify destinations and register destinations to the address book from the send history on the <Status Monitor> screen. This saves you the effort of directly entering the address, and also helps avoid sending to an incorrect destination due to entering the wrong address. When specifying a destination: <Status Monitor> When registering a destination: <Status Monitor> |